
Tutorial 8: Creating Podcasts
You can create audio and video podcasts in GarageBand,
and then send them to iWeb to publish over the Internet.
Podcasts are like radio or TV shows that people can download over the Internet. Users
can download an individual podcast episode or subscribe to a podcast series. You can
create podcast episodes in GarageBand, and then publish them on the Internet using
iWeb or another application.
Types of Podcasts
You can create several different types of podcasts in GarageBand:
 Audio podcasts include audio with narration, dialogue, music, and sound effects.
 Video podcasts include both video and audio.
 Enhanced audio and video podcasts can also include chapter markers, artwork, and
Web addresses (URLs).
In this lesson, you’ll learn how to:
 Create audio and video podcasts
 Find and import media files using the Media Browser
 Show the podcast or movie track
 Add and edit markers and marker regions
 Add artwork, URLs, URL titles, and chapter titles to markers
 Add episode artwork and episode information
 Edit marker and episode artwork
 Use “ducking” to make narration and dialogue easier to hear

Chapter 10
Tutorial 8: Creating Podcasts
103
Creating an Audio Podcast
You create an audio podcast in GarageBand by creating a podcast project, recording
your narration, and adding music, sound effects, and other audio. You can also enhance
an audio podcast by adding markers, artwork, URLs, and chapter titles, and episode
information.
Creating a Podcast Project
1
Choose File > New.
The New Project dialog appears.
2
Click New Project, then click Podcast.
3
Click Choose.
A new, empty podcast project appears in the GarageBand window. In a podcast
project, the podcast track appears above the other tracks in the timeline. The Media
Browser opens, and the editor shows the marker list, with columns for the start time,
artwork, chapter title, URL title, and URL for each marker. Podcast projects include
tracks for male and female voices, jingles (musical background tracks), and radio
sounds.
Note: A project can have either a podcast track or a movie track, but not both. If you
try to show the podcast track for a project that contains a movie track, a dialog appears
asking if you want to replace the movie track with a podcast track.
Recording Narration and Dialogue
You can create podcasts with only spoken narration or dialogue, or add musical
backing tracks, sound effects, and other sounds. You record narration in a Real
Instrument track. The podcast project includes two Real Instrument tracks, named Male
Voice and Female Voice, that are optimized for recording spoken narration or dialogue.
To record narration or dialogue:
1
Select either the Male Voice or Female Voice track by double-clicking its track header.
The Track Info pane opens, showing the track settings.
2
From the Input Source pop-up menu, choose the appropriate input source for the
microphone you are using to record your narration or dialogue.
3
Choose “On with Feedback Protection” from the Monitor pop-up menu to hear the
sound from the microphone. If feedback occurs, an alert appears asking if you want to
turn off monitoring.
4
Move the playhead to the point where you want to start recording.
5
Click the Record button, then start speaking.
6
When you’re done recording, click the Play button.

104
Chapter 10
Tutorial 8: Creating Podcasts
You can add and adjust effects for the narration track, including the Speech Enhancer
effect, which is especially useful for recording narration and dialogue using the built-in
microphone on your computer. For more information about recording in a Real
Instrument track, see “Tutorial 3: Recording Vocals and Musical Instruments” on
page 49.
Adding Podcast Sounds
GarageBand includes a variety of loops for you to use in your podcasts, including the
following:
 Jingles are complete background music tracks that use can use behind the narration
or dialogue, between spoken segments, or as an intro or outro. Some jingles are
available in long, medium, and short versions.
 Stingers are brief sounds that can be used as transitions or audio “punctuation”
between speakers or between sections of a podcast.
 Sound effects include the sounds of people, animals, and machines, as well as room
ambience and other environmental sounds.
You can search for podcast sounds in the loop browser, preview them, and add them
to your podcast project.
To search for podcast sounds in the loop browser:
1
Click the Loop Browser button to open the loop browser.
2
Click the podcast sounds button (with the radiating sound wave) in the upper-left
corner of the loop browser to switch to podcast sounds view.
3
Click a category in the left column, then click a subcategory in the right column to
show matching loops in the results list. The columns in the results list show the loop
name and the length for each loop.
4
Click a loop to preview it in the loop browser.
5
To end a search, either click the selected keyword again to deselect it, or click the Reset
button to deselect all selected keywords.
For more information about searching for loops, see “Tutorial 5: Adding Apple Loops”
on page 71.

Chapter 10
Tutorial 8: Creating Podcasts
105
Importing Media Files with the Media Browser
You can import media files from other iLife applications, including iTunes and iPhoto,
into a podcast project. You can also import other GarageBand projects that have been
saved with an iLife preview. You can find and preview media files in the Media Browser.
You can also add other folders to the Media Browser, so you can add media files in the
folders to your projects.
To find and preview media files in the Media Browser:
1
Click the Media Browser button (the icon shows different types of media), or choose
Control > Show Media Browser.
The Media Browser opens to the right of the timeline.
2
Do one of the following:
 To view GarageBand projects and files in the iTunes library, click the Audio button.
 To view files in the iPhoto library, click the Photos button.
 To view iMovie projects and files in the Movies folder, click the Movies button.
3
In the Media Browser, navigate to the folder containing the files you want to use. You
can also search for files by name by typing the filename in the search field.
To preview audio files and movies in the Media Browser, do one of the following:
 Select the file in the media list, then click the Play button at the bottom of the Media
Browser.
 Double-click the file in the media list.
The file starts playing.
To stop preview playback:
 Click the Play button in the Media Browser again.
To import an audio file:
m
Drag the audio file from the Media Browser to the timeline.
To add a folder to the Media Browser:
m
Drag the folder from the Finder to the middle area of the Media Browser.
Adding Music
You can add musical Apple Loops and record instruments to add music to your
podcast, just as you do with a music project. For information about adding Apple
Loops, see “Tutorial 5: Adding Apple Loops” on page 71. For information about
recording Real Instruments, see “Tutorial 3: Recording Vocals and Musical Instruments”
on page 49. For information about recording Software Instruments, see “Tutorial 4:
Playing and Recording Software Instruments” on page 58.
106
Chapter 10
Tutorial 8: Creating Podcasts
Adding and Editing Markers
You can add markers to a podcast, making it an enhanced podcast. When you add a
marker to a podcast, it appears in the podcast track as a marker region. You can edit
marker regions in the podcast editor by moving them to change when they start and
end, or by resizing them to change their duration. You can also add artwork, URLs, and
URL titles to a marker region.
To add a marker:
1
Click the Podcast Track.
2
Move the playhead to the place where you want to add the marker.
3
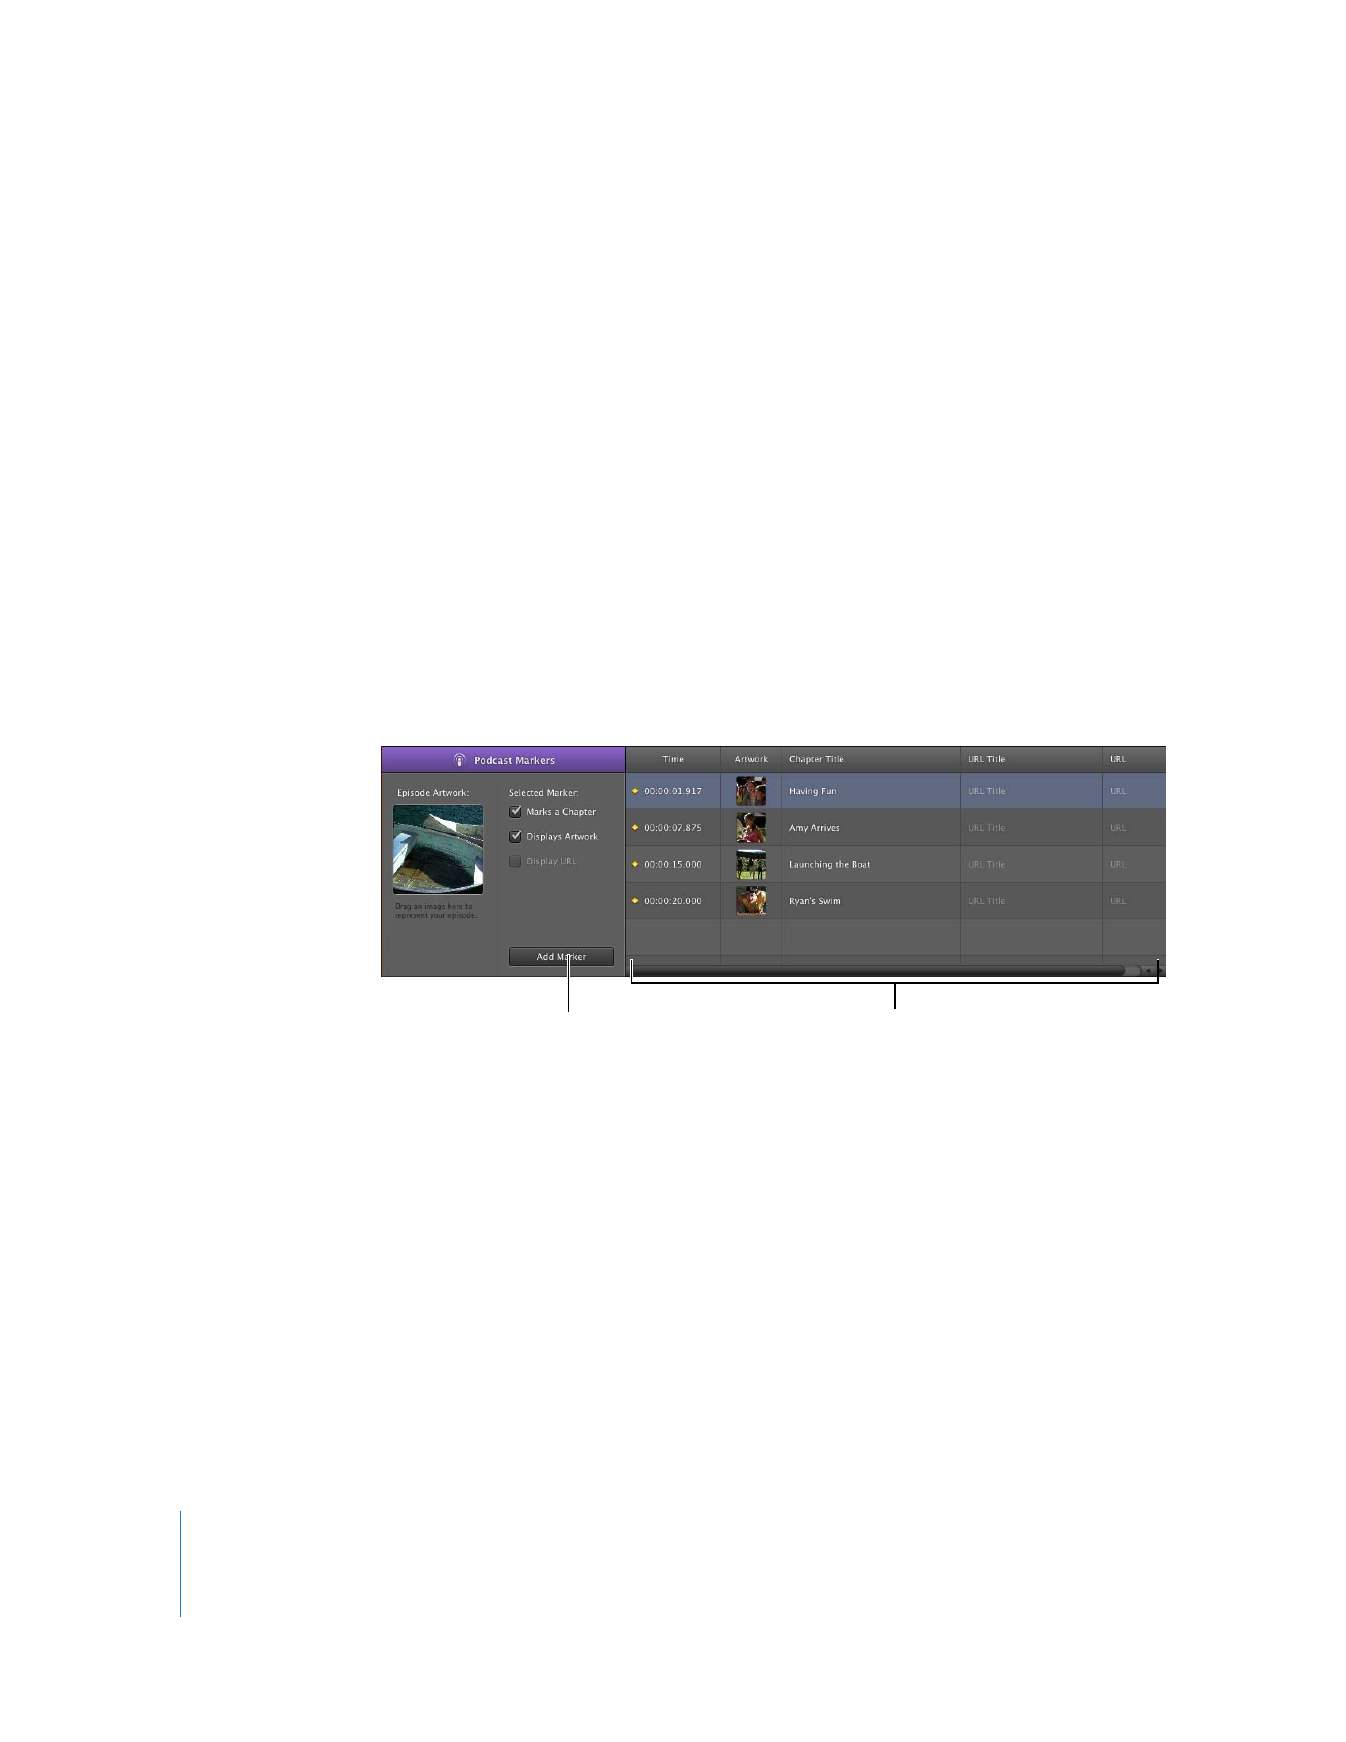
Click the Add Marker button at the bottom of the editor.
The marker appears in the editor, and the start time for the marker appears in the Time
column in the marker’s row. The marker also appears as a marker region in the podcast
track. As with other regions in the timeline, you can edit marker regions to control
when artwork and URLs appear and how long they are visible when you play the
podcast.
To move a marker region, do one of the following:
 In the podcast track, drag the marker region to a new position.
 In the editor, click the start time for the marker region and enter a new start time.
To resize a marker region:
m
Drag either the left or right edge of the marker region to the point where you want to
resize it.
You can’t loop a marker region.
Click here to
add a marker.
Edit the start time for markers and
add artwork, URLs, URL titles, and
chapter titles in the marker list.

Chapter 10
Tutorial 8: Creating Podcasts
107
Adding Marker Region Artwork
You can add artwork to individual marker regions. When you play the podcast, the
marker region artwork appears from the start to the end of the marker region.
To add artwork to a marker region:
1
Open the Media Browser, then click the Photos button.
2
In the Media Browser, locate the artwork you want to add.
3
Drag the artwork from the Media Browser to the Artwork box in the marker’s row in the
editor. You can also drag artwork directly to the podcast track, which adds a new
marker region with the artwork.
The artwork appears in the marker region in the podcast track and in the Artwork
column for the region in the editor. The Displays Artwork checkbox is selected. You can
change the artwork for a marker by dragging a new image to the Artwork column in
the marker’s row.
Adding a URL
You can add a URL to a marker and give the URL a title. When you play the podcast, the
URL is visible from the start to the end of the marker region. When you click the URL,
your web browser opens and displays the webpage for the URL.
To add a URL to a marker:
1
In the editor, click the placeholder text in the URL column of the marker’s row, then
type the URL.
The Displays URL checkbox is selected for the marker.
2
In the editor, click the placeholder text in the URL Title column of the marker’s row,
then type the title.
When you add a URL title, the title appears in place of the actual URL when you play
the podcast. Clicking the title opens your web browser to the webpage for the URL.
Adding Chapter Titles
You can add a chapter title to a marker, making it a chapter marker. When you play the
movie in iTunes, iDVD, or QuickTime Player, you can easily move to a specific chapter.
To add a chapter title to a marker:
m
In the editor, select the placeholder text in the Chapter Title column of the marker’s
row, then type a title.

108
Chapter 10
Tutorial 8: Creating Podcasts
Deleting Markers
You can delete a marker if you no longer want it in your podcast.
To delete a marker, do one of the following:
 In the podcast track, select the marker region, then press the Delete key.
 In the editor, select the marker in the marker list, then press the Delete key.
Adding Episode Artwork
You can add episode artwork to the podcast track. When you play the podcast in
iTunes or view it in iWeb, the episode artwork is visible whenever there is no marker
region with its own artwork.
To add episode artwork:
1
In the Media Browser, locate the artwork you want to add.
2
Drag the artwork from the Media Browser to the Episode Artwork well in the editor.
The episode artwork appears in the Episode Artwork well. When you play the podcast,
the episode artwork appears when there is no marker region with artwork.
Editing Artwork
You can resize and crop both marker region and episode artwork. In the image editor,
you can resize and crop your artwork to show all or part of the original image.
To edit artwork:
1
Double-click artwork in either the Episode Artwork well or the marker list.
The image editor opens, showing the artwork.
2
Drag the size slider to resize the artwork as large or small as you want. The black square
shows what part of the artwork is displayed when you play the podcast.
3
Drag the artwork so that the part you want to display is within the borders of the
square.
4
You can replace the artwork by dragging a new image to the image editor.
5
When you’re finished, click Set.
Editing Episode Information
Each podcast episode can contain information, including the episode title, author, and
description. An episode can also have a parental advisory, which appears when you
play the podcast in iTunes.
To edit episode information:
1
Select the podcast track.
2
Open the Track Info pane by choosing Track > Show Track Info.
The Track Info pane appears, showing the Episode Info pane.

Chapter 10
Tutorial 8: Creating Podcasts
109
3
To give the podcast episode a title, click the Title field, then type a title.
4
To add artist information, click the Artist field, then type the artist's name.
5
Choose None, Clean, or Explicit from the Parental Advisory pop-up menu.
6
To include a description of the podcast episode, click the Description field, then type a
description.
Ducking Backing Tracks
When you’re creating a podcast, you may want to lower the volume of the backing
tracks (for example, background music or sound effects) to hear spoken narration or
dialogue more easily. Lowering the volume of some tracks to make others easier to
hear is called ducking.
You apply ducking by setting which tracks are lead tracks and which are backing tracks.
Whenever there is sound on a lead track, the volume of the backing tracks is lowered
while the volume of all other tracks stays the same. You can apply ducking to any Real
Instrument or Software Instrument track in your podcast.
To make a track a lead track:
1
Choose Control > Ducking.
A ducking control appears in each track's header, with arrows pointing up and down.
2
Click the upper part of the track's ducking control (the arrow pointing up).
To make a track a backing track:
1
Choose Control > Ducking.
A ducking control appears in each track's header, with arrows pointing up and down.
2
Click the lower part of the track's ducking control (the arrow pointing down).
When you play the project, send it to iWeb, or export it, the backing tracks are ducked
whenever there is sound on any lead track. You can adjust the amount of ducking on
these tracks by choosing a different Ducker preset in the Track Info pane for the master
track.
To adjust the amount of ducking:
1
Open the Track Info pane.
2
Click Master Track, then click the Edit tab.
3
Choose a different preset from the Ducker preset menu. The preset name suggests the
intended use of each preset.
You can also click the Edit button for the Ducker, and create your own preset by
moving the sliders.

110
Chapter 10
Tutorial 8: Creating Podcasts
Creating a Video Podcast or Movie Project
Creating a video podcast is similar to creating an audio podcast, except that it includes
a movie or video file and does not include artwork. You can import an iMovie project or
other QuickTime-compatible video file, view the video as you add audio, and add and
edit markers. When you’re finished, you can send the completed project to iWeb to
publish as a video podcast, send it to iDVD to burn to a DVD, or export it as a
QuickTime movie.
Creating a Video Podcast Project
1
Choose File > New.
The New Project dialog appears.
2
Click New Project, then click Movie.
3
Click Choose.
A new, empty movie project appears in the GarageBand window.
Importing a Movie or Video File
You can import an iMovie project or other video file from the Media Browser. The
Media Browser lets you quickly locate iMovie projects and other video files in your
computer’s Movies folder, as well as other media files. For information about finding
and importing iMovie projects and video files using the Media Browser, see “Importing
Media Files with the Media Browser” on page 105.
When you import a movie into a project, the movie appears in the movie track,
beginning at the start of the project. You can’t change the position of the imported
movie in the project.
Note: A project can contain only one movie or video file. If you import a movie into a
project that already contains one, a dialog appears asking if you want to replace the
existing movie with the new one.
Viewing the Movie
When you import a movie into a project, the movie track appears at the top of the
timeline, showing still frames from the movie. You can view the movie
To view the movie or video file:
1
If the movie track is not visible, choose Track > Show Movie Track.
2
Click the Preview button (the large square button showing a movie frame) in the
header of the movie track.
The movie preview window appears.

Chapter 10
Tutorial 8: Creating Podcasts
111
3
To play the movie, press the Space bar.
4
To move to a different part of the movie, move the pointer over the preview window,
then drag the slider that appears.
5
To resize the preview window, drag the lower-right corner of the window.
Working with the Movie’s Audio Track
If the movie contains an audio track, a new Real Instrument track named Movie Sound
is created below the movie track for the movie’s audio. You can edit the Movie Sound
track exactly as you would edit any Real Instrument track: you can mute or solo it,
adjust the volume level and pan position, and add effects.
Note: If you mute the Movie Sound track, the movie’s audio will not be included when
you send the movie to iDVD or iWeb or when you export it as a QuickTime movie.
Adding Audio
You can record narration in a video podcast in exactly the same way as in an audio
podcast. You can add audio files from the loop browser, including both musical and
podcast sounds loops. You can also record in Real Instrument and Software Instrument
tracks, in exactly the same way as for other GarageBand projects.
For more information, see “Adding Podcast Sounds” on page 104, “Importing Media
Files with the Media Browser” on page 105, and “Adding Music” on page 105.
Adding Markers, Titles, and URLs to a Video Podcast
Markers make it easy to navigate to different parts of the finished movie, and to add
links to webpages. You can add markers to a video podcast project, and add URLs and
chapter titles to markers, in exactly the same way as in enhanced audio podcasts.
However, you cannot add artwork to a video podcast.
For more information, see “Adding and Editing Markers” on page 106, “Adding a URL”
on page 107, and “Adding Chapter Titles” on page 107.
After your podcast is finished, you can share it with others in several ways. For
information about sharing podcasts, see the next tutorial, “Tutorial 9: Sharing Your
Projects.”

11
112
11