
Tutorial 7: Mixing and
Adding Effects
GarageBand gives you the tools to easily mix your
projects and add professional-sounding effects.
In this tutorial, you’ll learn some basics about mixing and effects. You’ll learn how to:
 Mix tracks in your project to balance the sound
 Set the master volume
 Add a fade-out to the end of a project
 Add and adjust track effects
 Graphically edit the Visual EQ effect
 Edit and save effect presets
 Automate mixing and other parameters
What Is Mixing?
When you’ve built the arrangement of your project, the next step is to mix the project.
Mixing is when you step back and listen to the overall sound of the music, and make
changes to tracks and the project to balance the different parts, bring the music into
focus, and give it the right “sound.”
Mixing typically consists of the following steps:
 Balancing track volume levels
 Setting track pan positions
 Adding effects to enhance and color the sound
 Creating dynamic changes with automation curves
Chapter 9
Tutorial 7: Mixing and Adding Effects
93
Basic Mixing
The most basic steps in mixing are balancing the volume level of different tracks,
setting track pan positions, and setting the master volume.
Setting Track Volume Levels
The instruments and loops you use in your project may have different volume
(loudness) levels. To hear all the parts you’ve added, you balance the volume levels so
that no track overwhelms the others, and no track is lost in the mix.
This doesn’t mean that every track should be set to the same volume level. In
commercial mixes, certain tracks (typically the lead vocals, drums, and lead or solo
instruments) are louder, while other tracks (the backing instruments and vocals) are
softer.
To set a track’s volume level:
m
In the track’s header, drag the volume slider left to lower the volume level, or drag it
right to raise the volume level.
To set the volume level in finer increments, hold down the Shift key as you drag.
Setting Track Pan Positions
Setting different tracks to different positions in the stereo field (panning) helps make it
easier to distinguish tracks in the mix, and creates a sense of three-dimensional space
in your project.
In commercial music, the most important tracks (typically the lead vocals, drums, and
lead or solo instruments) are panned to the center or close to center, while other tracks
(the backing instruments and vocals) are panned left and right. Panning tracks no
farther than 50 percent left or right creates a natural sense of space; in contrast,
panning tracks to the extreme left or right creates a more unusual, artificial sound.
To set a track’s pan position:
m
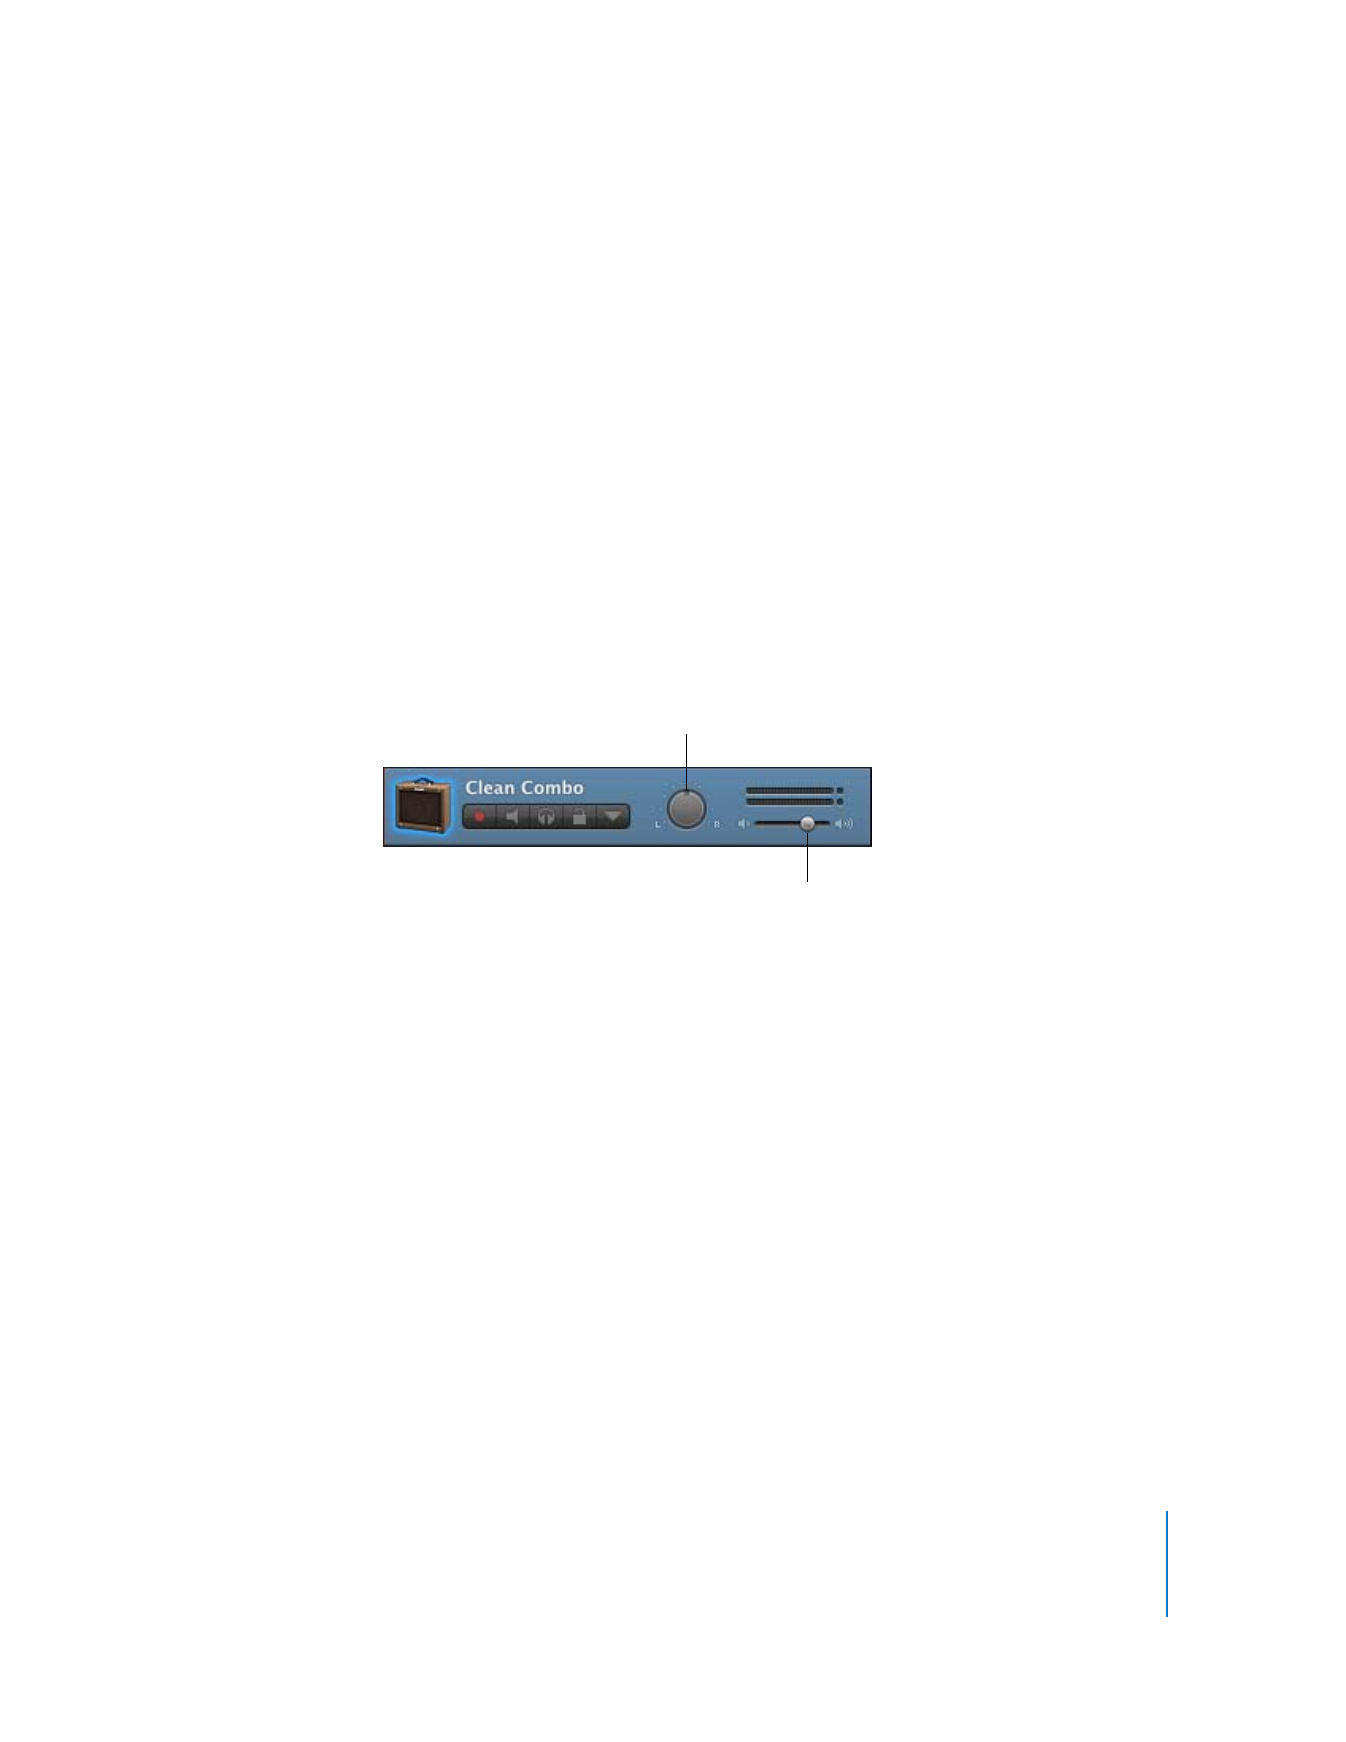
In the track’s header, drag the pan dial left to pan the track farther to the left, or drag it
right to pan the track farther to the right. You can also click along the edge of the dial
to set it to a specific position.
Note: Dragging inside the pan dial lets you set the pan position in more precise values.
Pan dial
Volume slider
94
Chapter 9
Tutorial 7: Mixing and Adding Effects
Setting the Master Volume
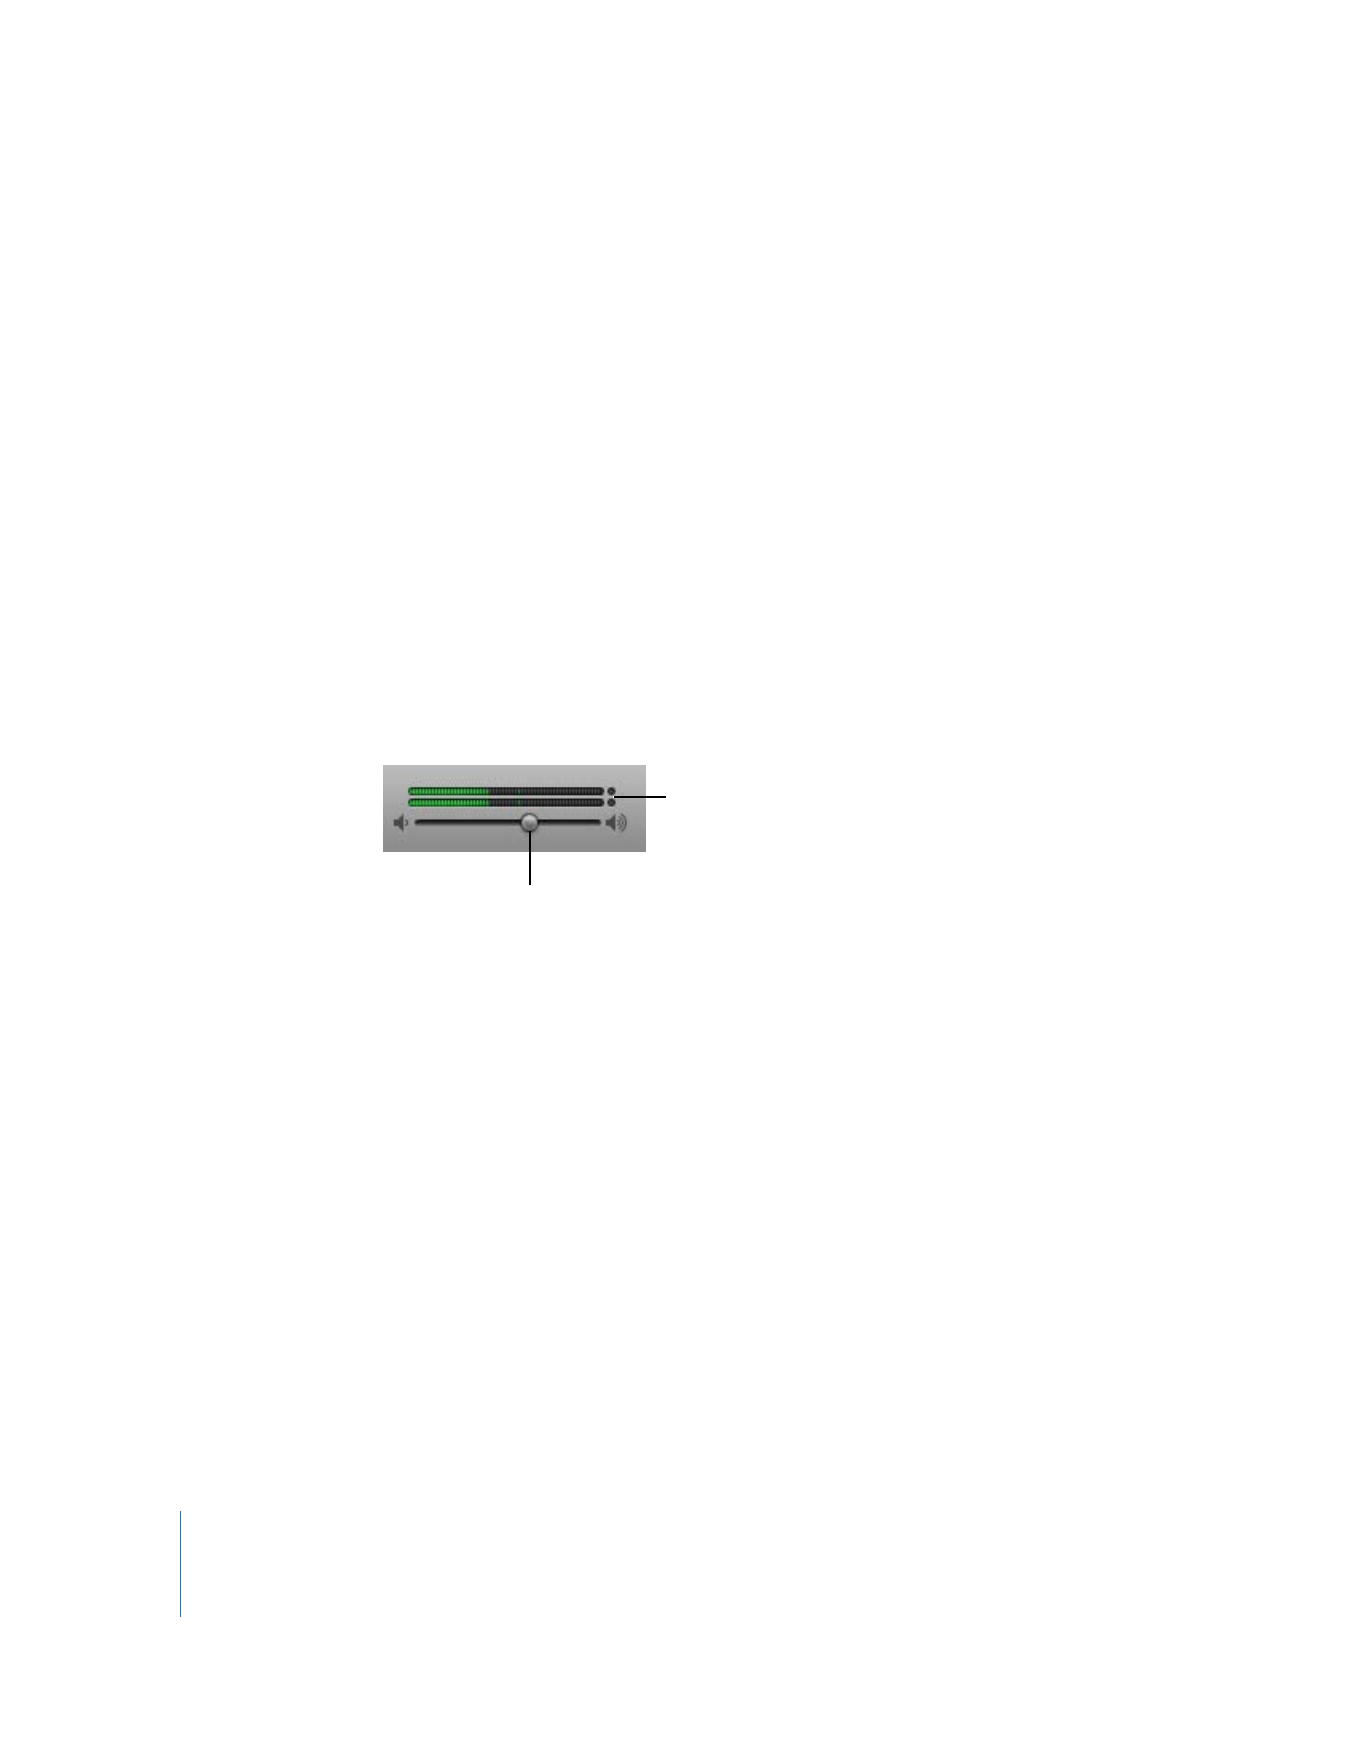
You can set the overall, or master, volume of a project using the master volume slider,
located to the right of the LCD. You should adjust the master volume to a level high
enough to eliminate background noise, but not so high that it causes clipping.
Important:
The master volume slider controls the volume of the project when it is
exported. Use your computer’s volume control to adjust the volume at which you listen
to the project play.
To set the master volume:
 Drag the master volume slider left to lower the output volume, or right to raise the
output volume. Option-click the slider to return it to a neutral value (0 decibel gain).
 Before you export, play the project from start to finish, watching the master level
meter located above the master volume slider. Make sure the small red dots to the
right of the level meter are not lit.
These dots (called clipping indicators) light to show that the volume level of the
project at some point is too high, which will cause distortion or “clipping” in the
exported project.
Adding a Fade-Out
A very common mixing technique is having all the music gradually become softer, or
“fade out,” at the end of a song. You can easily add a fade-out to the end of a project.
To add an automatic fade-out:
m
Choose Track > Fade Out.
The master track appears at the bottom of the timeline, showing the automation curve
for master volume. When you choose Fade Out, control points are added to the master
volume automation curve so that it gradually fades to silence over the last 10 seconds
of the project (the last 10 seconds before the end-of-project marker).
To adjust the length of the fade-out:
1
Choose Track > Show Master Track.
2
Choose Master Volume from the menu in the master track header.
3
Move the control points at the end of the volume automation curve to adjust the
length of the fade-out.
Make sure the clipping indicators
are not lit before exporting a project.
Drag the master volume slider
to adjust the overall loudness.

Chapter 9
Tutorial 7: Mixing and Adding Effects
95
Now play the project from a point before the fade-out begins. You’ll hear all the tracks
in the project fade out gradually to their final volume level.
To manually add a fade-in or fade-out:
1
Choose Track > Show Master Track.
2
Choose Master Volume from the menu in the master track header.
3
Add control points to the beginning of the volume automation curve for a fade-in, or
to the end of the curve for a fade-out.
4
Move the control points to adjust the length and intensity of the fade-in or fade-out.
Using Effects in GarageBand
Effects let you shape and enhance the sound of your music in a variety of ways. Anyone
who has listened to much popular music, or listened to movie soundtracks, has heard
the different effects used in contemporary music. GarageBand includes a complete set
of studio-quality effects that you can use on individual tracks or the overall project to
shape the sound of your music.
Types of Effects
GarageBand includes the following types of effects:
Compressor: A compressor adjusts the volume of the music to smooth out sudden
level changes. Compression can add punch and definition to a track or an entire song,
and make it sound better when played on audio equipment with a narrow dynamic
range.
Distortion: Distortion effects, which include amp simulation and overdrive (and, of
course, distortion), change the tone of the original sound to recreate analog or digital
distortion.
Echo: As the name suggests, an echo effect repeats a sound like an echo. It can add a
subtle sense of space to a sound, or create the impression that a voice or instrument is
in a large room, a cavern, or outer space.
EQ: EQ (short for equalization) is a powerful and versatile effect that lets you change
the level of selected frequencies. You can use EQ to make both subtle and dramatic
changes to your projects. EQ is likely the most commonly used effect in popular music.
GarageBand includes a special type of EQ called Visual EQ. You can use Visual EQ by
choosing an EQ preset, but you can also edit the effect graphically, making it easy to
see what part of the sound you are changing.
Gate (Noise Gate): A gate reduces low-level noise by cutting off the sound when it
falls below a certain volume level. It is often used as the first in a series of effects, and is
included on Real Instrument tracks to help reduce input noise.

96
Chapter 9
Tutorial 7: Mixing and Adding Effects
Modulation: Modulation effects, which include chorus, flangers, and phasers, build on
the time-based effects by shifting or modulating when the copied signal plays back.
They can also involve detuning the copied signal relative to the original.
Reverb: Reverb simulates the natural reflections of a sound in a surrounding space. It
can add definition and presence to voices and instruments, add ambience to a sound,
or simulate different rooms and other acoustic environments.
Stompboxes: Electric Guitar tracks include special stompbox effects that re-create the
sound of famous guitar effects pedals. Stompbox effects include echo, chorus,
overdrive, flanger, and other effects.
Effects can either be track effects, send effects, or master effects. Track effects modify
the sound on an individual (Real Instrument, Software Instrument, or Electric Guitar)
track. Send effects send part of the sound from a track to the effect on the master track.
Each Real Instrument, Software Instrument, and Electric Guitar track includes Echo and
Reverb send effects; you can control how much of the sound is sent from each track in
that track’s Track Info pane. Master effects modify the overall sound of the project,
affecting all tracks.
Adding Effects to a Track
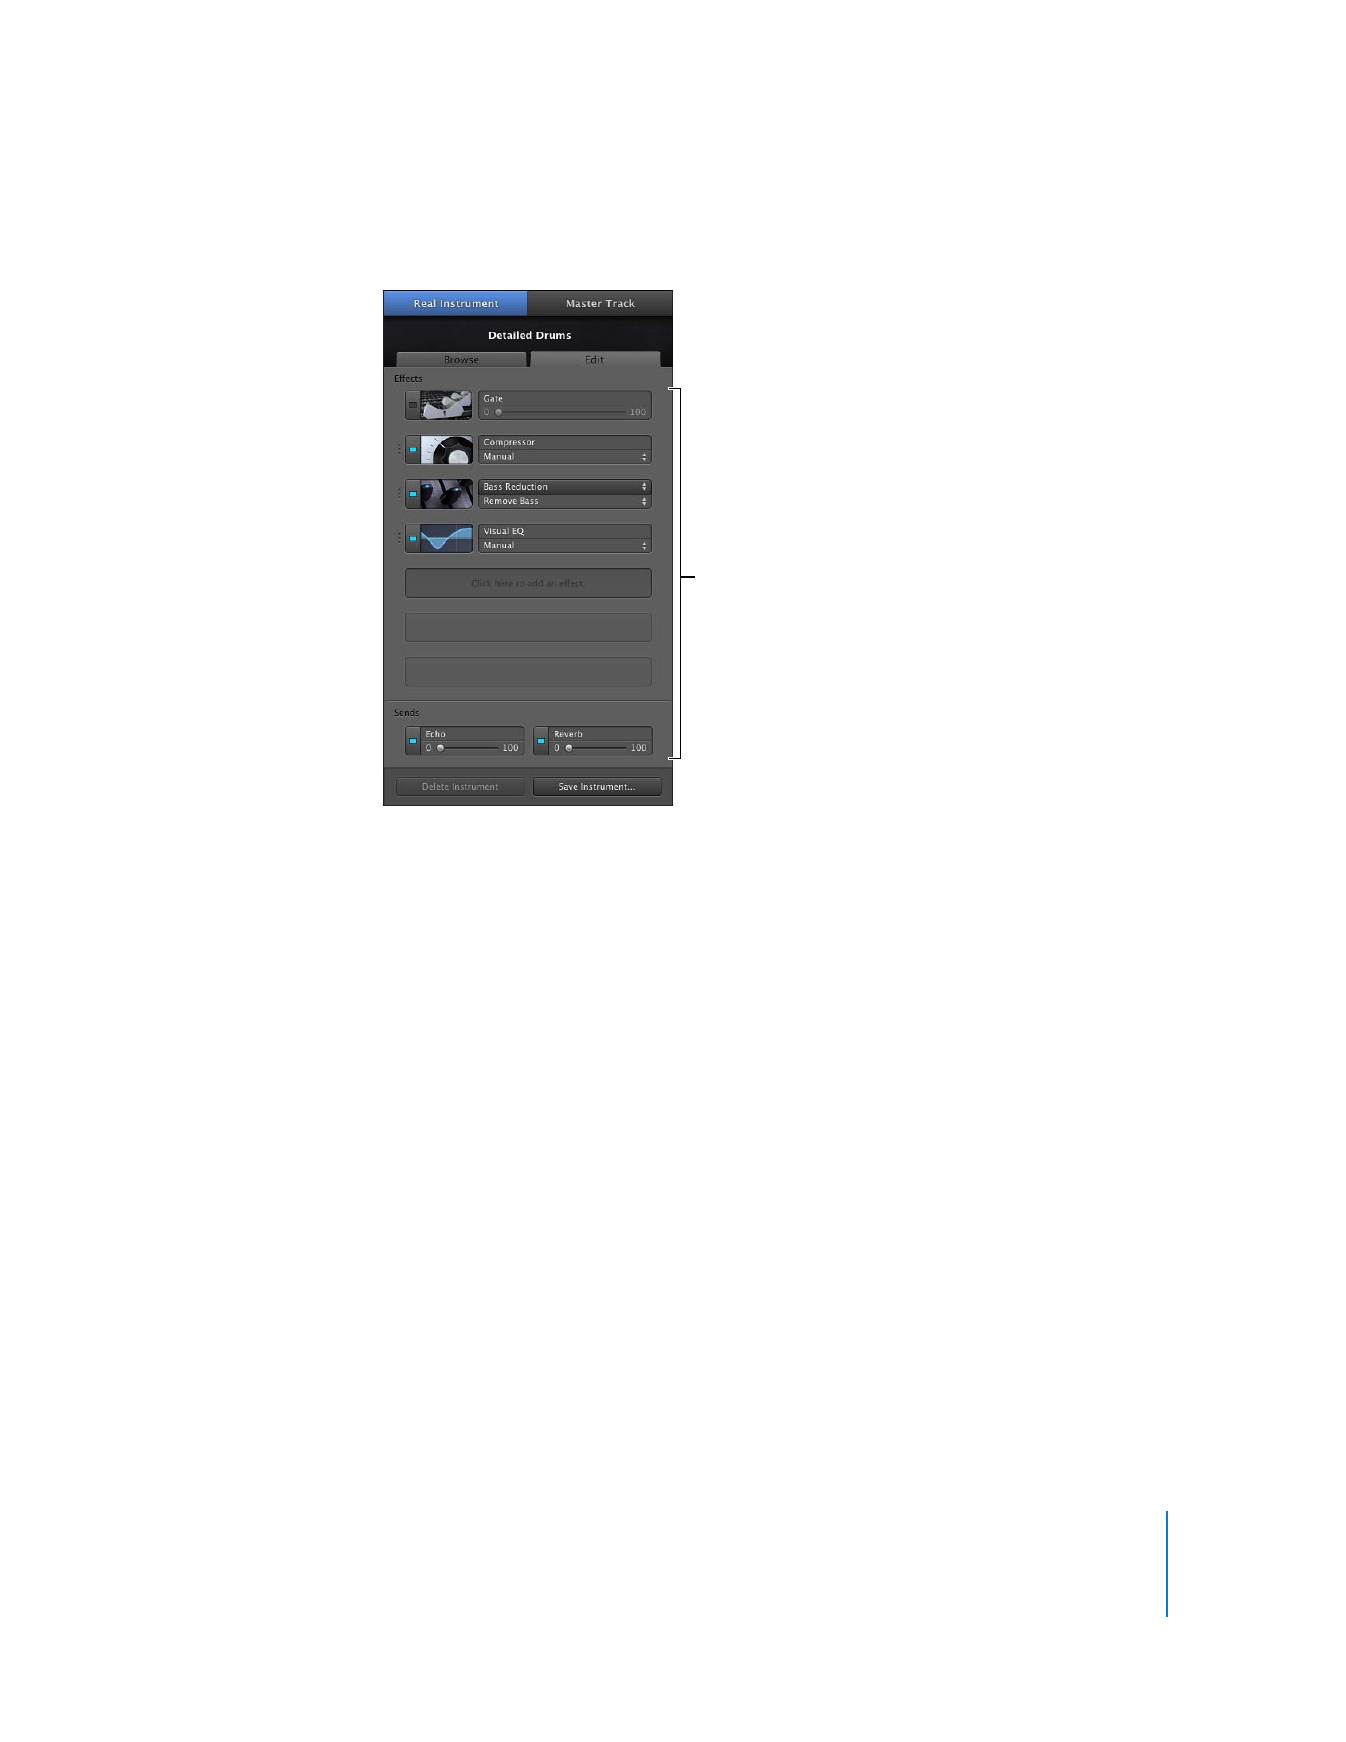
Each Real Instrument and Software Instrument track has a set of effects, which include
compressor and Visual EQ effects, as well as echo and reverb send effects. Real
Instrument tracks also include a gate (noise gate) effect. You can adjust a track's effects,
and add effects, in the Track Info pane.
The master track includes its own effects. You can adjust the master effects and add
one more effect to the master track in the Track Info pane.
To add an effect:
1
Click the Track Info button, or choose Track > Show Track Info to show the Track Info
pane.
The Track Info pane opens to the right of the timeline.
2
Click Edit to show the track effects.
Chapter 9
Tutorial 7: Mixing and Adding Effects
97
3
Choose an effect from one of the empty effect slots.
Additional effects include treble reduction, bass reduction, chorus, flanger, phase
shifter, and tremolo. The available effects are listed in the effect pop-up menu,
including any third-party Audio Units effects that are installed on your computer.
Turning Effects On and Off
You can turn individual effects on or off (turning an effect off temporarily is called
bypassing the effect). Turning effects on and off has several advantages: you can hear
how each effect changes the sound of your music, and you can see which effects have
the greatest impact on your computer’s performance.
When you turn off an effect, the effect’s current settings are retained, so any
adjustments you have made are not lost.
To turn on an effect:
m
In the Track Info pane, click the on/off button (with a rectangle in the center) to the left
of the effect name. The rectangle lights to show that the effect is active. Click the on/off
button again to turn the effect off.
Use these controls to
add and adjust effects.

98
Chapter 9
Tutorial 7: Mixing and Adding Effects
Choosing an Effect Preset
Each effect has a pop-up menu from which you can choose different effect presets.
Each preset name suggests the purpose of the preset or how it modifies the sound.
To choose an effect preset:
1
Double-click the track’s header to open the Track Info pane, if it is not already open.
2
Click Edit to show the track’s effects.
3
Choose a new preset from the Preset pop-up menu below the effect’s name.
Creating and Saving Effect Presets
You can adjust effect presets to fine-tune the sound of the effect, and save your own
presets to use with other instruments or in another project.
To edit an effect preset:
1
Click the Edit button (with a graphic for the effect) to the left of the effect name.
The effect’s Preset window appears. Each effect setting has a slider, button, or other
control, which is labeled to indicate its purpose.
2
Drag the sliders in the Preset window to adjust the settings for the preset.
When you adjust an effect preset, it appears as “Manual” in the pop-up menu, so you
know you’ve changed it from the original preset. You can go back and forth between
your manual settings and other presets to compare them before saving the new preset.
You can create your own effect presets and save them to use on another track or in
another project.
To edit the Visual EQ effect graphically:
1
Click the Edit button for the Visual EQ effect.
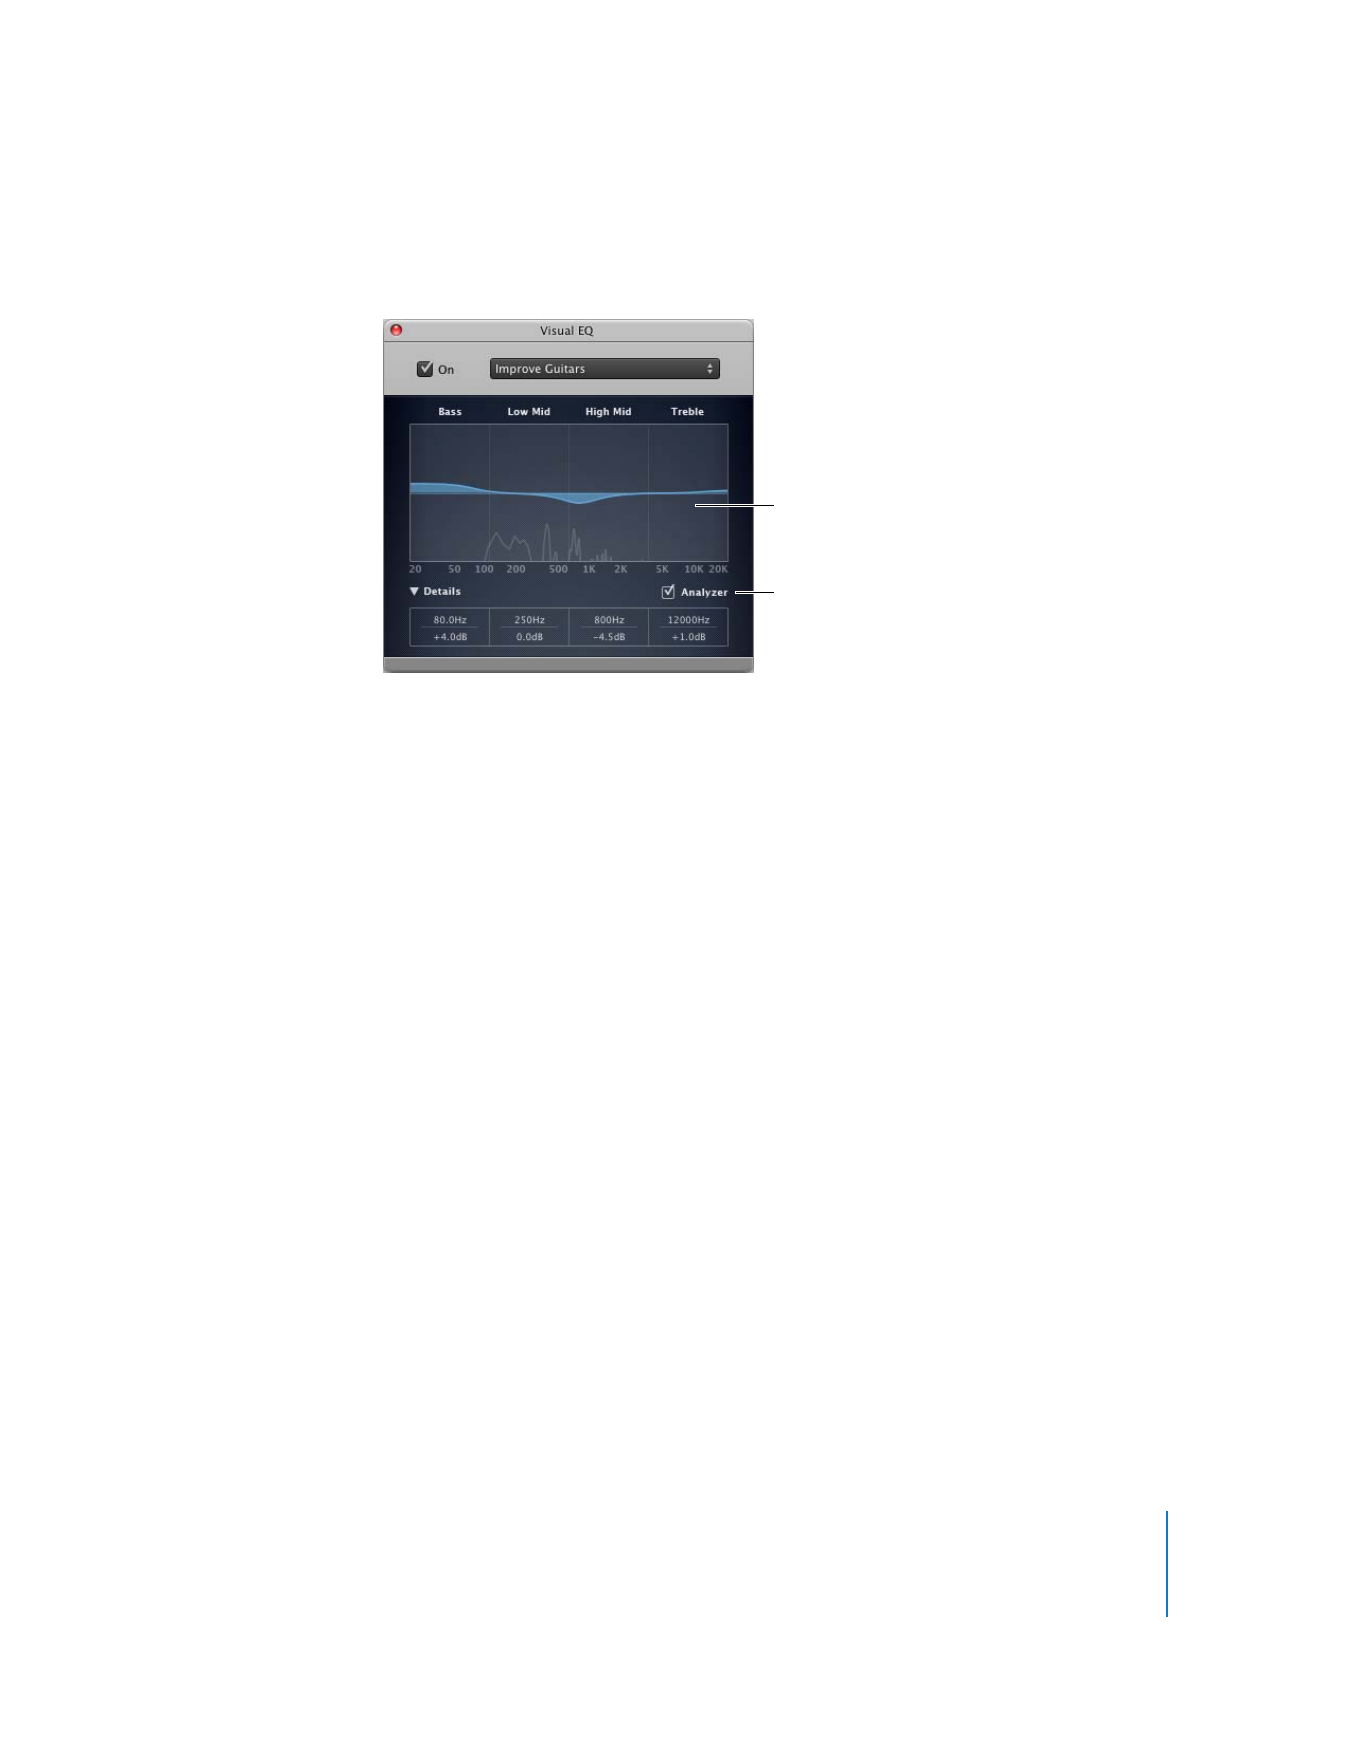
The Preset window for the Visual EQ appears. In the center of the window is the
graphic editing area, divided into four bands: Bass, Low Mid, High Mid, and Treble.
2
Place the pointer in one of the four bands in the editing area and do the following:
 To change the frequency for the band, drag the pointer left or right.
 To change the gain for the band (how much the frequencies are boosted or cut),
drag the pointer up or down.
3
To see the numeric values for each band, click the Details triangle. You can adjust
values numerically by dragging them up or down.
Chapter 9
Tutorial 7: Mixing and Adding Effects
99
4
To see the frequency curve for the track in real time, select the Analyzer checkbox, then
play the track.
To save an effect preset:
1
Adjust the settings for the preset to get the sound you want.
2
Choose Make Preset from the pop-up menu, then type a name for the preset in the
Save dialog.
Drag in one of the four bands to
graphically adjust the Visual EQ.
Click the Analyzer checkbox to see
the track’s frequency curve.
100
Chapter 9
Tutorial 7: Mixing and Adding Effects
Automating Your Mix
In addition to setting the volume level, pan position, and effects settings for a track,
you can add changes to these and other settings over time using automation. You
automate changes over time by adding automation curves to tracks, adding control
points to each automation curve, and adjusting the control points to different values.
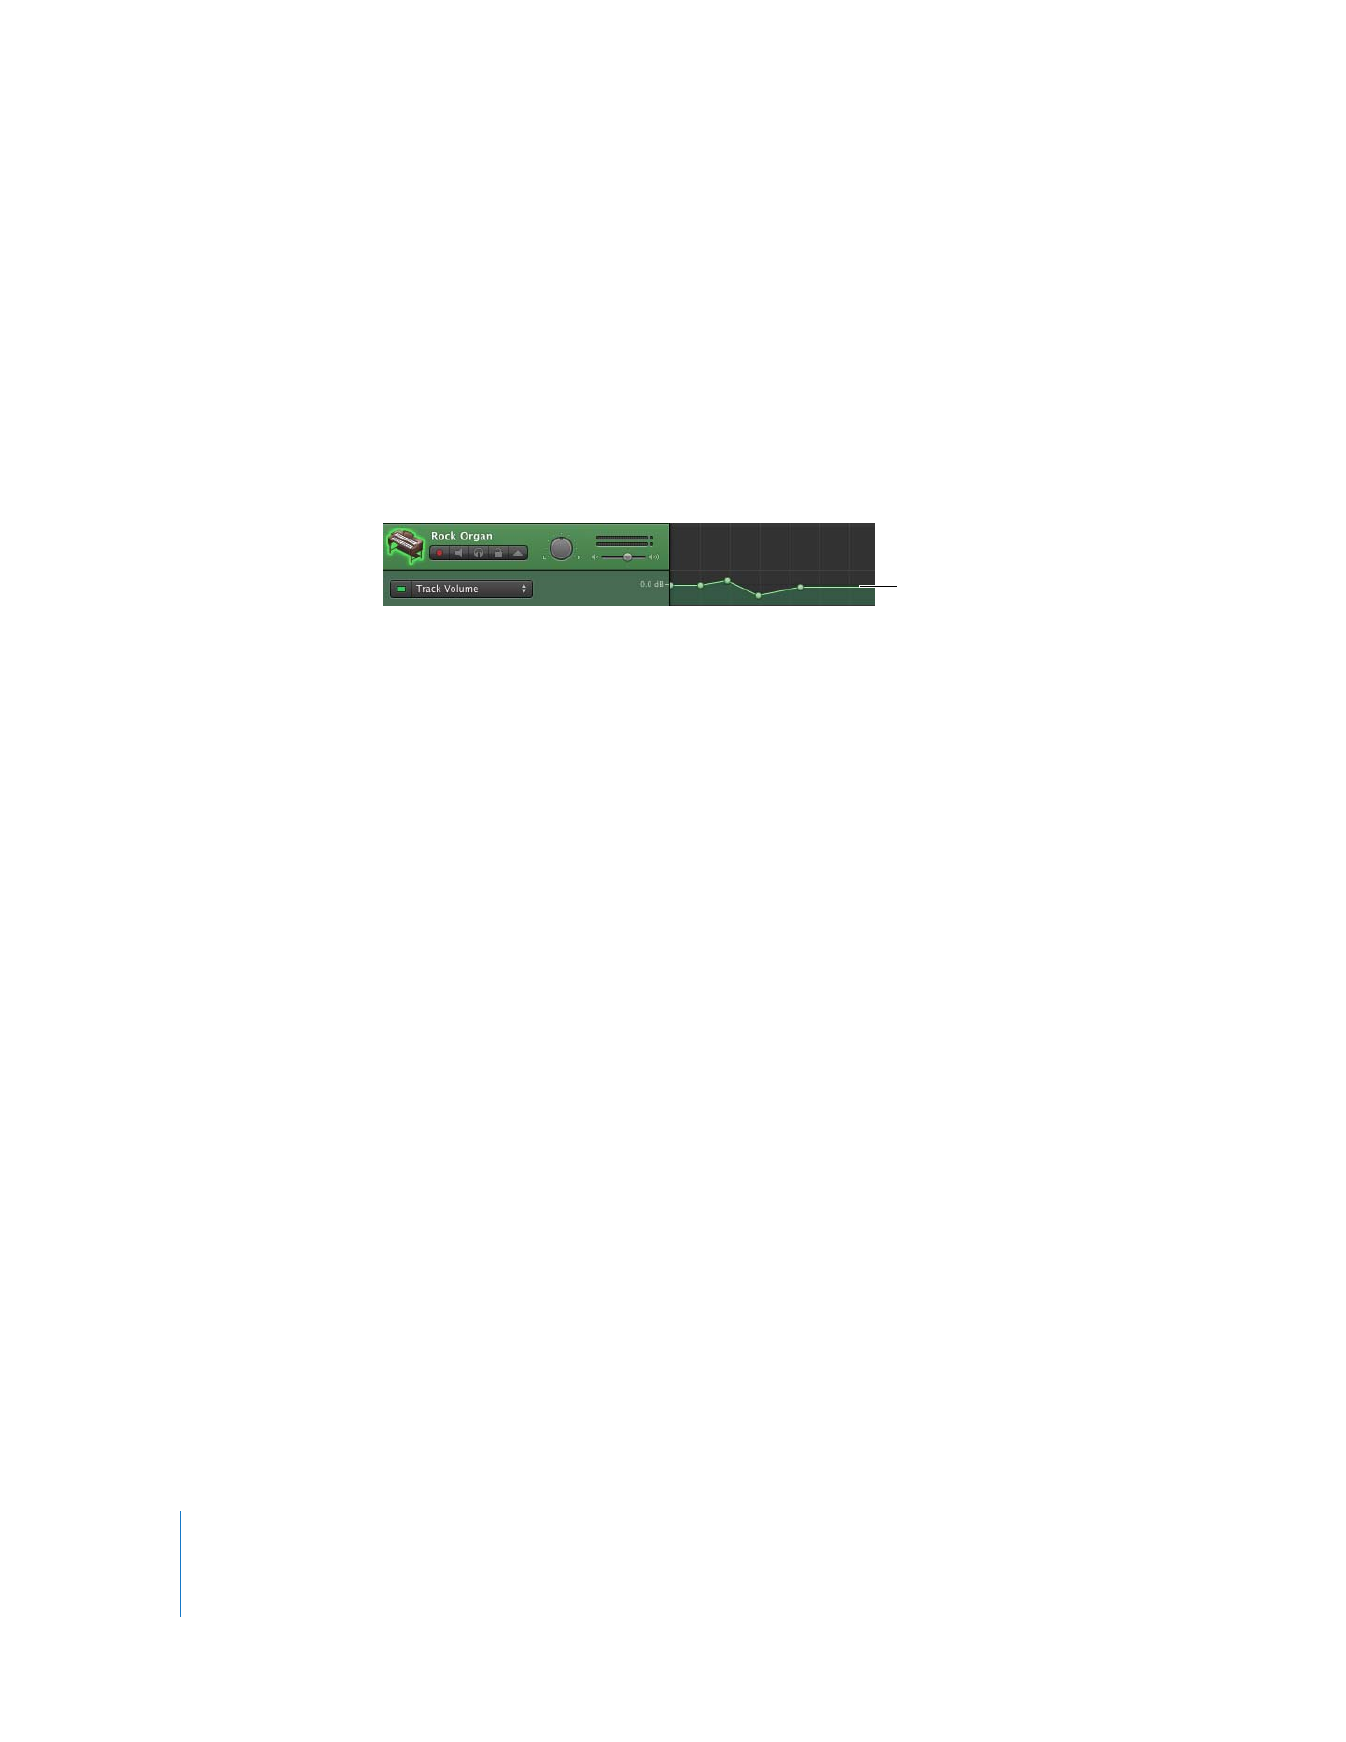
To show a track’s automation curves:
m
Click the triangle to the right of the Lock button in the track’s header.
A row appears below the track, showing the volume automation curve.
To choose the automation curve you want to edit:
m
From the pop-up menu on the left side of the track’s automation row, choose the
parameter you want to edit.
Now you can automate the parameter by adding control points to the curve, and then
dragging the control points to change their value.
To add a control point:
m
In the editor, click the curve at the place where you want to add a control point.
Note: Adding a control point activates the curve, if it is not already active. The square
button becomes colored to show that the curve is active.
To adjust a control point, do one of the following:
 Drag the control point up or down to a new value.
 Drag the control point left or right to move it to a different point in time.
You can use the vertical lines in the row to align control points with measures and
beats in the timeline.
For Real Instrument, Software Instrument, and Electric Guitar tracks, you can automate
Track Volume and Track Pan. For the master track, you can automate Master Volume,
Master Pitch, and Master Tempo. You can also automate parameters for any effect on a
track (including the master track) by adding an automation curve for the parameter.
To add an automation curve for an effect parameter:
1
From the pop-up menu on the left side of the track’s automation row, choose Add
Automation.
A menu appears, listing all the effects on the track.
2
Click the disclosure triangle for the effect with the parameter you want to automate.
Volume automation curve

Chapter 9
Tutorial 7: Mixing and Adding Effects
101
3
Select the checkbox for the parameter you want to automate. You can select multiple
checkboxes to add multiple effect parameters.
4
When you’re done, click OK.
The parameter appears in the pop-up menu, and the automation curve switches to
show the automation for the last selected effect parameter.
You can also lock automation control points to regions, so that when you move the
region in the timeline, the control points move with it.
To lock automation control points to regions:
m
Choose Control > “Lock Automation Curves to Regions.”
All control points are locked to the region corresponding to the automation curve.
The following conditions apply to locking control points to regions:
 Shortening or lengthening a region has no effect on its control points.
 Deleting a region deletes its control points as well.
 If you overlap a region containing control points with another region, the control
points and the region are shortened.
 If you drag a region containing no control points over part of a track containing
control points, the control points are locked to the new region.
 Looping a region does not loop its control points–you must copy the region instead.
To delete an automation curve for an effect parameter:
1
From the pop-up menu on the left side of the track’s automation row, choose Add
Automation.
2
When the menu appears, deselect the checkbox for the parameter you want to delete.
You can select multiple parameters.
3
When you’re done, click OK.
Note: When you delete an automation curve, all the control points on that curve are
also deleted. This cannot be undone.

10
102
10