
Tutorial 5: Adding Apple Loops
You can use Apple Loops to add backing and rhythm
tracks to your projects. You can also add Apple Loops to
the loop library and create your own Apple Loops.
GarageBand comes with a large collection of Apple Loops. Apple Loops are
prerecorded musical phrases in a variety of genres, instruments, and moods that you
can add to your projects. Loops are recorded to create seamlessly repeating patterns
that you can extend (or “loop”) to fill any amount of time. What’s great about using
Apple Loops in your GarageBand project is that you can freely mix loops that were
recorded in different keys and at different tempos, but they all play back in the project
key and at the project tempo.
Most popular music today is based on repeating rhythmic patterns (also called
“grooves” or “riffs”), especially in the drums, bass, and other backing parts. To create
music in a groove-based style, an effective way of working is to add loops for the
drums, and then add loops for bass and other rhythm parts. Working this way, you can
define the rhythmic feel of the project and build the basic arrangement by blocking
out sections with different grooves. After the rhythm parts are in place, you can record
voices and instruments to add lead, solo, and harmony parts.
You can quickly set the feel of a project by adding Apple Loops. GarageBand makes it
easy to search for loops that fit the criteria you want, preview them, and add them to
the timeline.
In this tutorial, you’ll learn how to:
 Find and preview loops in the loop browser
 Add loops to the timeline
 Add loops to the loop library
 Create your own Apple Loops

72
Chapter 7
Tutorial 5: Adding Apple Loops
Searching for Loops to Use in a Project
GarageBand includes a loop browser that lets you search for loops by instrument,
genre, or mood. You can also search for loops by name, limit searches to a specific scale
type or to nearby keys, and mark loops as favorites for quick access. No matter how big
your collection of loops becomes, you can quickly find the ones you want using the
loop browser.
If the loop browser is not visible, show it so you can use it to search for loops.
To show the loop browser:
m
Click the Loop Browser button (the button with the open eye).
You can search for loops using either button view or column view (there’s also a special
view for podcast sounds, which is covered in “Tutorial 8: Creating Podcasts” on
page 102). In button view, you click keyword buttons to find loops that match the
keywords. In column view, you choose from different categories and keywords to find
matching loops. You can select either view using the view buttons in the upper-left
corner of the loop browser, and move back and forth between them freely.
To choose button view or column view:
m
Click the left button (with columns) to show column view, or click the center button
(with musical notes) to show button view. The button on the right shows podcast
sounds view, covered in “Tutorial 8: Creating Podcasts” on page 102.
Chapter 7
Tutorial 5: Adding Apple Loops
73
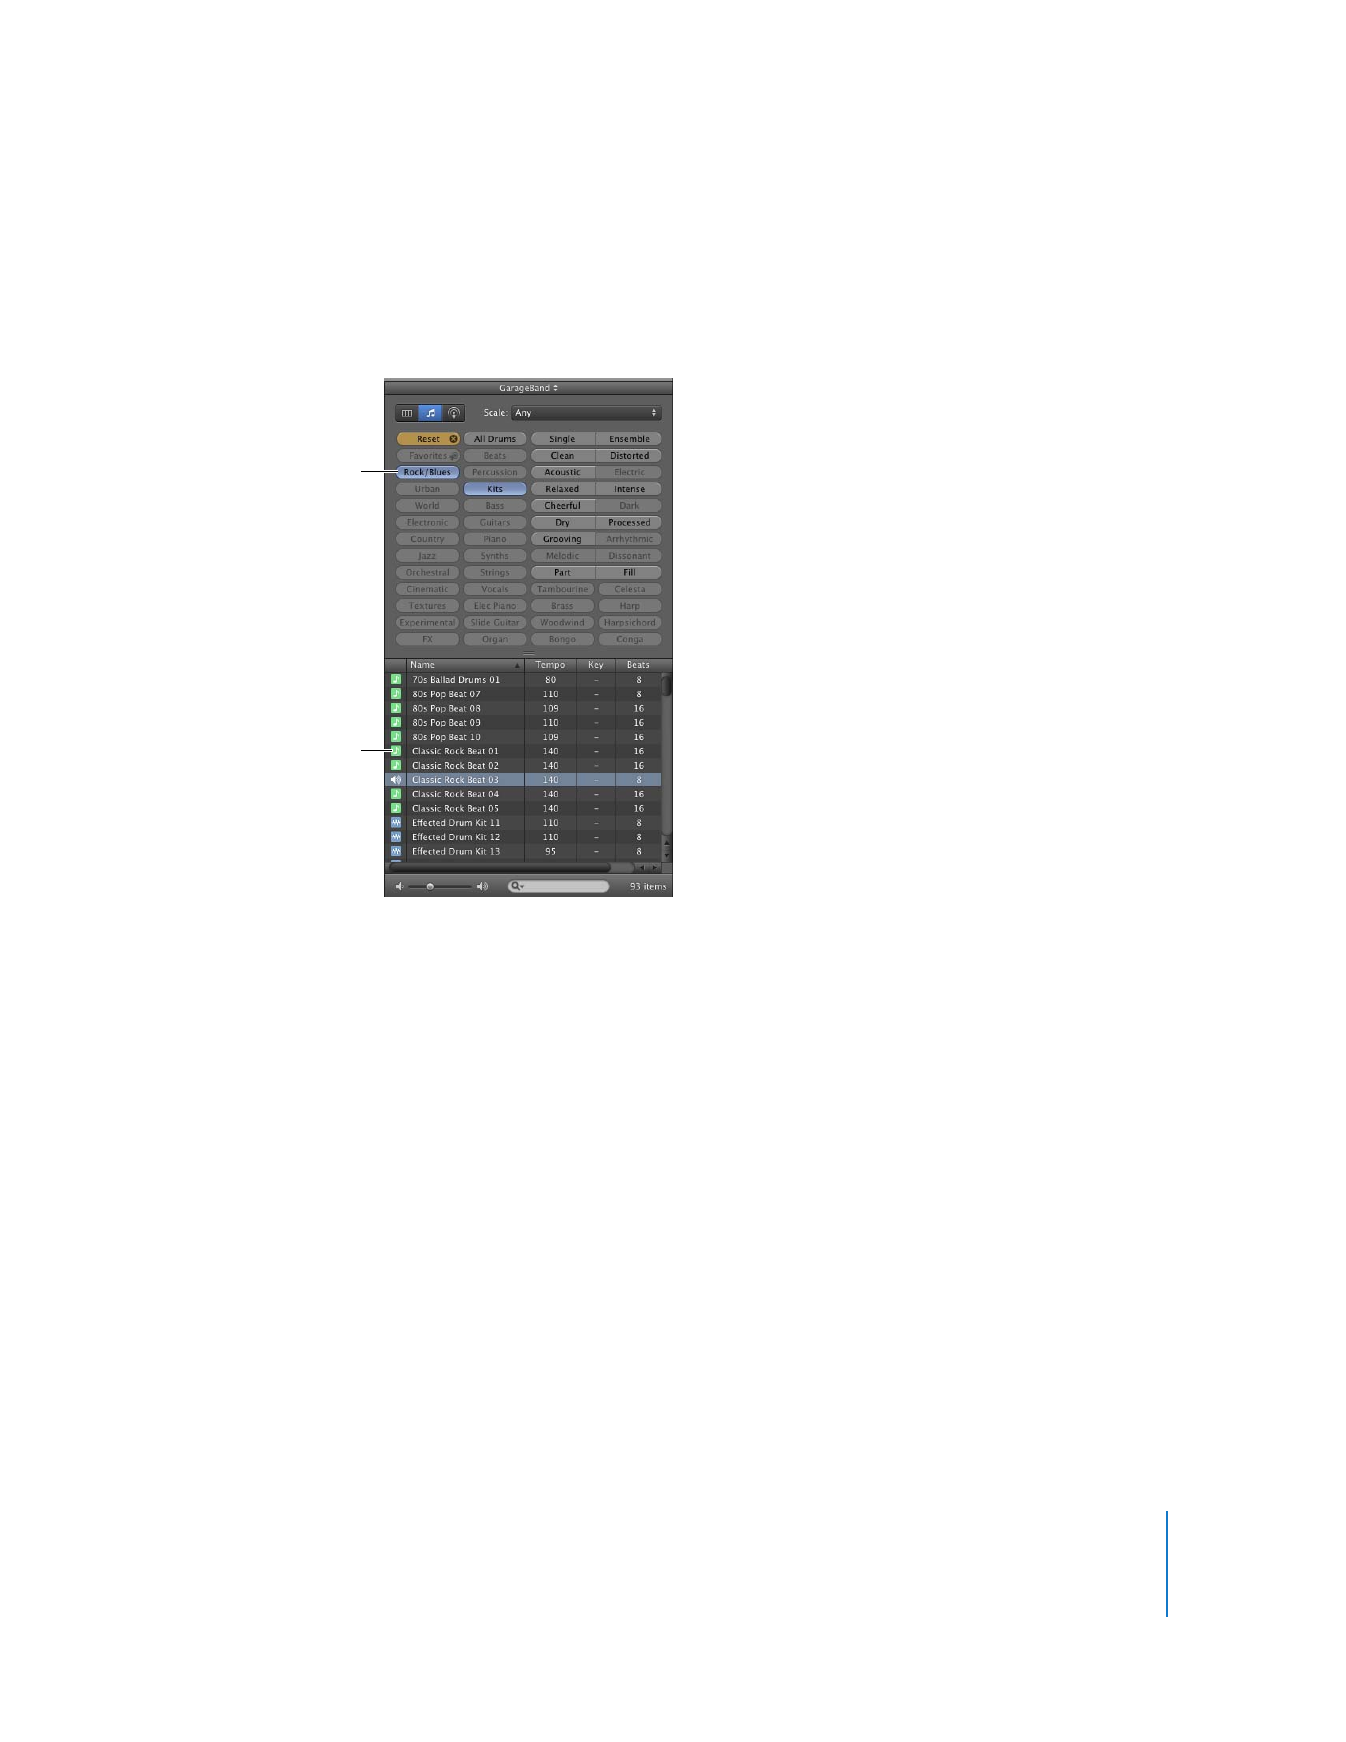
Searching for Loops in Button View
Button view features a grid of keyword buttons. You click a button to see the loops
matching the selected keyword in the results list to the right. You can narrow your
results by clicking multiple buttons.
To search for loops in button view:
1
Click the button with musical notes in the upper-left corner of the loop browser to
switch to button view.
2
Click a keyword button to show matching loops in the results list. The columns in the
results list show the type of loop, name, tempo, key, and number of beats for each
loop.
3
To refine your results, click multiple keyword buttons. This narrows the matching loops
to only those that match all of the selected keywords.
4
To end a search, click the Reset button to deselect all selected keywords. You can also
click keywords to deselect them individually.
When you click a keyword, incompatible keywords (those that share no loop with the
selected keyword) are dimmed.
Now find some drum loops in button view by clicking the All Drums keyword button.
Scroll through the list to see all the matching loops. Notice that the number of
matching loops is shown next to the search field.
Matching loops appear
in the results list.
Click a keyword button.
74
Chapter 7
Tutorial 5: Adding Apple Loops
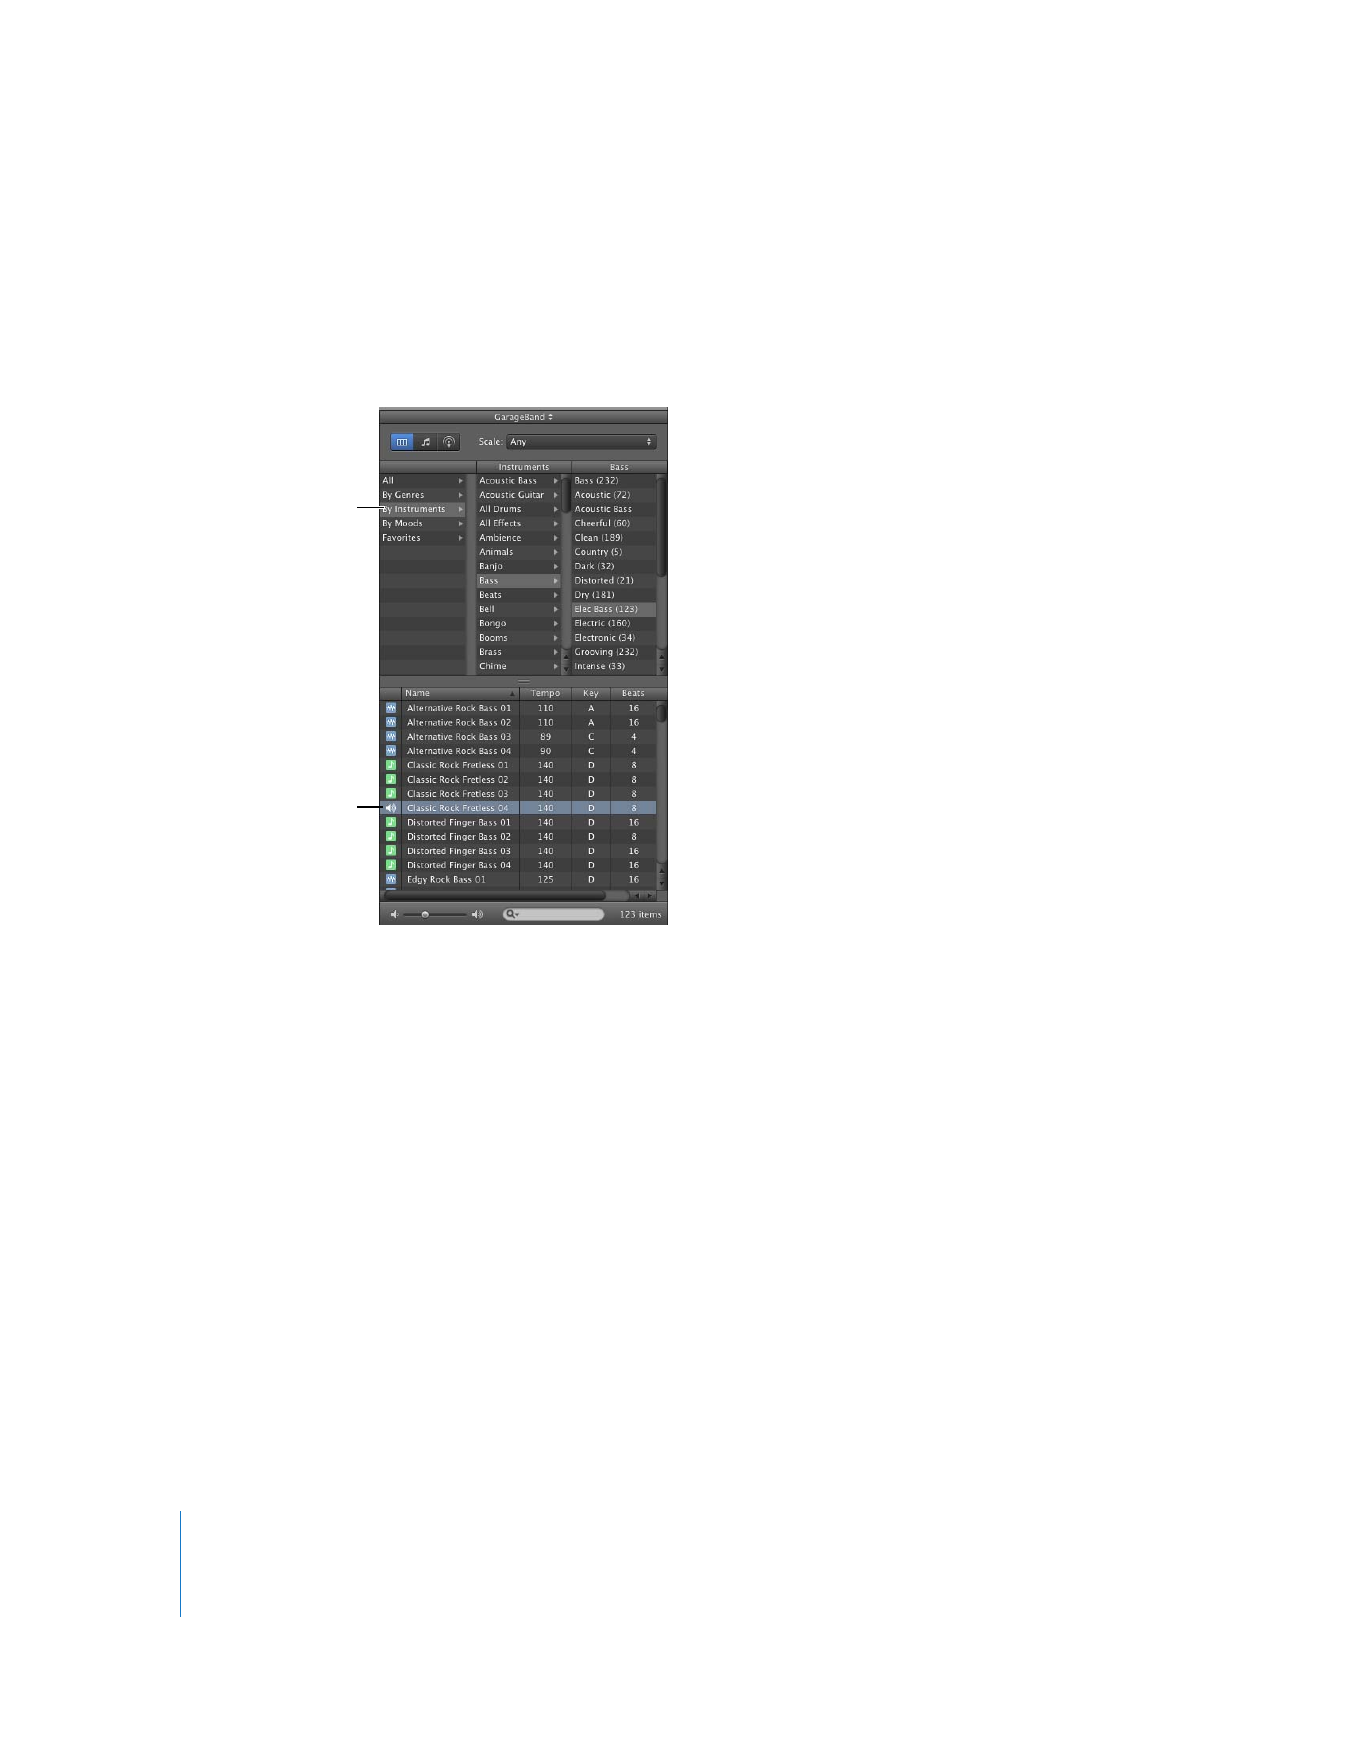
Searching for Loops in Column View
In column view, clicking a keyword type in the left column shows categories for that
keyword type in the middle column. Clicking a category shows keywords for that
category in the right column. Clicking a keyword shows matching loops in the results
list. You can expand your results by clicking multiple keywords.
To search for loops in column view:
1
Click the column button in the upper-left corner of the loop browser to switch to
column view.
2
Click a keyword type in the left column.
3
Click a category in the middle column.
4
Click a keyword in the right column to show matching loops in the results list.
Now find some bass loops in column view by first selecting the By Instruments
keyword type, then the Bass category, and then the Grooving keyword.
When you find loops in either button view or column view, the total number of
matching loops is shown next to the search field at the bottom of the loop browser.
Select keywords in the
columns, moving from
left to right.
Matching loops appear
in the results list.

Chapter 7
Tutorial 5: Adding Apple Loops
75
Previewing Loops
When you find loops that match your search criteria, you can preview them in the loop
browser to hear which loop will sound best in your project. You can preview the loop
by itself (solo), or hear it together with the project.
To preview a loop:
m
Click the loop in the results list. Click the loop again to stop previewing it, or click
another loop to preview that loop.
You can preview a loop together with the material you’ve already added to the project
by clicking the Play button before you click the loop. When you preview a loop
together with a project, GarageBand matches the tempo and key of the loop to the
project’s tempo and key, and syncs the loop with the project so it starts playing on the
beat. You may have to wait a few seconds to hear the loop begin playing.
When you preview a loop, you can control the volume of the loop using the volume
slider in the loop browser.
To adjust the volume of the loop you are previewing:
m
Drag the volume slider in the loop browser left to lower the loop’s volume, or right to
raise the loop’s volume.
If you adjust the volume of a loop in the loop browser, and then add the loop to your
project by dragging it to an empty part of the timeline, the volume of the track created
for the loop is set to the preview volume of the loop.
Now try previewing the loops you found earlier, and see which ones you like.
Refining Loop Searches
You can refine your searches in the loop browser in several ways. You can:
 Search for loops by name
 Display only loops from a specific Jam Pack or folder
 Display only loops of a particular scale type
 Display only loops in keys near the project’s key
 Mark loops as favorites for quick access
Drag the volume slider to
adjust the volume of the loop.
76
Chapter 7
Tutorial 5: Adding Apple Loops
Searching by Name
You can quickly find loops by name using the search field. This makes it easy to find a
specific loop or a group of related loops.
To search for loops by name:
m
Type the name you want to search for in the search field, then press Return. Loops with
the text in their file name appear in the results list.
Try refining the drum loops you found earlier by typing “acoustic”, “club”, or “funk” in the
search field. You can type other words to see what results you get.
Showing Loops from a Specific Jam Pack or Folder
If you have installed one or more of the GarageBand Jam Packs on your computer, your
loop library can contain many thousands of loops. To make searching for loops easier,
you can choose to display only loops from a specific Jam Pack, or only the loops
included with GarageBand. If you have created your own loops or added loops from
another source, you can also choose to display only those loops.
To view loops from a specific Jam Pack or folder:
m
Choose the Jam Pack or folder with the loops you want to see from the loop library
pop-up menu, located next to the word “Loops” at the top of the loop browser.
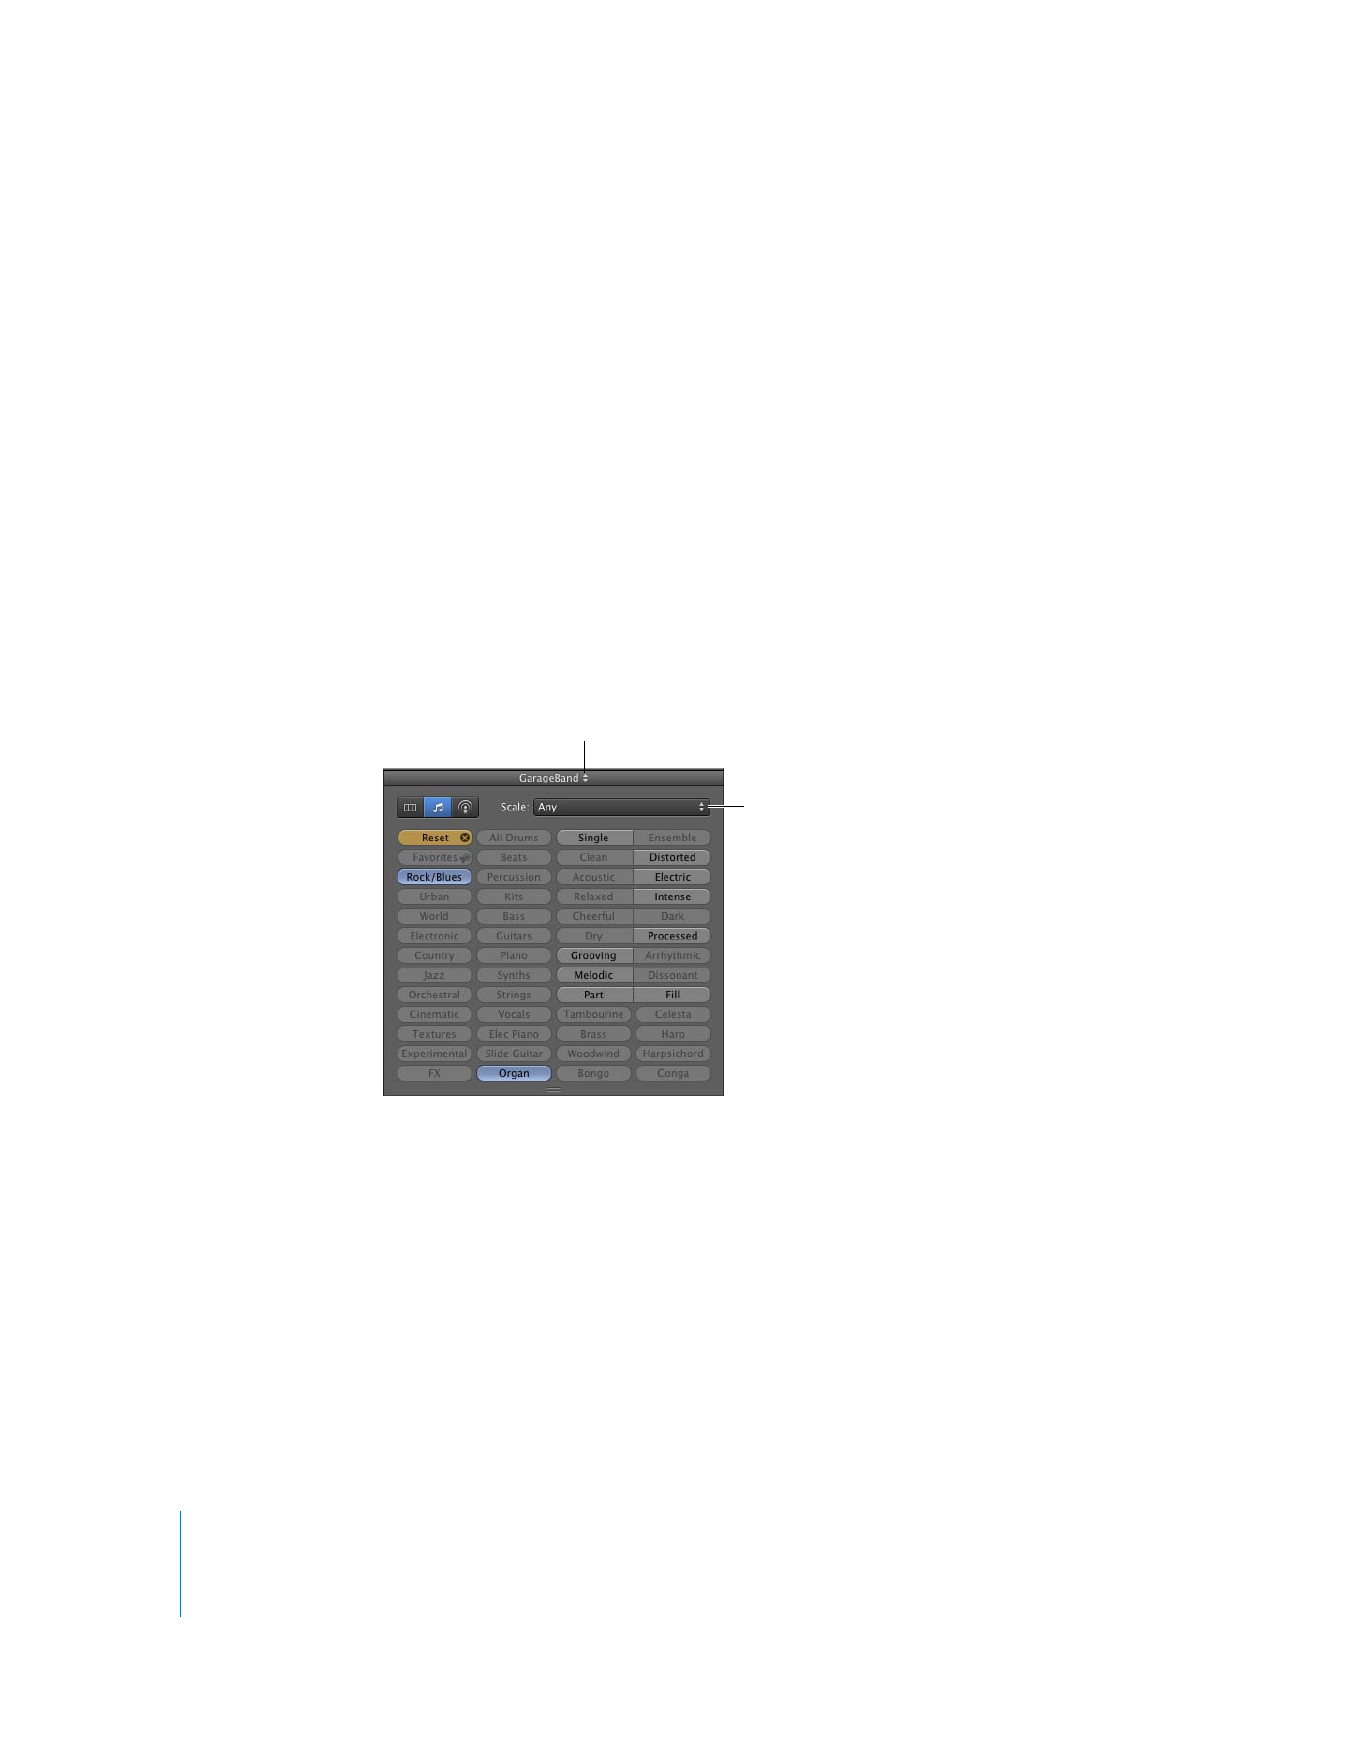
Searching by Scale Type
Most loops other than drum loops are recorded using a particular musical scale. In
most cases, when you arrange several loops so that they play together, you’ll want to
use loops with the same scale type. You can narrow the loops shown in the results list
to those using either the major or minor scale, those using neither scale, or those that
are good for both.
Click here to show the
loop library pop-up menu.
Choose a scale type
from this menu.

Chapter 7
Tutorial 5: Adding Apple Loops
77
To display only loops of a particular scale type:
m
Choose the scale type from the Scale pop-up menu.
Try refining the bass loops you found earlier to show only those using the major scale.
Limiting Searches to Nearby Keys
Loops with melody and harmony instruments are recorded in a specific musical key.
When you add a loop to a project, GarageBand matches the loop’s key with the key of
the project. The closer the loop’s original key is to the key of the project, the more
natural the loop sounds when transposed to the project key. When a loop is transposed
by a large number of semitones, the result can sometimes sound unnatural or
distorted.
To view loops only in keys near the project key:
1
Choose GarageBand > Preferences, then click Loops.
2
In the Loops pane, click the “Filter for more relevant results” checkbox.
Note: The “Filter for more relevant results” checkbox is selected by default. To see loops
in keys farther away from the project’s key, deselect the checkbox.
You can use several methods together to find specific loops. For instance, you can use
keywords with the Scale pop-up menu, or with the search field, to find only bass loops
using the major scale, or to find only percussion loops with “latin” in the file name.
Marking Loops as Favorites
You can mark loops you want to use frequently as favorites, and quickly access your
favorites in the loop browser.
To mark a loop as a favorite:
m
In the results list, click the checkbox for the loop in the Fav (short for Favorites) column.
You may need to scroll the results list to see the Fav column.
To view your favorites:
m
In either button view or column view, click Favorites.
Your favorites appear in the results list.

78
Chapter 7
Tutorial 5: Adding Apple Loops
Adding Loops to the Timeline
When you find a loop you want to use, you add it to the project by dragging it to the
timeline.
To add a loop to the timeline:
m
Drag the loop from the loop browser to an empty part of the timeline where there is
no track. A new track of the appropriate type is created, and the loop is added to the
new track.
There are two types of Apple Loops, like the two kinds of tracks: Real Instrument loops
and Software Instrument loops. Real Instrument loops are audio recordings, and
Software Instrument loops contain information about notes you play, but are “rendered”
by your Mac in real time. In the loop browser, Real Instrument loops have a blue icon in
the loop browser with an audio waveform and Software Instrument loops have a green
icon with a musical note.
Note: You can also drag a loop to a track of the same type (Real Instrument or Software
Instrument) to add it to the timeline. If you drag a Software Instrument loop to a
Software Instrument track, a dialog appears, asking which instrument you want to use.
You can also convert a Software Instrument loop to a Real Instrument loop when you
drag it to the timeline. Real Instrument loops require less processing power for
playback, which can allow you to use more tracks and effects in your project, especially
for projects with many loops.
To convert a Software Instrument loop to a Real Instrument loop:
m
Option-drag the loop from the loop browser to the timeline.
By default, Option-dragging a Software Instrument loop converts it to a Real
Instrument loop. You can change the default behavior so that dragging a Software
Instrument loop converts it to a Real Instrument loop, and Option-dragging does not
convert it.
To change the default behavior for converting Software Instrument loops:
1
Choose GarageBand > Preferences.
2
Click Loops.
3
In the Loops pane, select the “Convert to Real Instrument” checkbox.
Drag a loop to an empty
part of the timeline to create
a new track for the loop.

Chapter 7
Tutorial 5: Adding Apple Loops
79
When you add a loop to a project, a region is created in the timeline for the loop.
Regions appear as colored rectangular areas in the tracks of a project. The edits you
make to the region do not change the original loop, so you can always return to the
original sound of the loop or use it in another project.
Now try adding some of the drum and bass loops you found earlier to the timeline.
Changing Apple Loops in the Same Family
Some Apple Loops belong to a series, or family. Loops that belong to the same family
have the same name, but with a unique number at the end. (For example, Classic Rock
Guitar 01 and Classic Rock Guitar 02 belong to the same family.) When you add a loop
belonging to a family to the timeline, the loop has a pair of arrows in its upper-left
corner. You can change it to any other loop in the same family.
To change an Apple Loop to another loop in the same family:
1
Click the arrows in the upper-left corner of the loop.
A menu appears, showing all the loops in the same family.
2
Choose a loop from the menu.
Adding Loops to the Loop Library
When you install GarageBand, the loops included with the application are installed in
the Apple Loops library. When you add more loops to your collection, they are installed
in the loop library and appear in the loop browser for you to use.
To add Apple Loops to your loop library:
m
Drag the loops, or the folder containing the loops, over the loop browser. The loops are
added to the Apple Loops library and are immediately available to use in your projects.
If you add loops located on a different hard disk or partition, a dialog appears asking
whether you want to copy them to the loop library, or index them in their current
location. If you add loops from the desktop, a dialog asks if you want to move them or
index them in their current location.
If you add loops located on a CD or DVD, GarageBand copies them to the loop library.

80
Chapter 7
Tutorial 5: Adding Apple Loops
Creating Your Own Apple Loops
You can save your recordings as Apple Loops. When you save a region as an Apple
Loop, it is added to the loop library and appears in the loop browser, so you can use it
in other projects. Apple Loops you create from recorded regions match the tempo and
key of the project, just like the Apple Loops included with GarageBand.
To save a region as an Apple Loop:
1
Select the region in the timeline.
2
Choose Edit > Add To Loop Library, or drag the region over the loop browser.
3
In the Add Loop dialog, type a name for the loop.
4
Choose the scale and genre from the pop-up menus.
5
Choose an instrument category and instrument name from the list.
6
Click the appropriate mood buttons for easy searching.
7
Click Create.

8
81
8