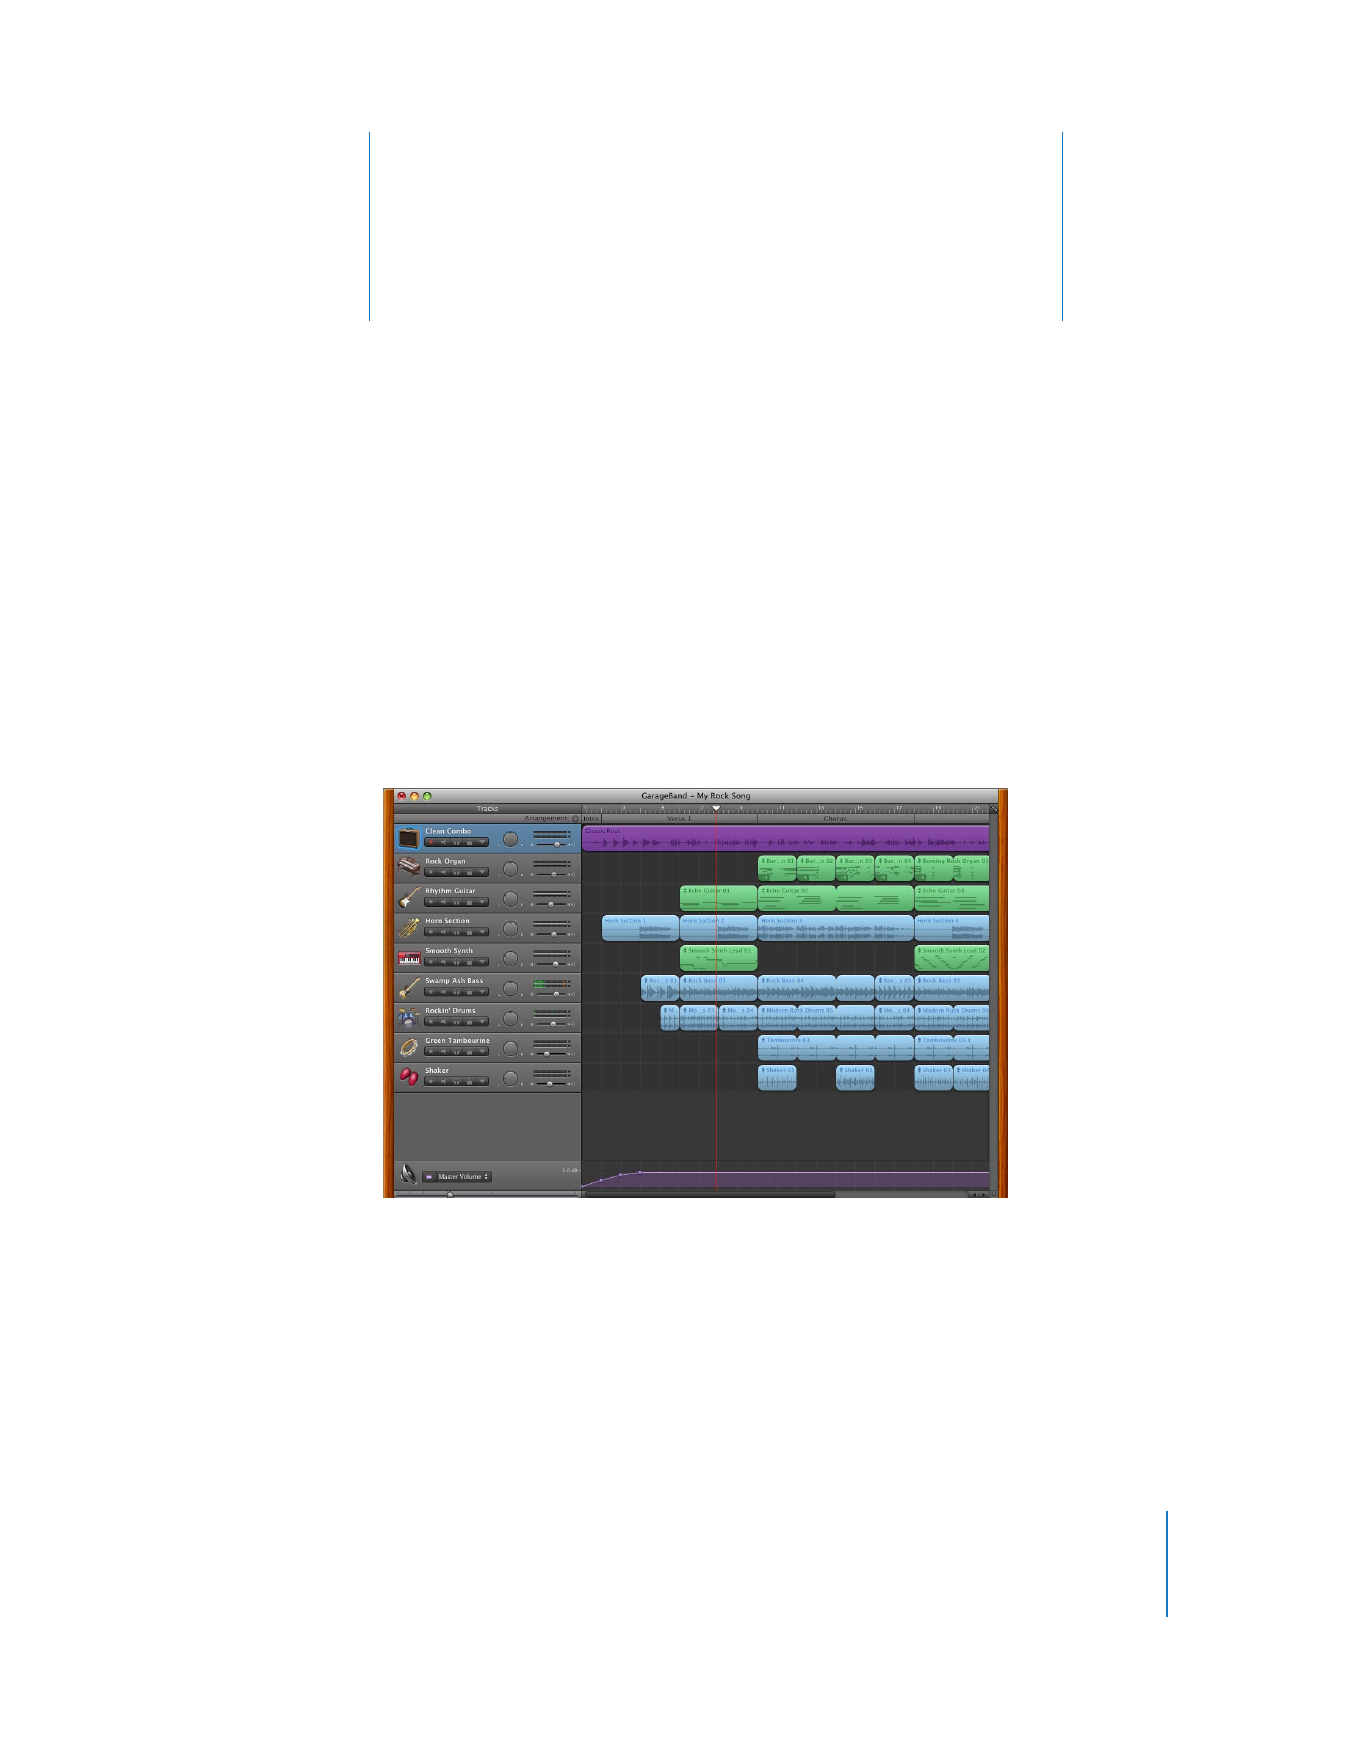
GarageBand at a Glance
This chapter gives you a tour of the GarageBand window.
You’ll learn the names and locations of controls, as well as
their functions.
It’s a good idea to take a look at these pages even if you don’t plan to complete the
tutorials, because knowing the names and functions of the GarageBand controls will
make it easier to find answers to your questions in GarageBand Help. You may find the
descriptions here are enough to get you started working on your own projects.
The GarageBand window includes the timeline, the loop browser, the editor, and the
Track Info pane. You record instruments, arrange regions, and mix your projects in the
timeline; search for loops in the loop browser; and change instruments and effects in
the Track Info pane.
10
Chapter 2
GarageBand at a Glance
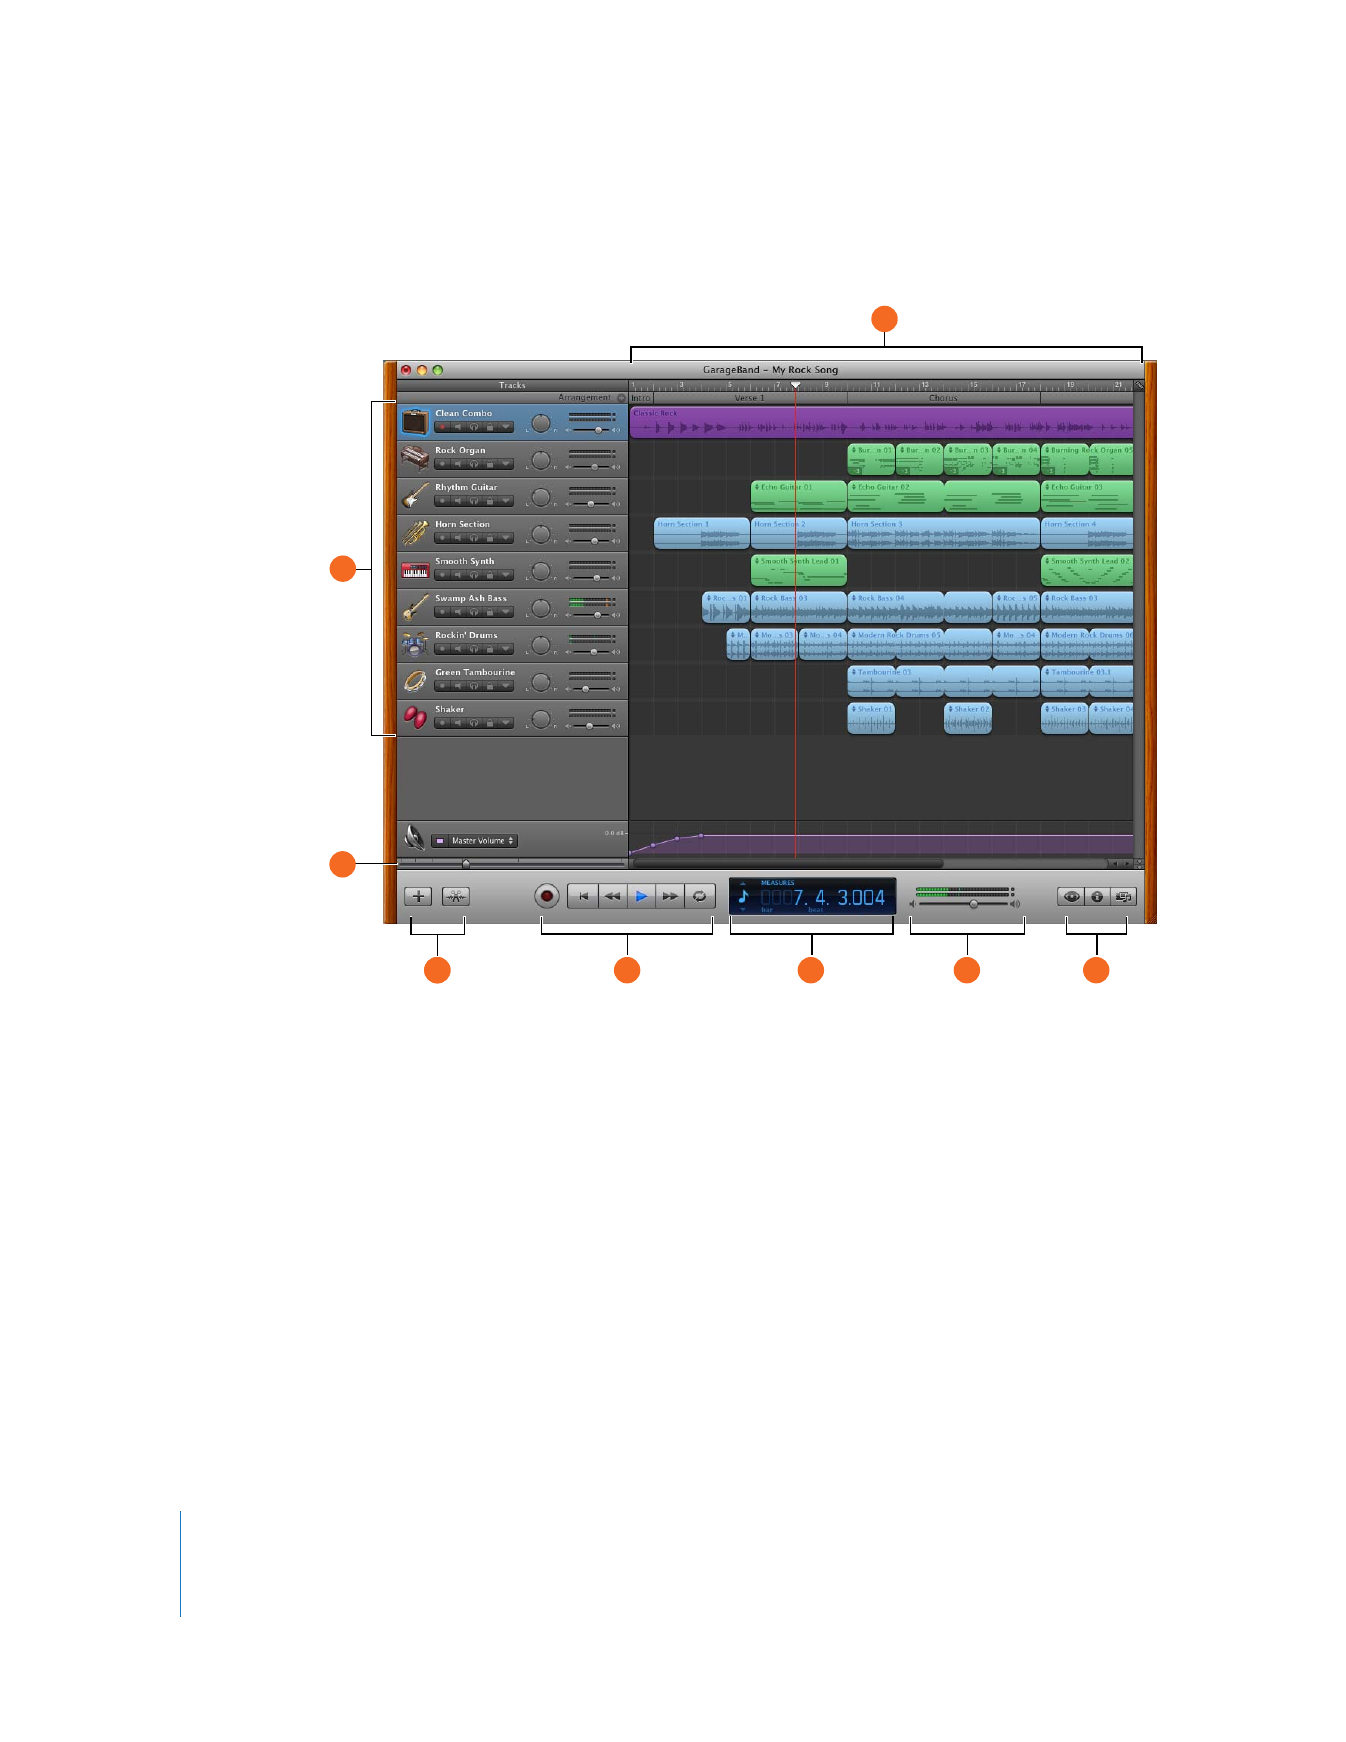
GarageBand Window
H
G
F
E
C
F
D
B
A

Chapter 2
GarageBand at a Glance
11
A
Timeline: Contains the tracks where you record instruments, add loops, and arrange regions.
Also includes the beat ruler, which you use to move the playhead and align items in the timeline.
See “Timeline” on page 12 for a description of the features and controls of the timeline.
B
Track
headers:
The instrument icon and name are shown at the left of each track’s header.
Click the track name to type a new name.
Click the Record Enable button (the red circle) to turn on the track for recording.
Click the Mute button (the speaker icon) to silence the track.
Click the Solo button (the headphone icon) to hear the track by itself.
Click the Lock Track button (the padlock icon) to lock the track.
Click the triangle to show the track’s automation curves.
Drag the pan dial to adjust the pan position of the track (the left-to-right placement in the
stereo field).
Drag the volume slider to adjust the track’s volume. Watch the level meter to see the track’s
volume level as you record and play.
C
Zoom
slider:
Drag the zoom slider to zoom in for a closer view of part of the timeline, or to
zoom out to see more of the timeline.
D
Add Track and Editor buttons: Click the Add Track button to add a track below the existing
tracks in the timeline. Click the Editor button to show or hide the editor.
E
Transport controls: Click the Record button to start recording.
Click the Play button to start or stop playback of the project.
Click the Go To Beginning, Rewind, or Fast Forward buttons to move the playhead to different
parts of the project.
Click the Cycle button to turn the cycle region on or off.
F
LCD:
The LCD has five modes: Time, Measures, Chord, Tuner, and Project. Click the icon at the left
side of the LCD and choose a different mode.
In Time mode, the LCD shows the playhead’s position in absolute time (hours, minutes, seconds,
fractions). Drag or double-click the numerals to move the playhead.
In Measures mode, the LCD shows the playhead’s position in musical time (measures, beats,
ticks). Drag or double-click the numerals to move the playhead.
In Chord mode, you can see chord symbols when you play any Software Instrument.
In Tuner mode, you can tune a guitar in either an Electric Guitar or Real Instrument track.
In Project mode, you can choose a different key and time signature for the project, and change
the project tempo.
G
Master volume slider and level meter: Drag the volume slider to adjust the project’s master
volume level. Watch the level meter to see if clipping is occurring before you export a project.
H
Loop Browser, Track Info, and Media Browser buttons: Click the Loop Browser button to open
the loop browser.
Click the Track Info button (with the “i”) to open the Track Info pane.
Click the Media Browser button to open the Media Browser.
12
Chapter 2
GarageBand at a Glance
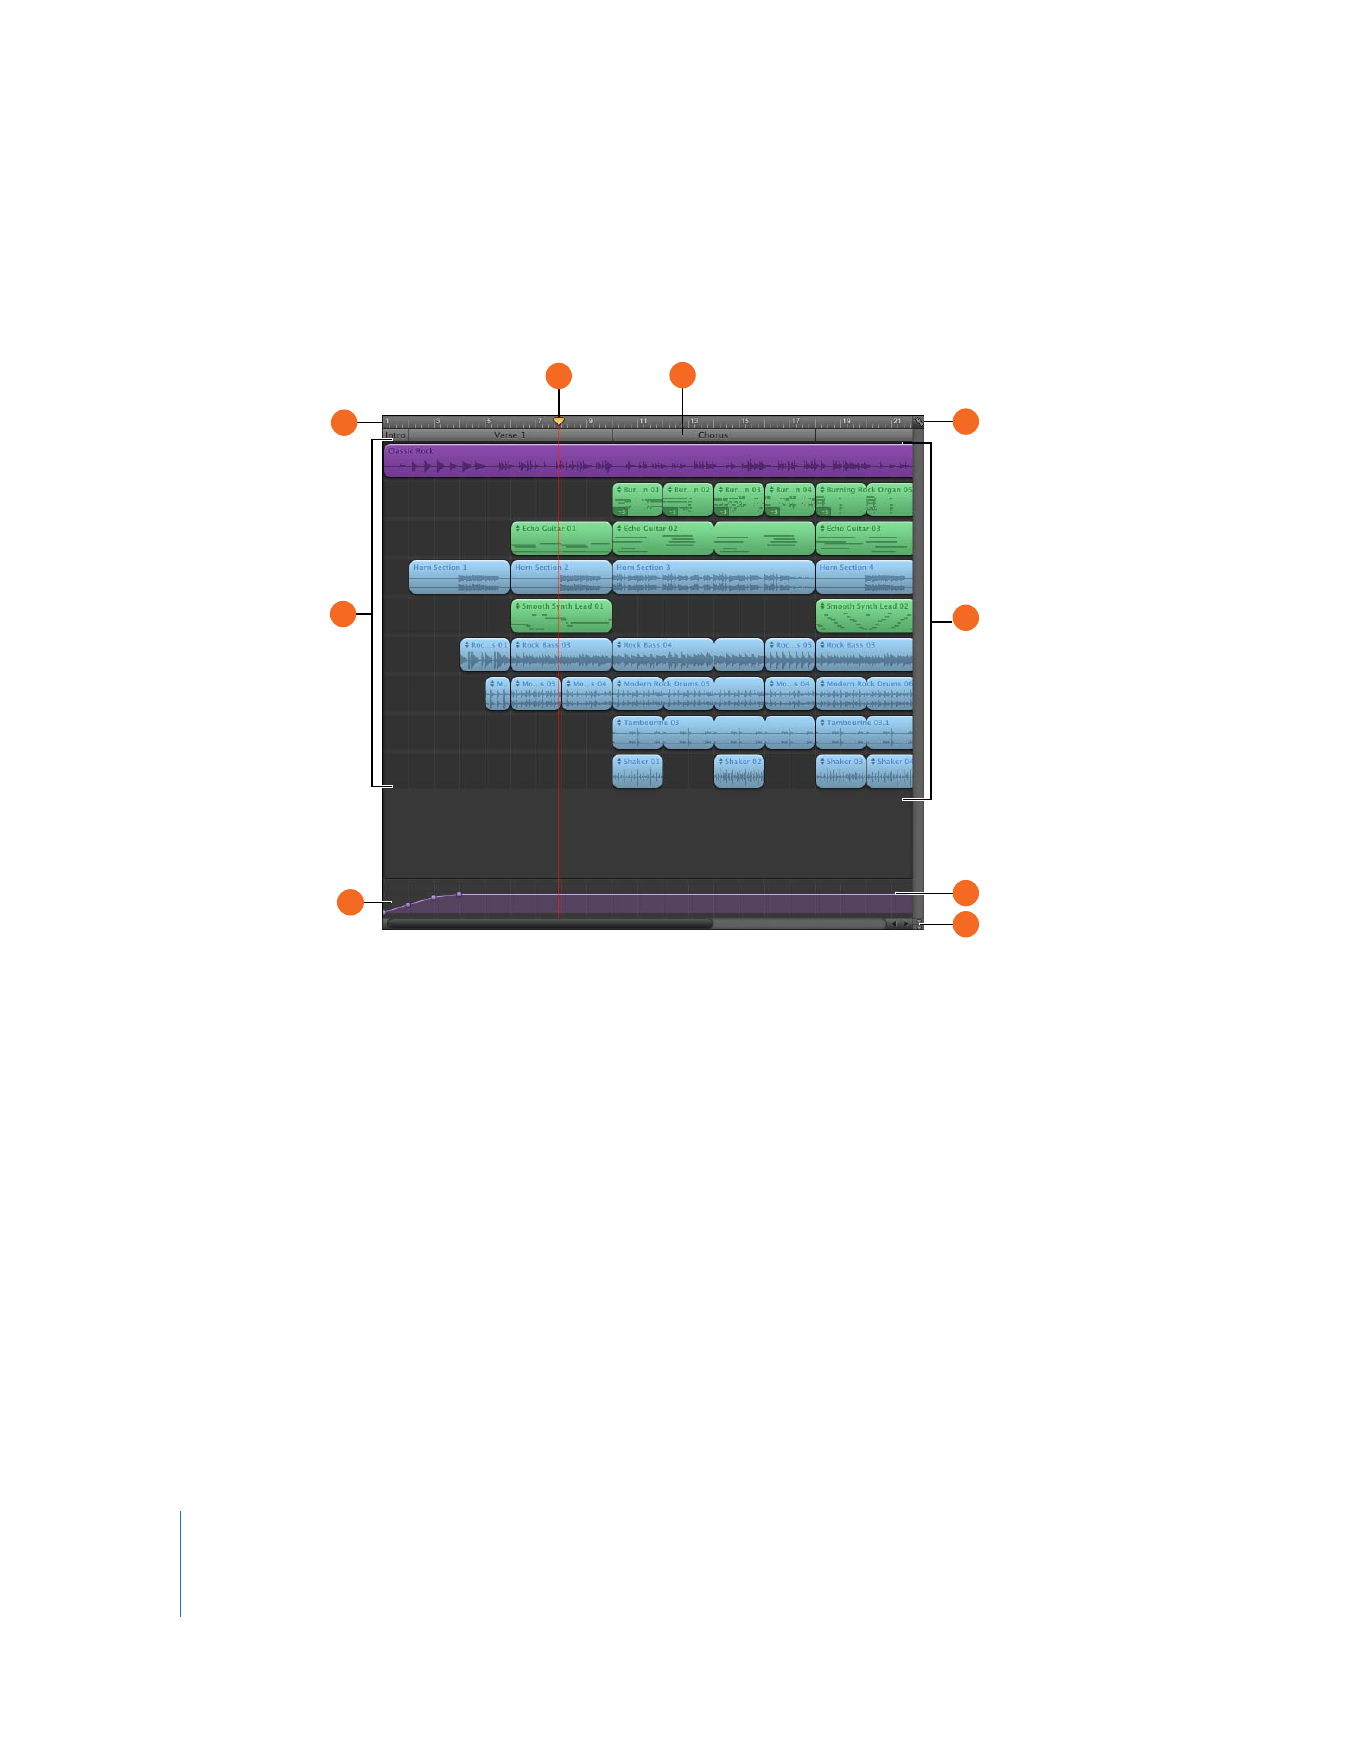
Timeline
The timeline contains the tracks where you record instruments, add loops, and arrange
regions to build your song arrangement.
A
D
F
G
E
B
H
I
C

Chapter 2
GarageBand at a Glance
13
A
Beat ruler: Shows the units of time (either beats and measures or minutes and seconds) in the
timeline. You can click the beat ruler to move the playhead to any point in the timeline.
B
Tracks: You record and arrange your music in the tracks in the timeline. You can add tracks and
change the instrument and effects for each track.
C
Master track: You can use the automation curves in the master track to add a fade-in or
fade-out, change the tempo, or transpose parts of the project to a different key.
D
Playhead: Shows the point in the project that is currently playing, or where playback starts
when you click the Play button. You can move the playhead to change what part of the project is
playing. Cut and copied items are pasted at the playhead position.
E
Arrange track: You can add arrange regions to the arrange track to define different sections of a
project (such as intro, verse, and chorus), then copy and move the arrange regions to quickly
rearrange your project.
F
Grid button: Choose a note value for the timeline grid, or choose Automatic to have the value
change when you zoom in or out.
G
Regions: Your recordings and the loops you add to your project appear as regions in the
timeline. You can copy and paste regions, loop and resize them, move and transpose them, and
make other changes to build the arrangement of your music.
H
Automation curve: Add automation curves for volume, pan, and other parameters to a track,
including the master track, then add and adjust control points on each curve to automate
mixing and other parameters.
I
Playhead Lock button: Click to unlock the playheads in the timeline and the editor, so that they
can show different parts of the project.
14
Chapter 2
GarageBand at a Glance
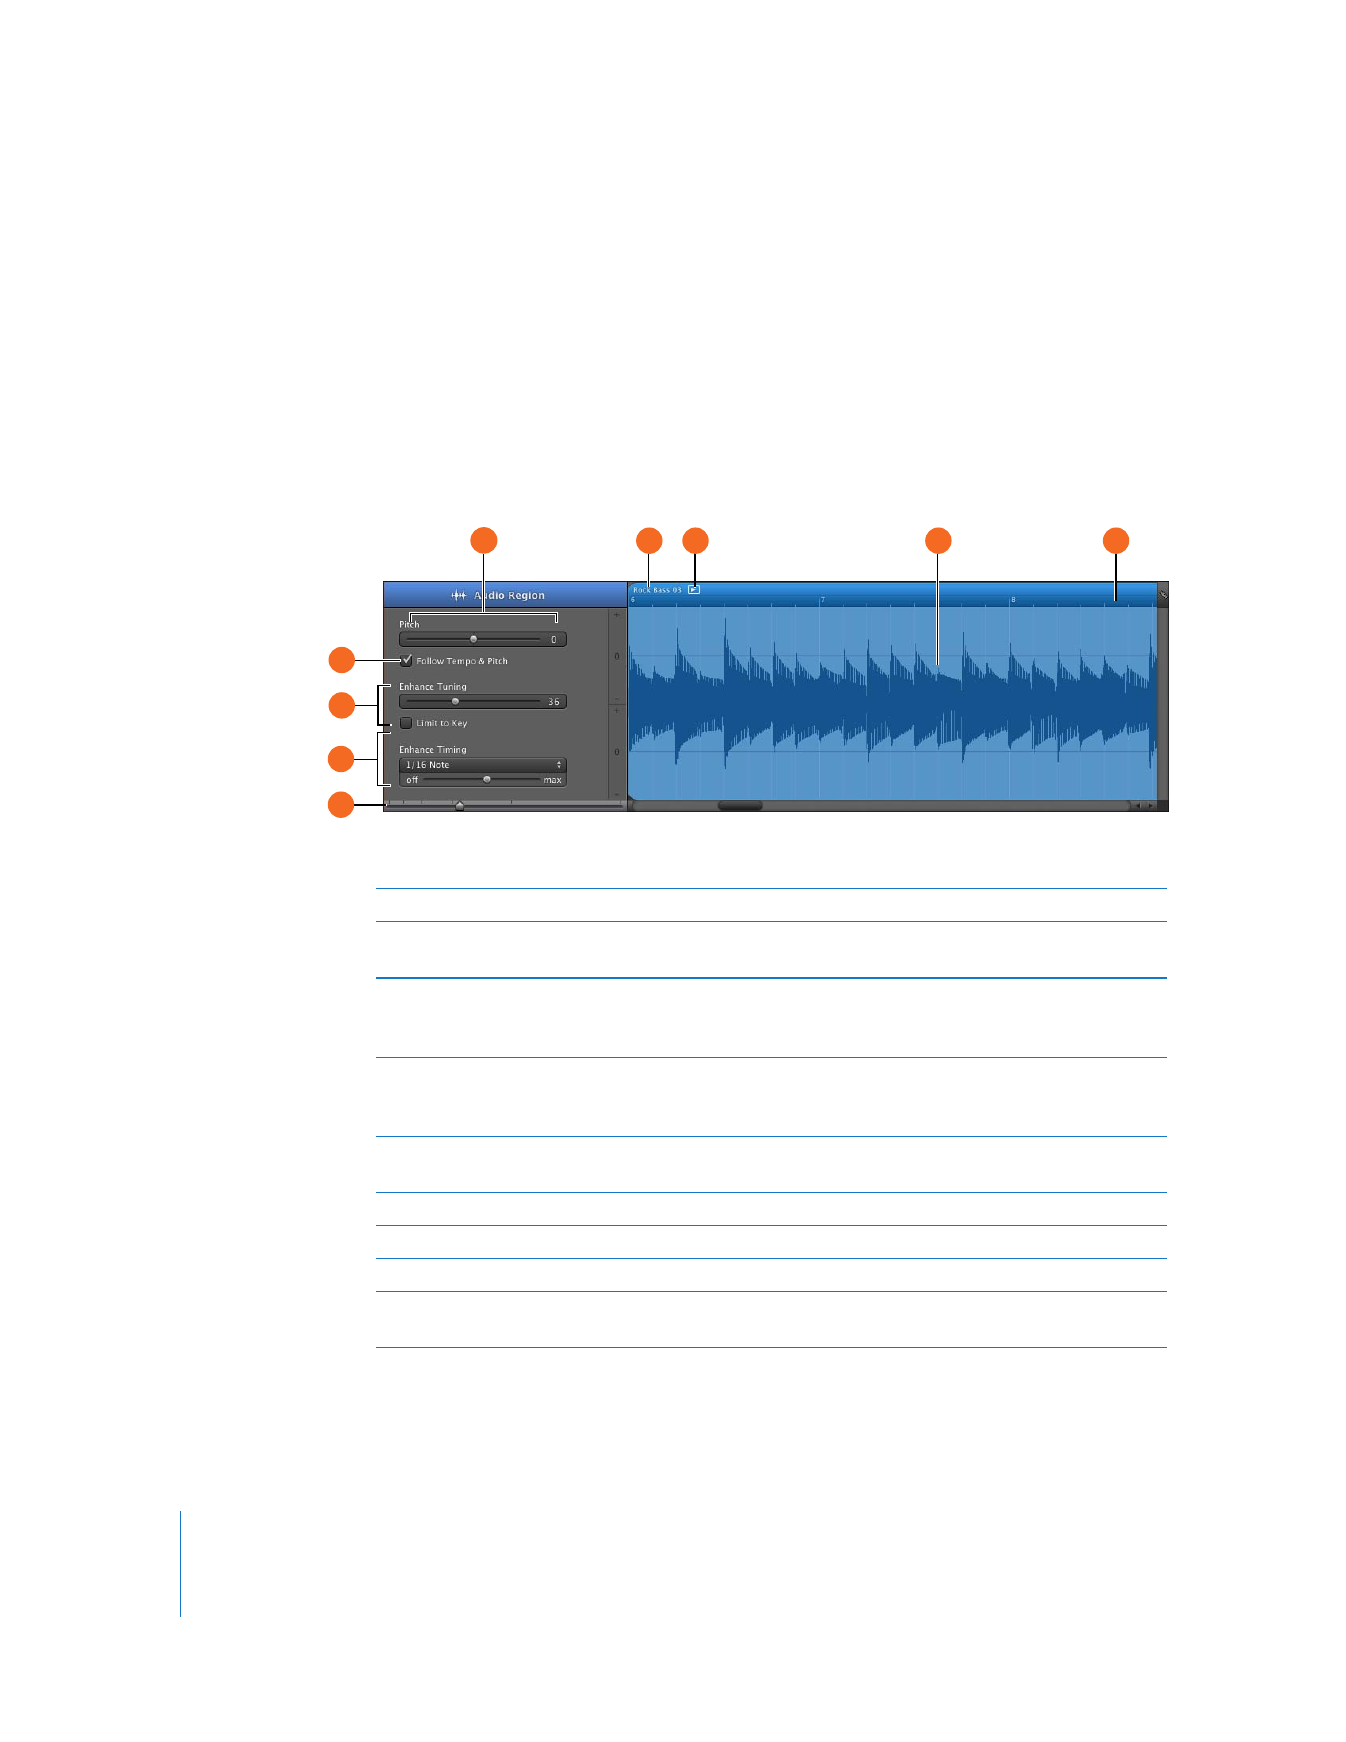
Editor
The editor is like a microscope showing a close-up view of the regions in a track.
You can edit Real Instrument and Software Instrument regions in the editor.
For Real Instrument Tracks
When you select a Real Instrument track (with a blue header), the editor shows the
waveform of the regions in the track. You can crop, join, move, transpose, and rename
regions in the editor.
B
E
C
D
A
F
G
I
H
A
Pitch slider: Drag the slider to transpose the selected region up or down by up to 12 semitones.
B
Follow Tempo & Pitch checkbox: Select to have the selected region follow the project tempo
and key. The checkbox is visible only when a region on the track is selected.
C
Enhance Tuning slider and checkbox: Drag right to increase the amount of tuning
enhancement, or drag left to lower the amount. The “Limit to Key” checkbox limits tuning
enhancement to notes in the project key.
D
Enhance Timing slider and pop-up menu: Drag right to increase the amount of timing
enhancement, or drag left to lower the amount. Choose the note value to use as the basis for
timing enhancement from the pop-up menu.
E
Zoom slider: Drag to zoom in for a closer view or to zoom out to see more of the track or
selected region. Zooming in the editor is independent of the timeline.
F
Region name field: Double-click the region name and type a new name.
G
Play region button: Click to play the selected region.
H
Waveform display: Shows the waveform of the regions in the track.
I
Beat ruler: Shows beats and measures for the area visible in the editor. Click the Grid button to
choose the note value for the beat ruler in the editor.
Chapter 2
GarageBand at a Glance
15
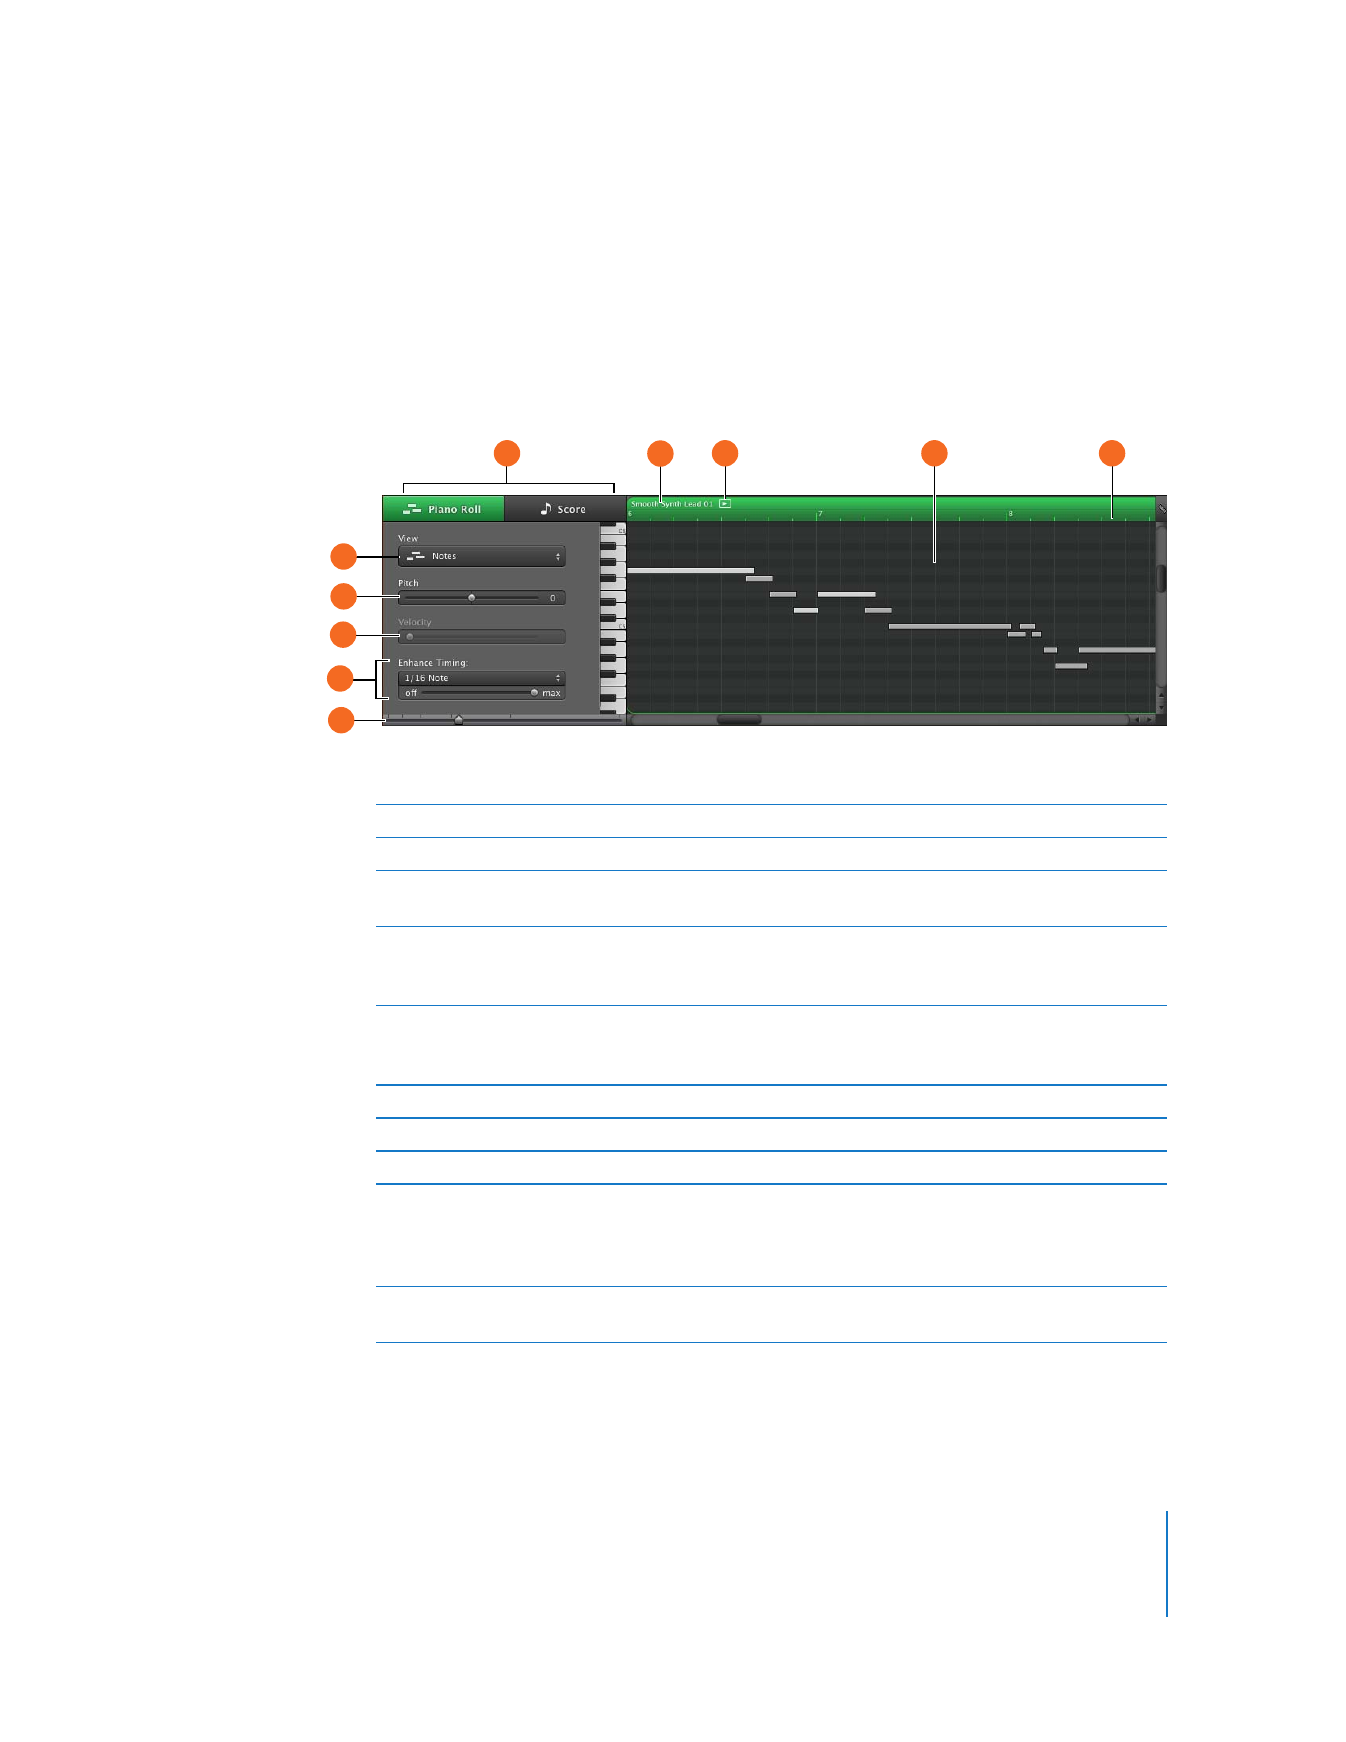
For Software Instrument Tracks–Piano Roll View
When you select a Software Instrument track (with a green header), the editor shows a
graphic “piano roll” display of the track or selected region. You can edit individual notes
in Software Instrument regions, fix the timing of notes, and transpose and rename
regions. You can also show and edit controller data for pitch bend, a modulation wheel,
or a sustain pedal, recorded when you play your music keyboard.
A
G
H
I
J
B
C
D
F
E
A
Piano Roll/Score buttons: Click to change the editor to piano roll (graphic) view or score view.
B
View pop-up menu: Choose whether to show notes or controller data in the editor.
C
Pitch slider: Drag the slider to transpose the selected Software Instrument region up or down
by up to 36 semitones. The Pitch slider is available only when a region on the track is selected.
D
Velocity slider: Drag the slider to change the velocity of selected notes. A note’s velocity reflects
how hard the key is pressed when you play the note. The Velocity slider is available only when a
region on the track is selected.
E
Enhance Timing slider and pop-up menu: Drag right to increase the amount of timing
enhancement, or drag left to lower the amount. Choose the note value to use as the basis for
timing enhancement from the pop-up menu.
F
Zoom slider: Drag to zoom in for a closer view or to zoom out to see more of the track.
G
Region name field: Double-click the region name and type a new name.
H
Play region button: Click to play the selected region.
I
Notes/controller data display: Shows the individual notes of Software Instrument regions in a
graphic format. You can move and resize notes to adjust their pitch, where they start playing,
and how long they play. To see controller data instead of notes, choose the controller you want
to see in the View pop-up menu.
J
Beat ruler: Shows beats and measures for the area visible in the editor. Click the Grid button to
choose the note value for the beat ruler in the editor.
16
Chapter 2
GarageBand at a Glance
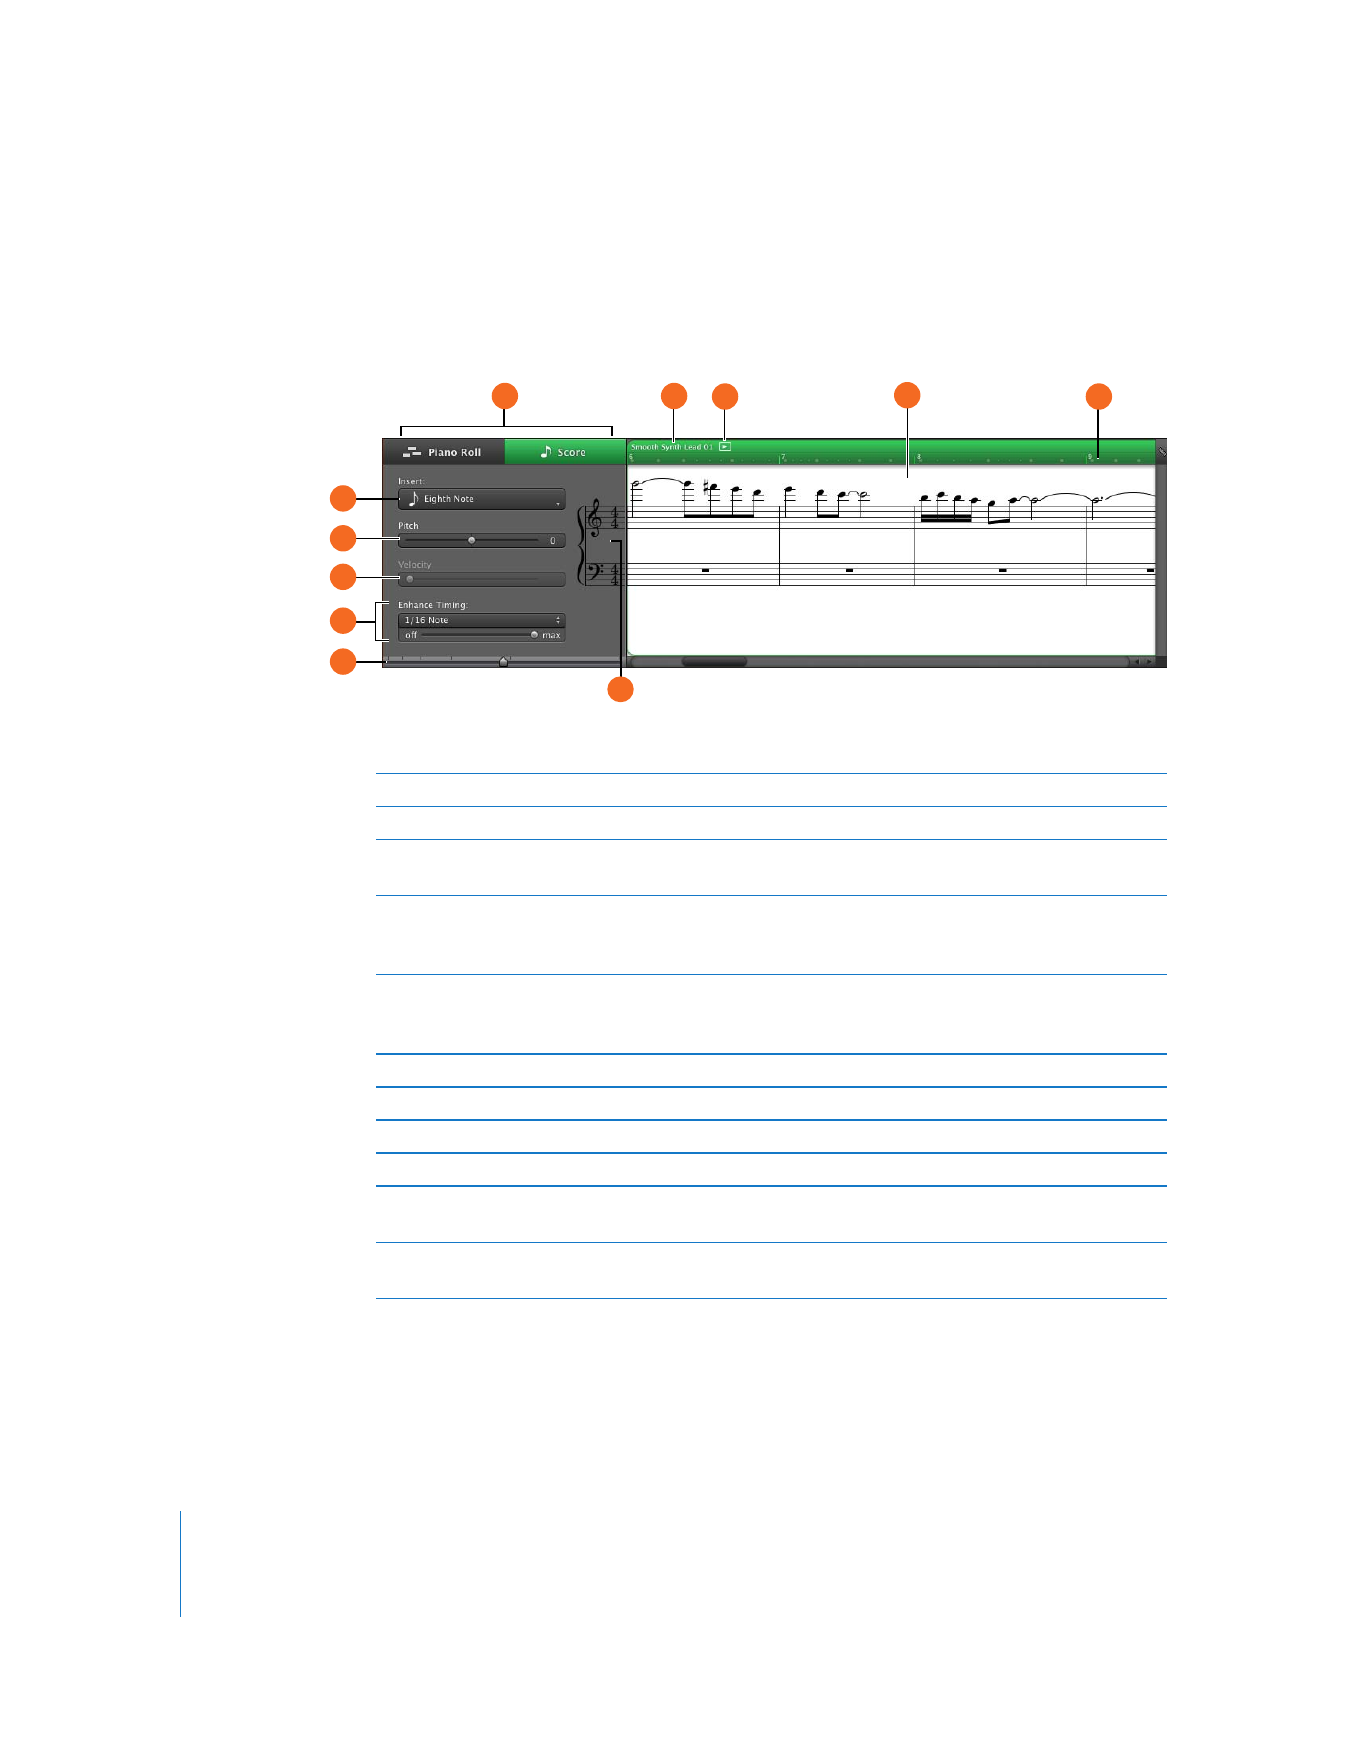
For Software Instrument Tracks–Score View
You can also view Software Instrument tracks and regions in score view. In score view,
notes and other musical events are shown in standard music notation. You can edit
notes, note velocity, and pedal markings in score view.
G
A
H
I
F
E
D
C
B
J
K
A
Piano Roll/Score buttons: Click to change the editor to piano roll (graphic) view or score view.
B
View pop-up menu: Choose whether to show notes or controller data in the editor.
C
Pitch slider: Drag the slider to transpose the selected Software Instrument region up or down
by up to 36 semitones. The Pitch slider is available only when a region on the track is selected.
D
Velocity slider: Drag the slider to change the velocity of selected notes. A note’s velocity reflects
how hard the key is pressed when you play the note. The Velocity slider is available only when a
region on the track is selected.
E
Enhance Timing slider and pop-up menu: Drag right to increase the amount of timing
enhancement, or drag left to lower the amount. Choose the note value to use as the basis for
timing enhancement from the pop-up menu.
F
Zoom slider: Drag to zoom in for a closer view or to zoom out to see more of the track.
G
Clef pop-up menu: Choose a different clef for the score display.
H
Region name field: Double-click the region name and type a new name.
I
Play region button: Click to play the selected region.
J
Notation display: Shows notes and other events in standard music notation. You can move
notes to adjust their pitch and where they start playing, and change how long they play.
K
Beat ruler: Shows beats and measures for the area visible in the editor. Click the Grid button to
choose the note value for the beat ruler in the editor.
Chapter 2
GarageBand at a Glance
17
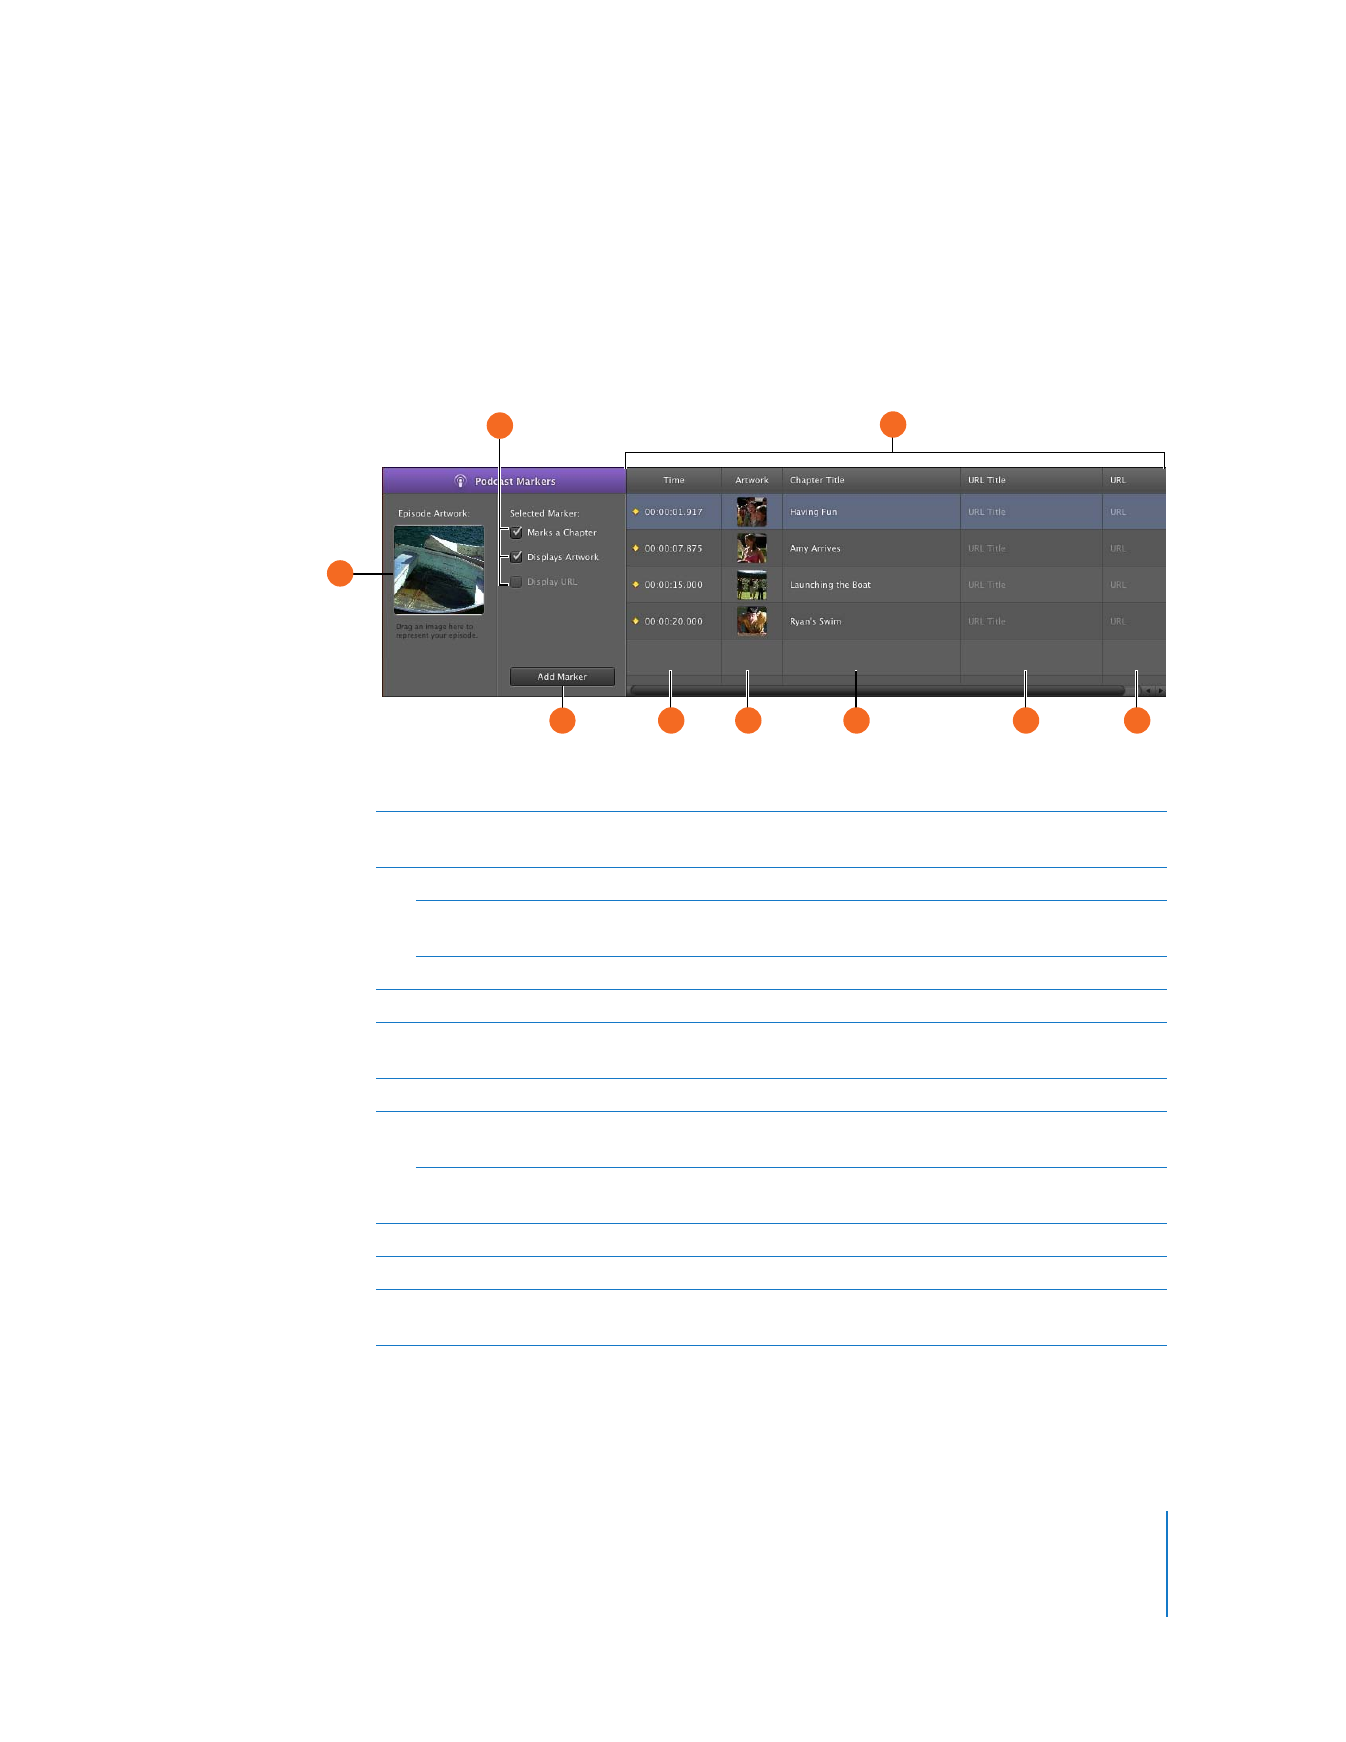
For Podcast and Movie Projects–Marker View
When you’re working on a podcast episode, you can view and edit markers in
the editor. In the marker list you can edit each marker’s time position, marker
region artwork, URL, URL title, and chapter title. You can also add episode artwork
in the editor.
D
B
A
C
E
F
G
H
I
A
Episode Artwork well: Drag artwork here to represent the podcast.
(Appears only when you are creating a podcast.)
B
“Marks a Chapter” checkbox: Shows whether the selected marker marks a chapter.
Displays Artwork checkbox: Shows whether the selected marker contains marker region
artwork. (Appears only when you are creating an audio podcast.)
Display URL checkbox: Shows whether the selected marker has a URL.
C
Add Marker button: Add a marker at the playhead position.
D
Marker list: Shows each marker’s start time, artwork (for podcasts) or video frame (for videos),
chapter title, URL, and URL title.
E
Time column: Shows the start time for each marker.
F
Artwork column: Shows the artwork for each marker region. Add artwork by dragging image
files from the Media Browser. (Appears only when you are creating an audio podcast.)
Still Frame column: Shows the video frame at the position of each marker.
(Appears only when you are working with a movie or video file.)
G
Chapter
Title
column:
Shows the title of each chapter marker. Click and type a title for a marker.
H
URL Title column: Shows the title of each marker region’s URL. Click and type a title for the URL.
I
URL column: Shows the URL for each marker region. Type a URL for the website for which you
want to show a link.
18
Chapter 2
GarageBand at a Glance
Loop Browser
Using the loop browser, you can quickly search for loops to add to your projects. You
can find loops using keywords for an instrument, musical genre, or mood. You can also
perform text searches and refine your results in several ways. The loop browser shows
the tempo, key, and number of beats for each matching loop. You can preview loops in
the loop browser before you add them to a project, and add more loops to
GarageBand by dragging them onto the loop browser. The loop browser gives you
three ways to find loops: button view, column view, and podcast sounds view.
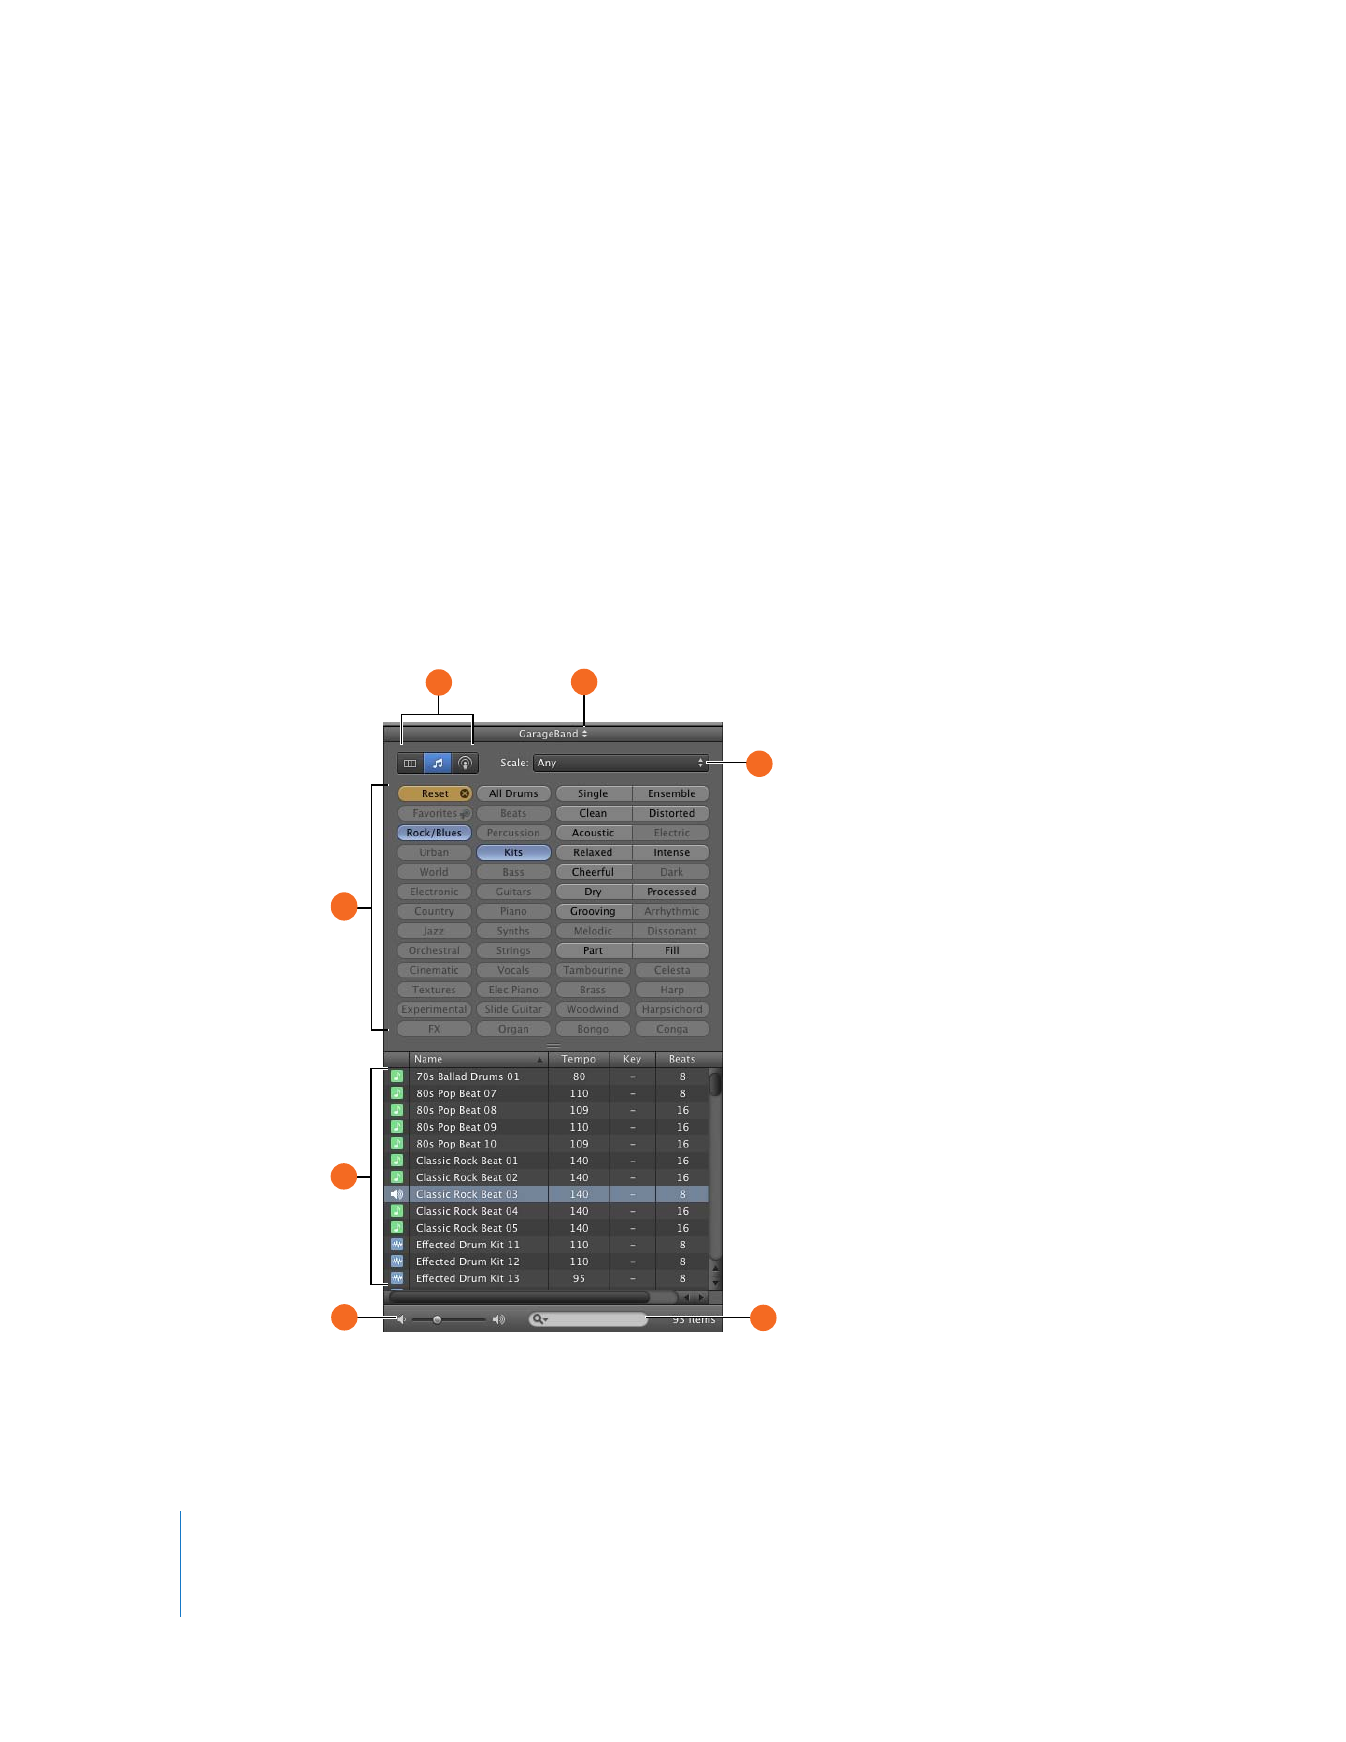
Button View
In button view, the loop browser contains a set of keyword buttons. Click a button to
show matching loops in the results list. Clicking multiple buttons narrows the results to
those loops that match all of the selected keywords.
C
E
C
A
B
D
G
F

Chapter 2
GarageBand at a Glance
19
A
View buttons: Click one of the buttons to show column view, button view, or podcast sounds
view.
B
Loop library pop-up menu: Choose the loops you want to show in the loop browser from the
pop-up menu.
C
Keyword buttons: Click a keyword button to display matching loops in the results list. You can
click multiple keyword buttons to narrow your results.
Reset button: Deselects all currently selected buttons, so you can start a new search.
D
Scale pop-up menu: Choose a scale type to see only loops using that musical scale.
E
Results list: Shows loops that match the selected keywords. Also displays the tempo, key, and
number of beats for each loop. Click a loop in the results list to preview it. Click the Favs
checkbox for a loop to add it to your favorites.
F
Preview volume slider: Drag the slider to adjust the volume of the loop being previewed.
G
Search field: Type text in the field to see loops with the text in their file name or path.
20
Chapter 2
GarageBand at a Glance
Column View
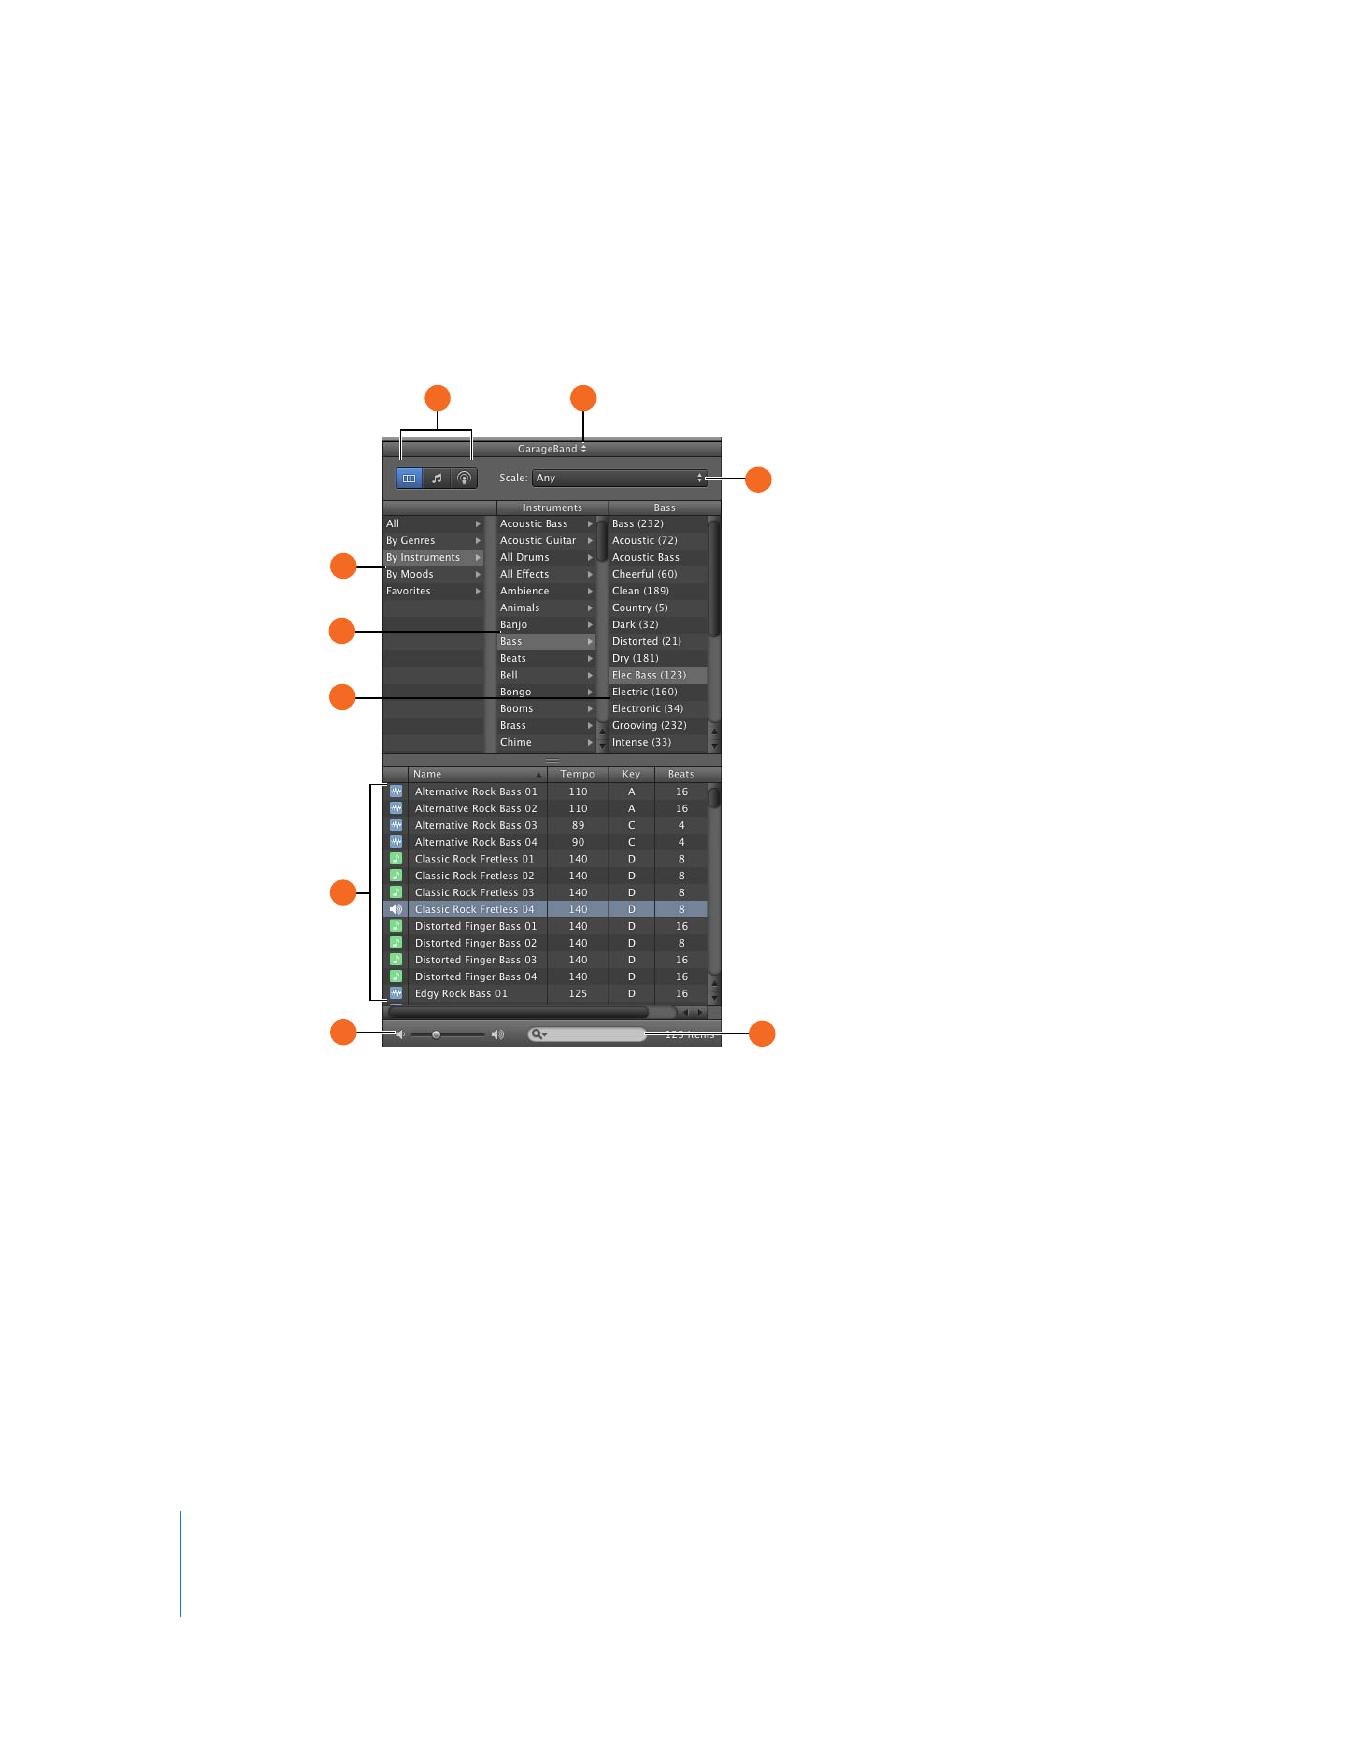
In column view, the loop browser features columns for keyword type, categories, and
keywords. Click a keyword type to show categories for that type, click a category to
show keywords, then click a keyword to show matching loops in the results list.
G
I
H
E
C
D
A
B
F

Chapter 2
GarageBand at a Glance
21
A
View buttons: Click one of the buttons to show column view, button view, or podcast sounds
view.
B
Loop library pop-up menu: Choose the loops you want to show in the loop browser from the
pop-up menu.
C
Keyword type column: Click a keyword type to show the categories for that keyword type in
the middle column.
D
Category column: Click a category to show keywords for that category in the right column.
E
Keyword column: Click a keyword to show matching loops in the results list.
F
Scale pop-up menu: Choose a scale type to see only loops using that scale.
G
Results list: Shows the loops that match the selected keywords. Also displays the tempo, key,
and number of beats for each loop. Click a loop in the results list to preview it. Click the Favs
checkbox for a loop to add it to your favorites.
H
Preview volume slider: Drag the slider to adjust the volume of the loop being previewed.
I
Search
field:
Type text in the field to see loops with the text in their file name or path.
22
Chapter 2
GarageBand at a Glance
Track Info Pane
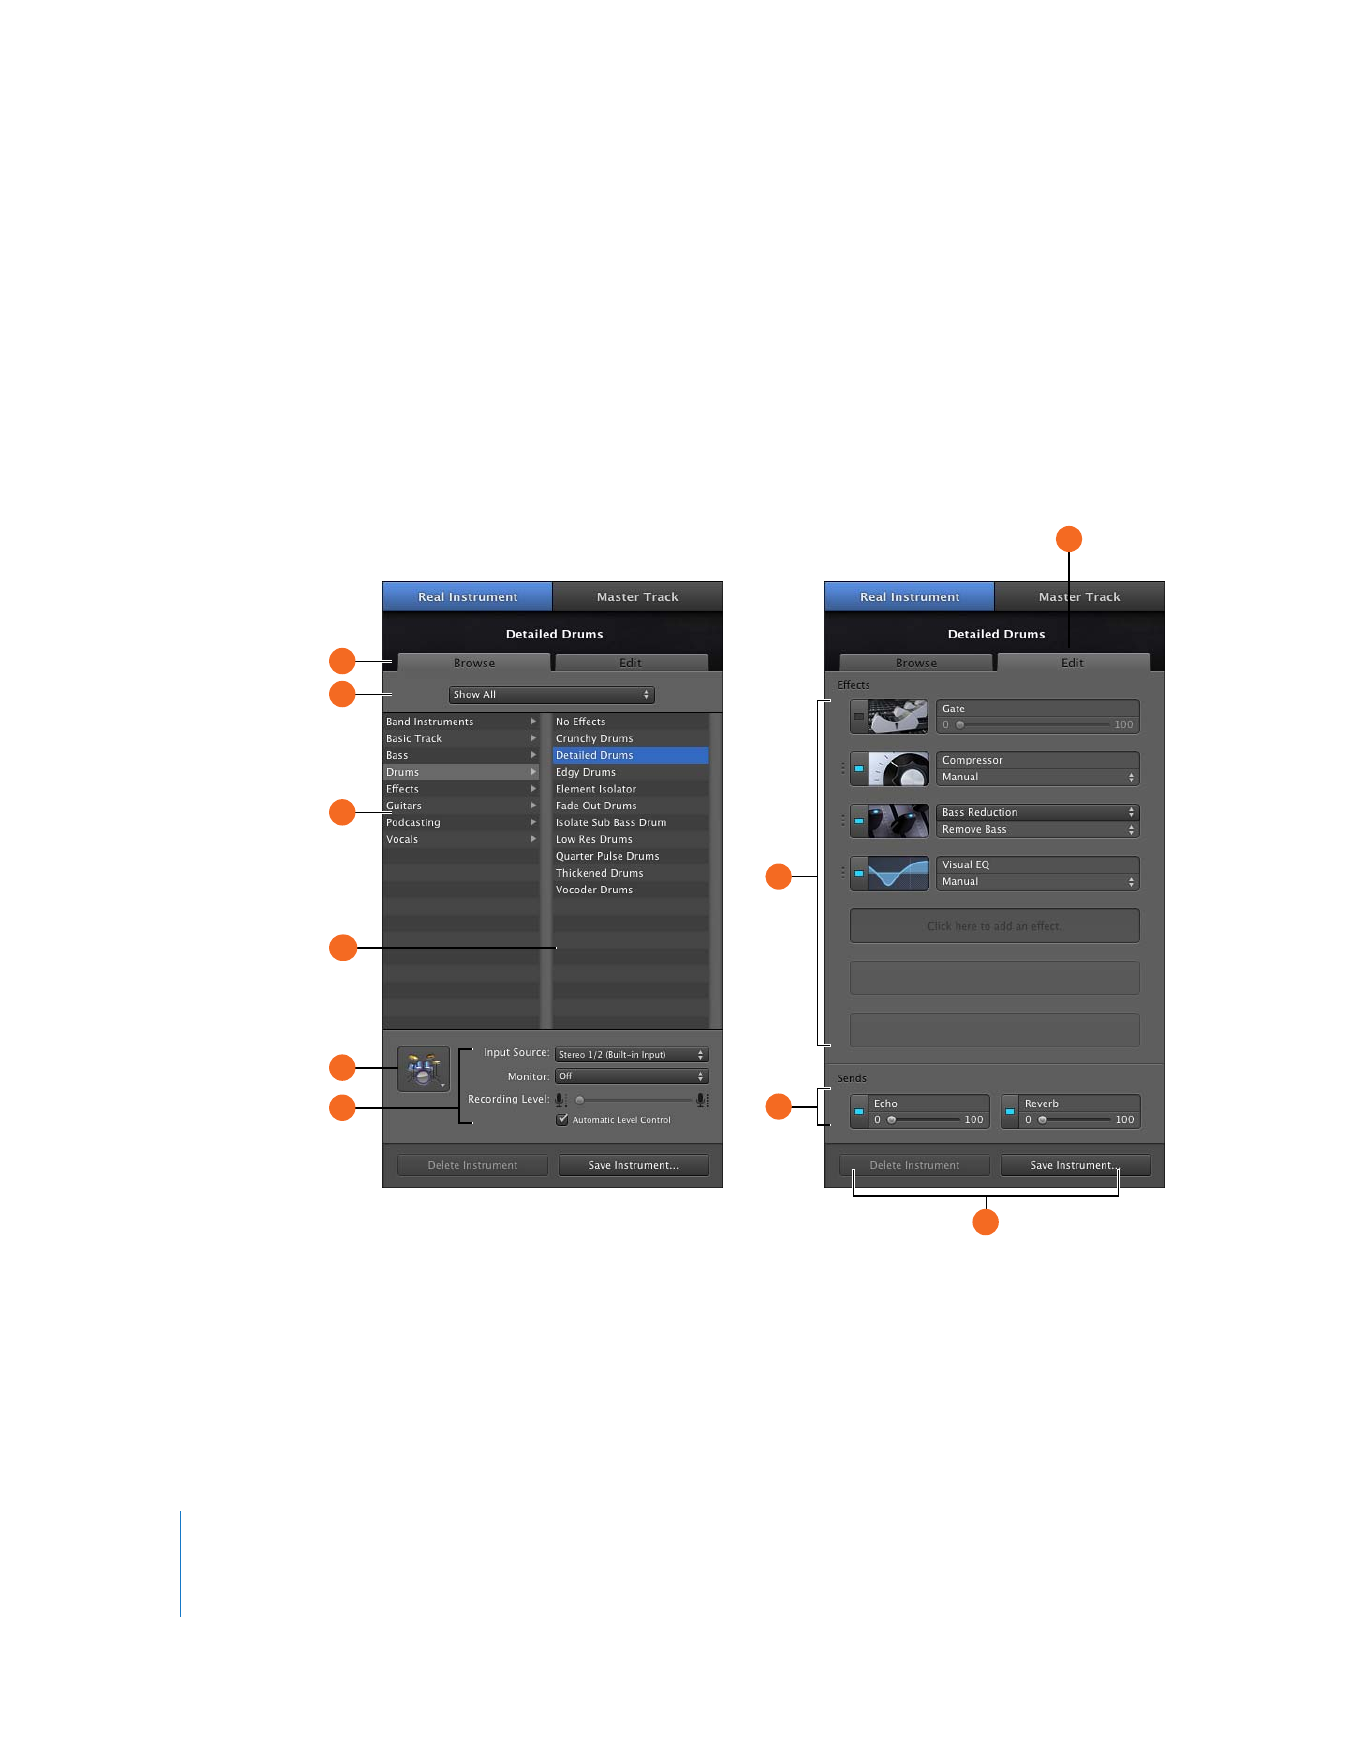
The Track Info pane shows the current instrument, effects, and input settings for the
selected track, and shows the master effects settings for the master track. You can
change these settings in the Track Info pane.
Real Instrument and Software Instrument Tracks
Some controls in the Track Info pane are different for Real Instrument tracks than for
Software Instrument tracks (as noted in the following descriptions).
A
B
C
D
D
E
F
H
J
I
G

Chapter 2
GarageBand at a Glance
23
A
Browse button: Click to view the instrument list, icon menu, and input controls for the track.
B
Instrument library pop-up menu: Choose which instruments you want to see in the category
and instrument lists from the pop-up menu.
C
Instrument category list: Click an instrument category to see the instruments for that category
in the instrument list on the right.
D
Instrument
list:
Select an instrument from the list.
E
Instrument icon pop-up menu: Click to choose a new instrument icon from the icon menu that
appears. Icons make it easy to distinguish tracks that use similar instruments.
F
Input Source pop-up menu (Real Instrument tracks only): Choose the input source for Real
Instrument recording.
Monitor pop-up menu (Real Instrument tracks only): Turn on monitoring to hear your
instrument as you play, or turn it off to avoid feedback.
Recording Level slider and checkbox (Real Instrument tracks only): Drag to set the input
volume for the track. Select the Automatic Level Control checkbox to have GarageBand lower
the recording level to prevent clipping.
G
Edit button: Click to view the effects menus and controls for the track.
H
Effects slots: Each track includes a compressor and four additional effects slots.
Click an empty effects slot and choose an effect from the pop-up menu.
Click an effect’s LED to turn the effect on or off.
Click an effect name and choose a new effect from the effect pop-up menu.
Click a preset and choose a new preset from the preset pop-up menu.
Drag an effect up or down by the textured area on its left edge to reorder effects.
Sound Generator pop-up menu (Software Instruments only): Choose a new generator to change
the sound of the Software Instrument.
I
Sends sliders: Each track includes Echo and Reverb sliders that control the amount of the track’s
output that is sent to the master Echo and Reverb effects.
J
Save Instrument and Delete Instrument buttons: Click the Save Instrument button to save an
instrument. Click the Delete Instrument button to delete a saved instrument.
24
Chapter 2
GarageBand at a Glance
Electric Guitar Track
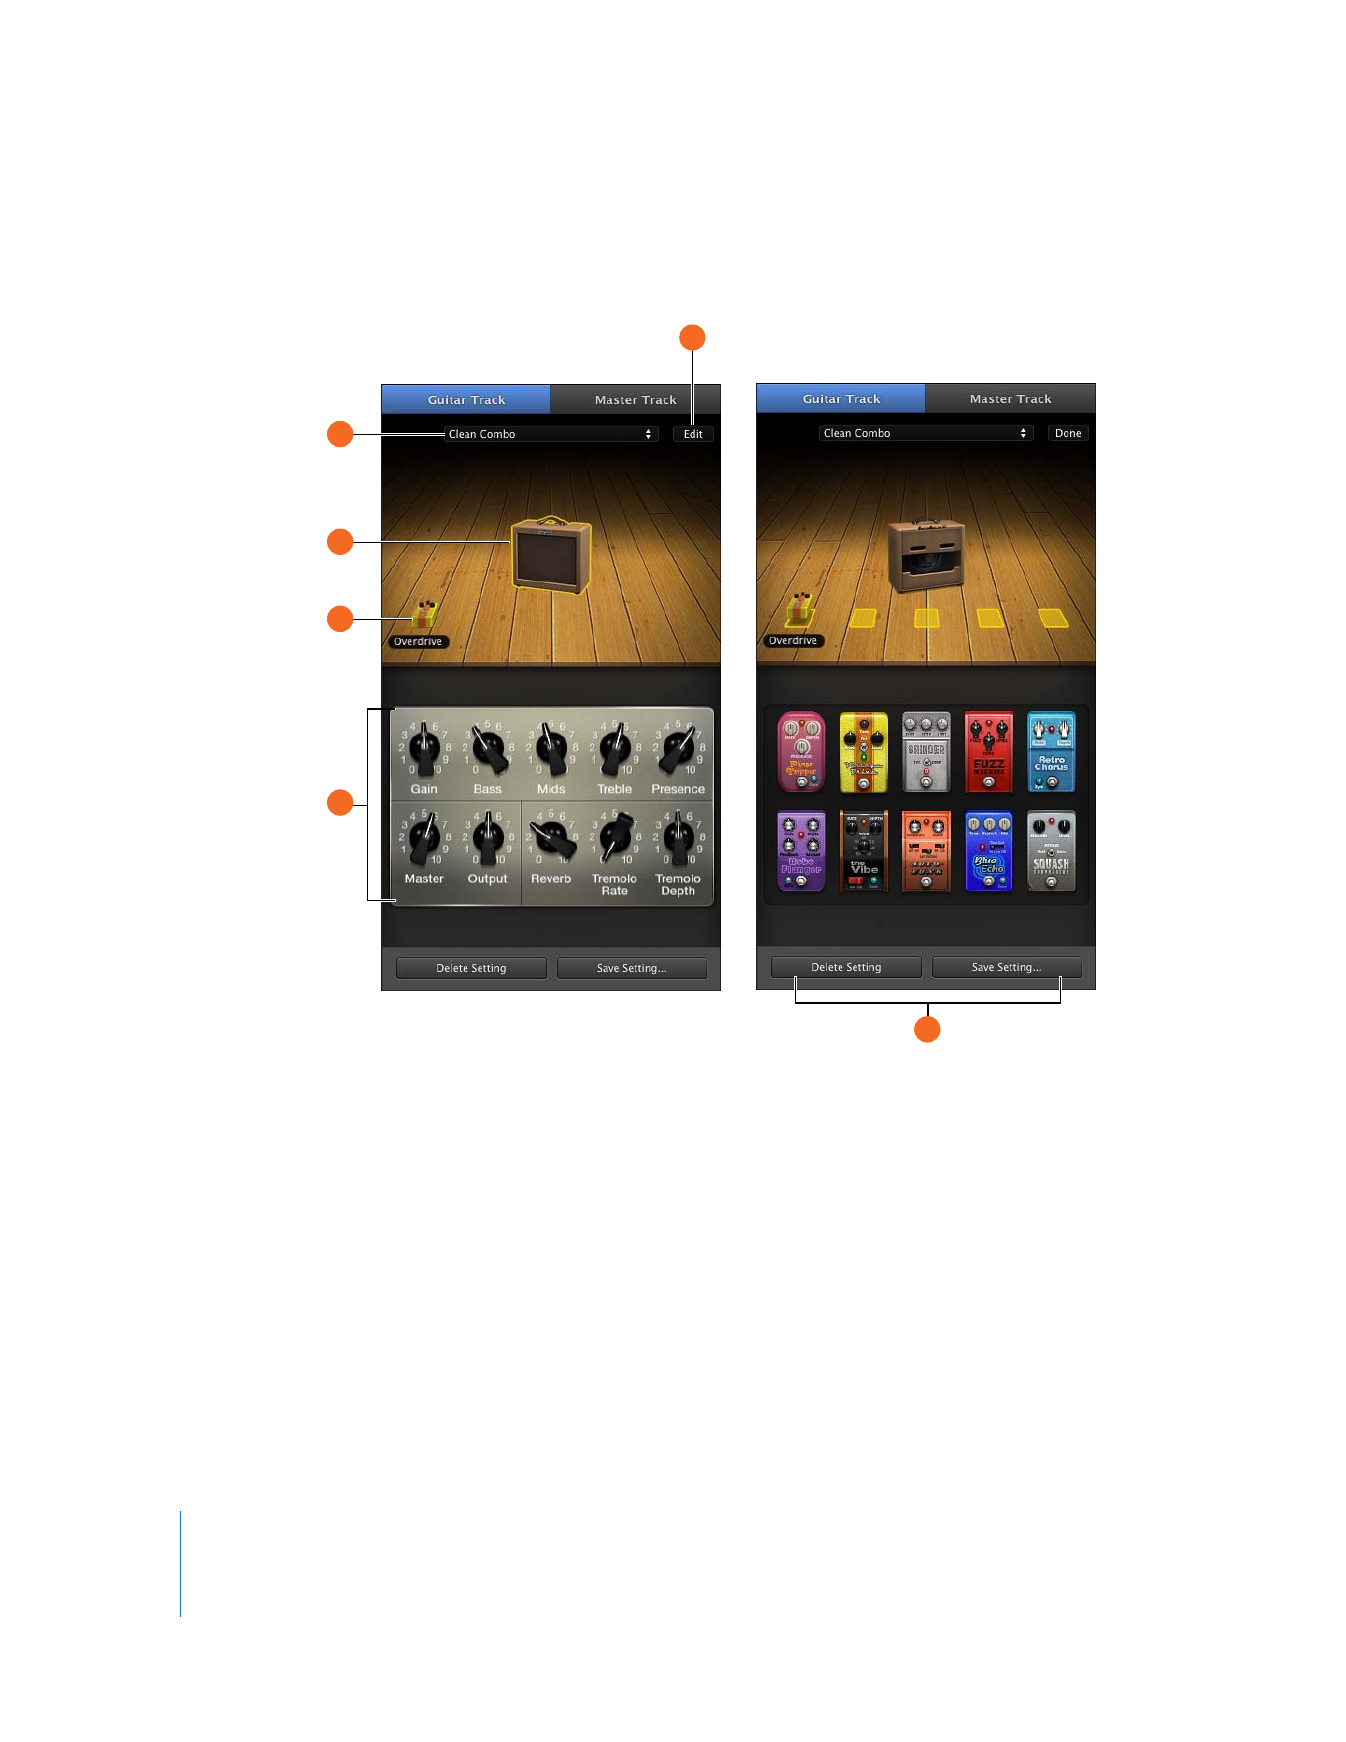
The Electric Guitar track shows the guitar amp and stompbox effects on the stage.
D
A
B
C
F
E

Chapter 2
GarageBand at a Glance
25
A
Guitar preset pop-up menu: Choose a guitar preset from the menu.
B
Guitar amp: Shows a visual representation of the current guitar amp. Click the amp to see the
amp controls below the stage. Hold the pointer over the amp, then click the arrows that appear
to change the amp model.
C
Stompbox effects: Shows a visual representation of the stompbox effects in the current preset.
Click a stompbox to see its stompbox controls below the stage.
D
Controls
area:
When the amp is selected, shows the amp controls. When a stompbox is selected,
shows its stompbox controls. Drag the knobs to change the amp or stompbox control settings.
Click the bypass switch for a stompbox effect to turn the effect on or off.
E
Edit button: With the amp selected, click Edit to view the amp model, master effects, and input
controls. With a stompbox effect selected, click Edit to view all the stompbox effects below the
stage. Drag a stompbox to one of the slots on the stage to add a stompbox effect. When you are
finished editing an amp or stompbox, click Done.
F
Save Instrument and Delete Instrument buttons: Click the Save Instrument button to save an
instrument. Click the Delete Instrument button to delete a saved instrument.
26
Chapter 2
GarageBand at a Glance
Master Track
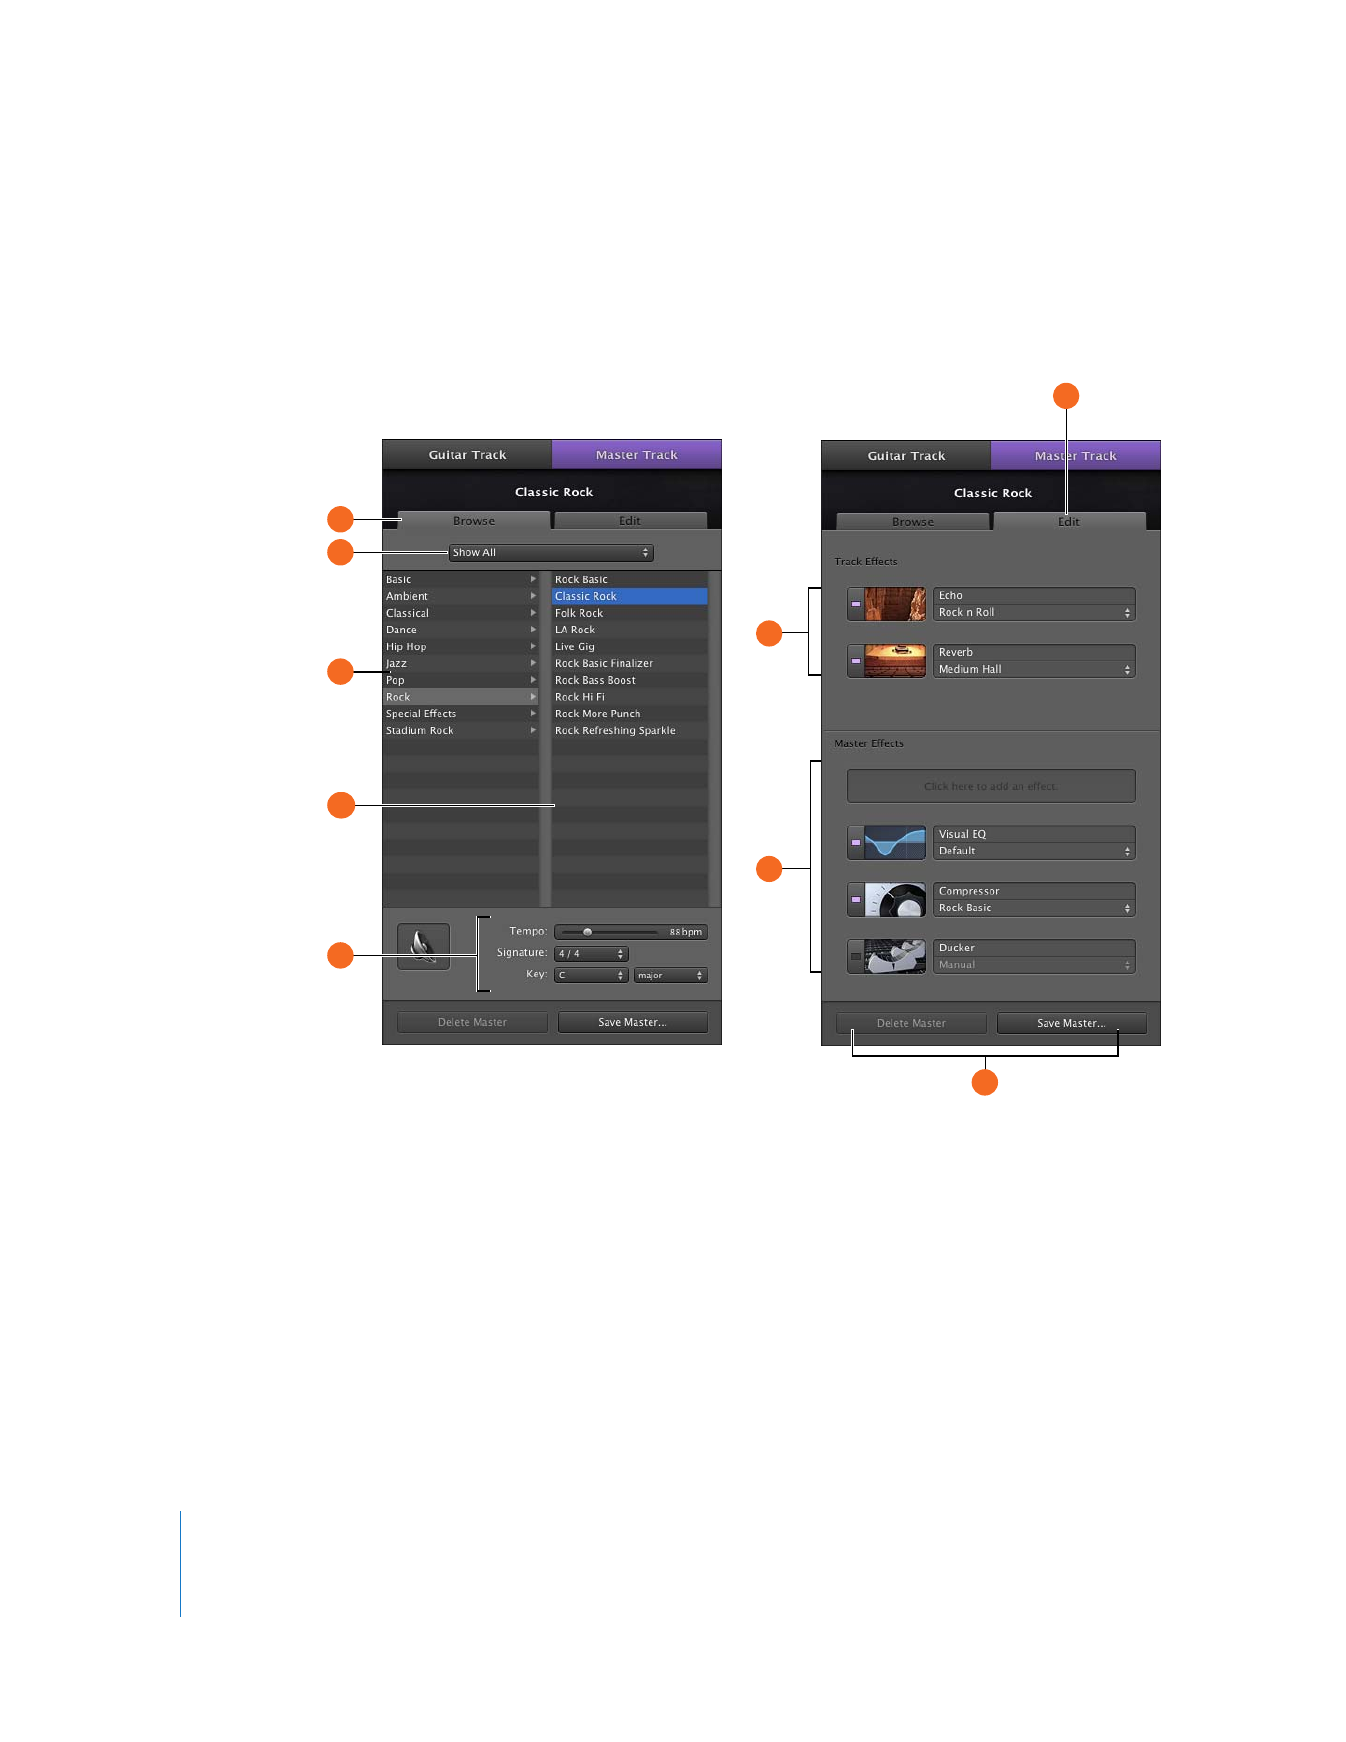
The Track Info pane for the master track shows the global project settings and effects
settings for the overall project. Global project settings include tempo, time signature,
and key. Global effects settings include master echo, reverb, EQ, and compressor.
H
G
A
B
C
D
D
E
F
I

Chapter 2
GarageBand at a Glance
27
The Echo and Reverb sliders for each track control the amount of echo and reverb sent
from that track to the master echo and reverb effects. In the Track Info pane for the
master track, you can change the master echo and reverb effects.
A
Browse button: Click to view the instrument list, icon menu, and input controls for the track.
B
Master effects pop-up menu: Choose which master effects you want to see in the category and
effects lists from the pop-up menu.
C
Master effects category list: Click a category to see the effects for that category in the master
effects list on the right.
D
Master effects preset list: Click a master effects preset from the list to apply it to the project.
E
Tempo, key, and time signature controls: Drag the Tempo slider to change the project tempo.
Choose a key from the Key pop-up menu, then choose a scale type from the pop-up menu to
the right.
Choose a time signature from the Signature pop-up menu.
F
Edit button: Click to view the effects menus and controls for the track.
G
Track Effects: Click the LED to turn the echo and reverb effects on or off. Choose an echo preset
from the Echo pop-up menu. Choose a reverb preset from the Reverb pop-up menu. These
effects control the sound of the Send effects in individual tracks.
H
Master Effects slots: Each master track includes a Visual EQ, a compressor, a ducker, and one
additional effects slot.
Click an effect’s LED to turn the effect on or off.
Click a preset and choose a new preset from the preset pop-up menu.
Click an empty effects slot and choose an effect from the pop-up menu.
I
Save Master and Delete Master buttons: Click the Save Master button to save a set of master
effects. Click the Delete Master button to delete a saved set of master effects.
28
Chapter 2
GarageBand at a Glance
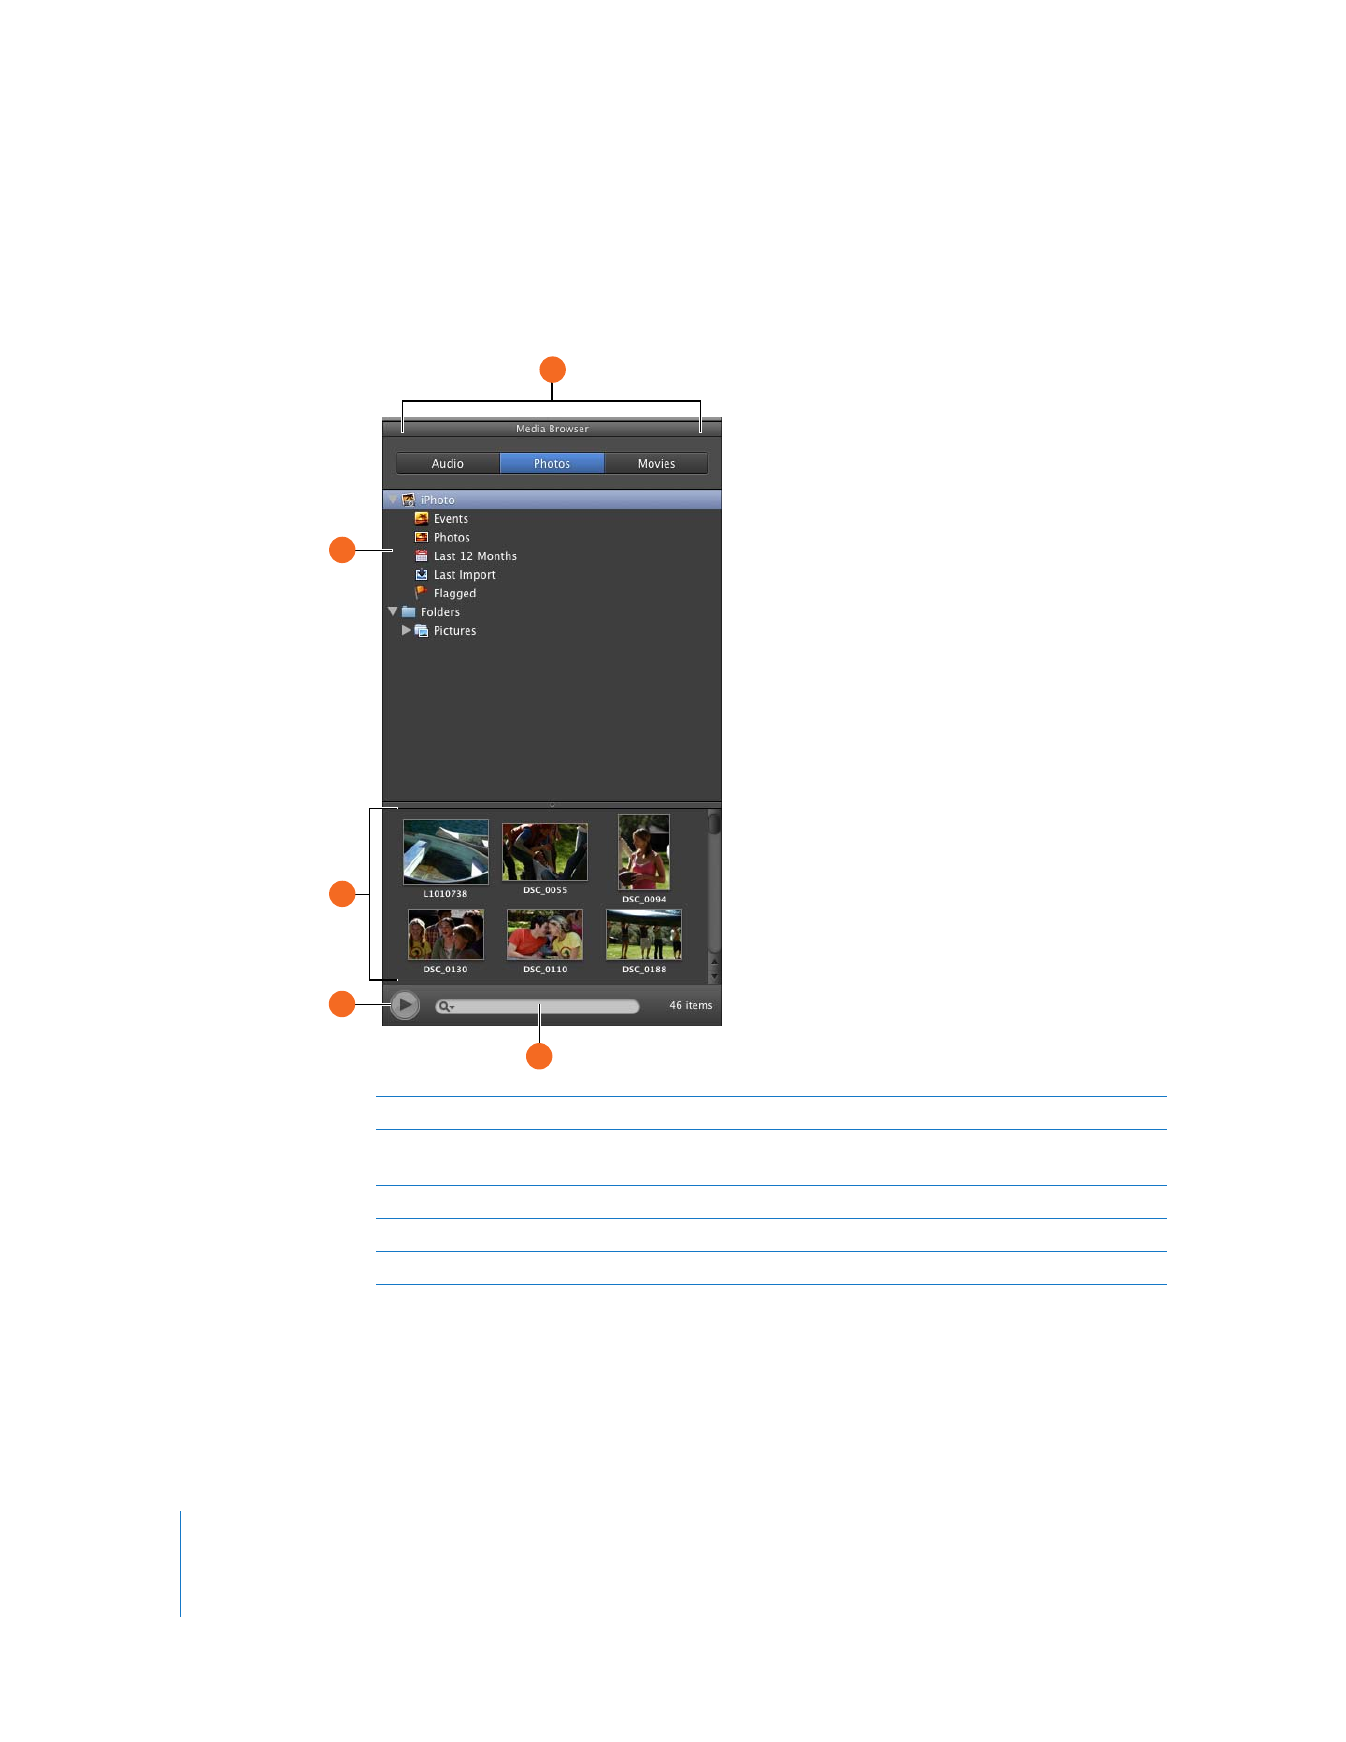
Media Browser
With the Media Browser, you can find and add songs from your iTunes library, photos
from your iPhoto library, iMovie projects, and other video files.
A
Media Type buttons: Click the button for the type of media files you want to work with.
B
Source list: Navigate to the folder containing the files you want to use. You can also add folders
by dragging them from the Finder.
C
Media list: View, preview, and select media files to add to your project.
D
Play button: Click to preview the selected media file.
E
Search field: Type text to search for files by name.
C
A
B
D
E

3
29
3