Tutorial 4: Playing and Recording
Software Instruments
GarageBand includes an extensive set of Software
Instruments, including drums, guitars, pianos, organs,
and synthesizers, that you can use in your projects.
Software Instruments are a special kind of instrument. You play the notes (using your
computer keyboard, the onscreen keyboard, or a MIDI-compatible music keyboard
connected to your computer) and your computer generates the actual sound,
depending on which Software Instrument you choose.
You can add effects to a Software Instrument and edit Software Instrument regions in
the editor. You can also add more Software Instruments to the Track Info pane by
purchasing one of the Jam Packs available for GarageBand.
In this tutorial, you’ll learn how to:
 Add a Software Instrument track and change track settings
 Play Software Instruments using your computer keyboard, the onscreen keyboard,
or a music keyboard
 Record a Software Instrument
 View, edit, and print music notation from a Software Instrument track
You play and record a Software Instrument in a Software Instrument track. You can
change the instrument for the track, even after you have recorded on it. You start by
adding a new Software Instrument track.
Chapter 6
Tutorial 4: Playing and Recording Software Instruments
59
To add a new Software Instrument track:
1
Click the Add Track button, or choose Track > New Track.
2
In the New Track dialog, click Software Instrument, then click Create.
A new Software Instrument track with a Grand Piano instrument appears in the
timeline, and the Track Info pane opens to the right of the timeline.
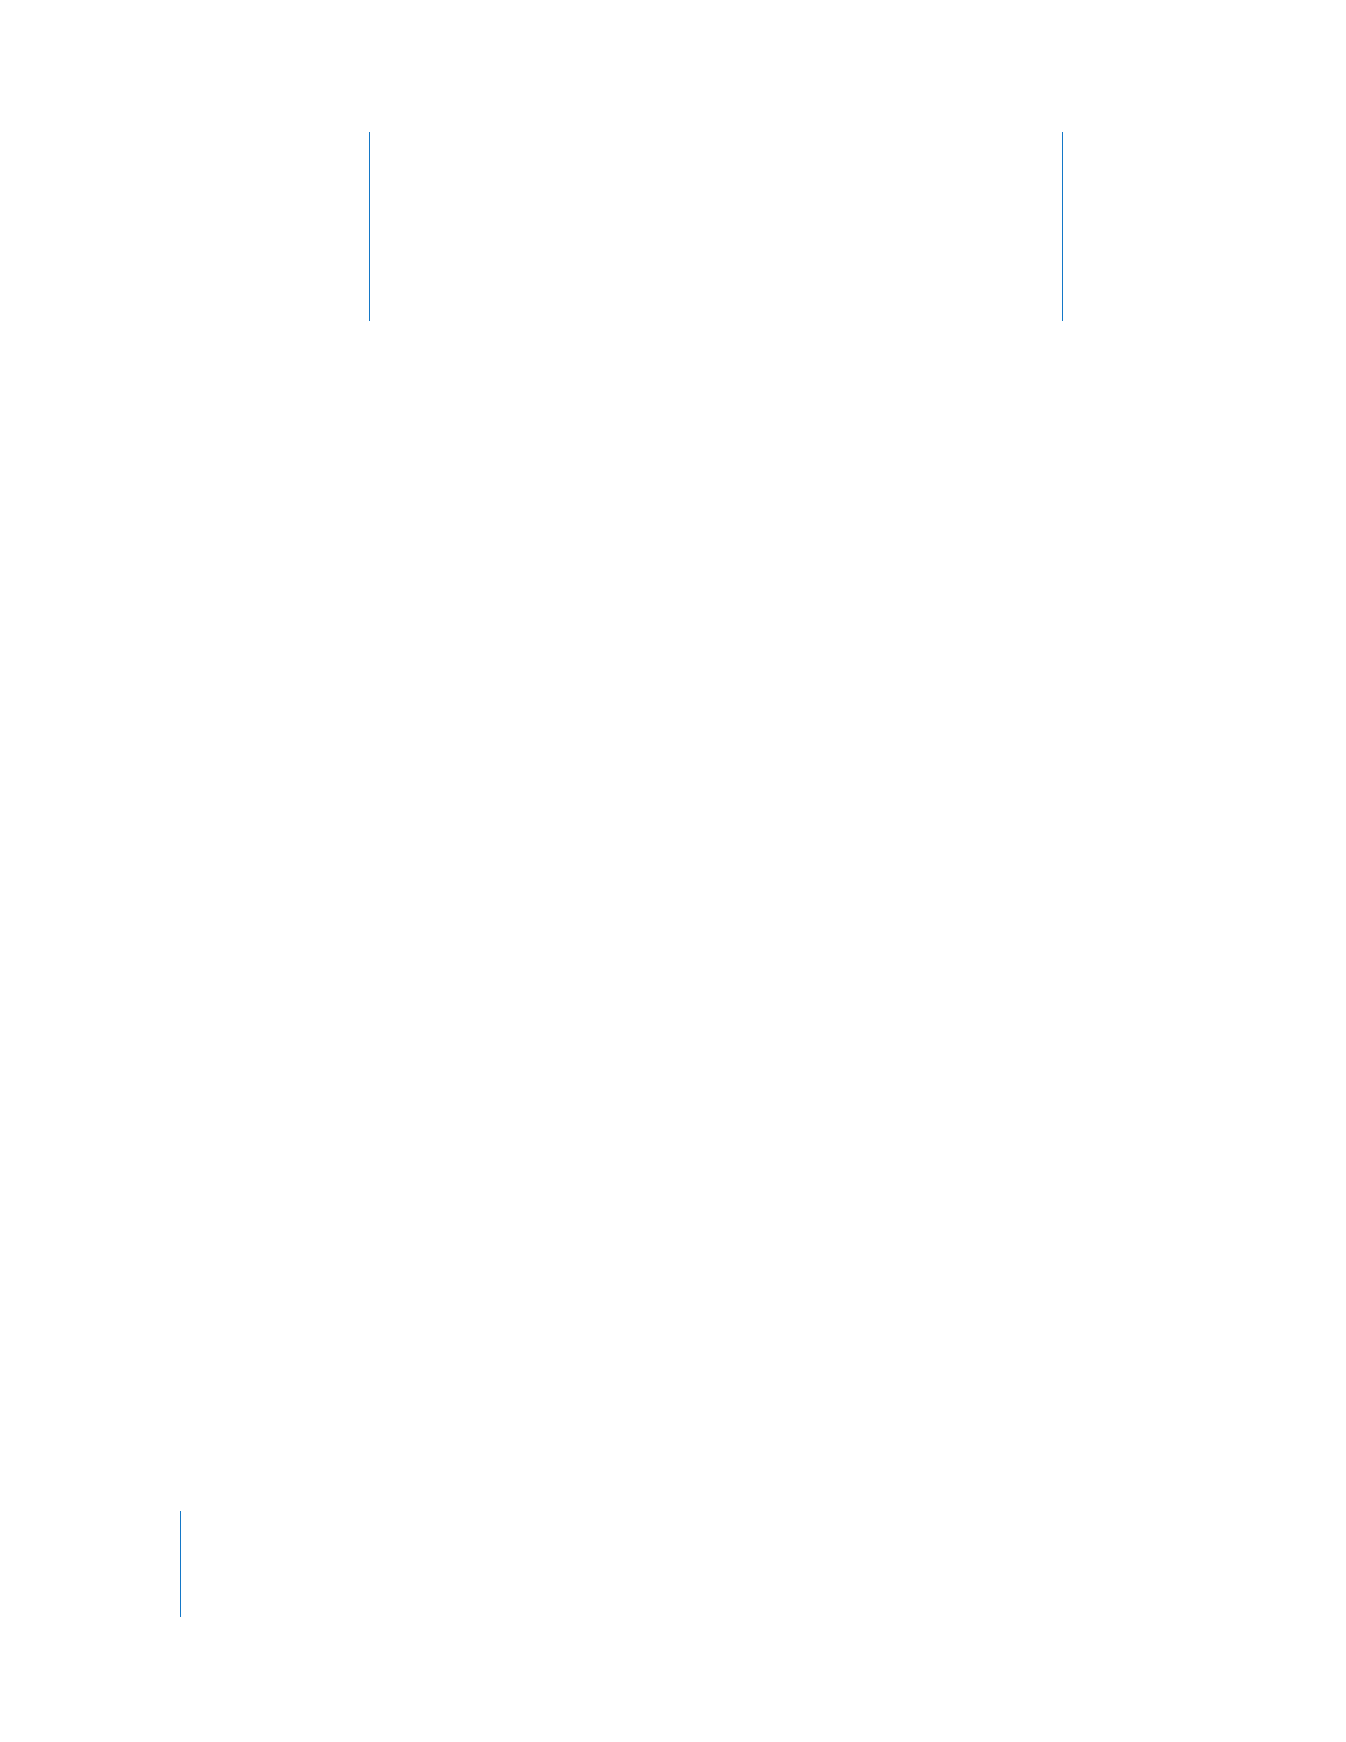
3
In the Track Info pane, select an instrument category from the list on the left, then
select an instrument from the list on the right.
The header of the Software Instrument track changes to the name of the instrument
you selected. If you have a USB or MIDI keyboard connected to your computer, you can
play notes and hear the Software Instrument right away. Even without a keyboard
connected, you can play Software Instruments with the Musical Typing keyboard or
onscreen keyboard.
Select an instrument
category from this list.
Select an instrument
from this list.
60
Chapter 6
Tutorial 4: Playing and Recording Software Instruments
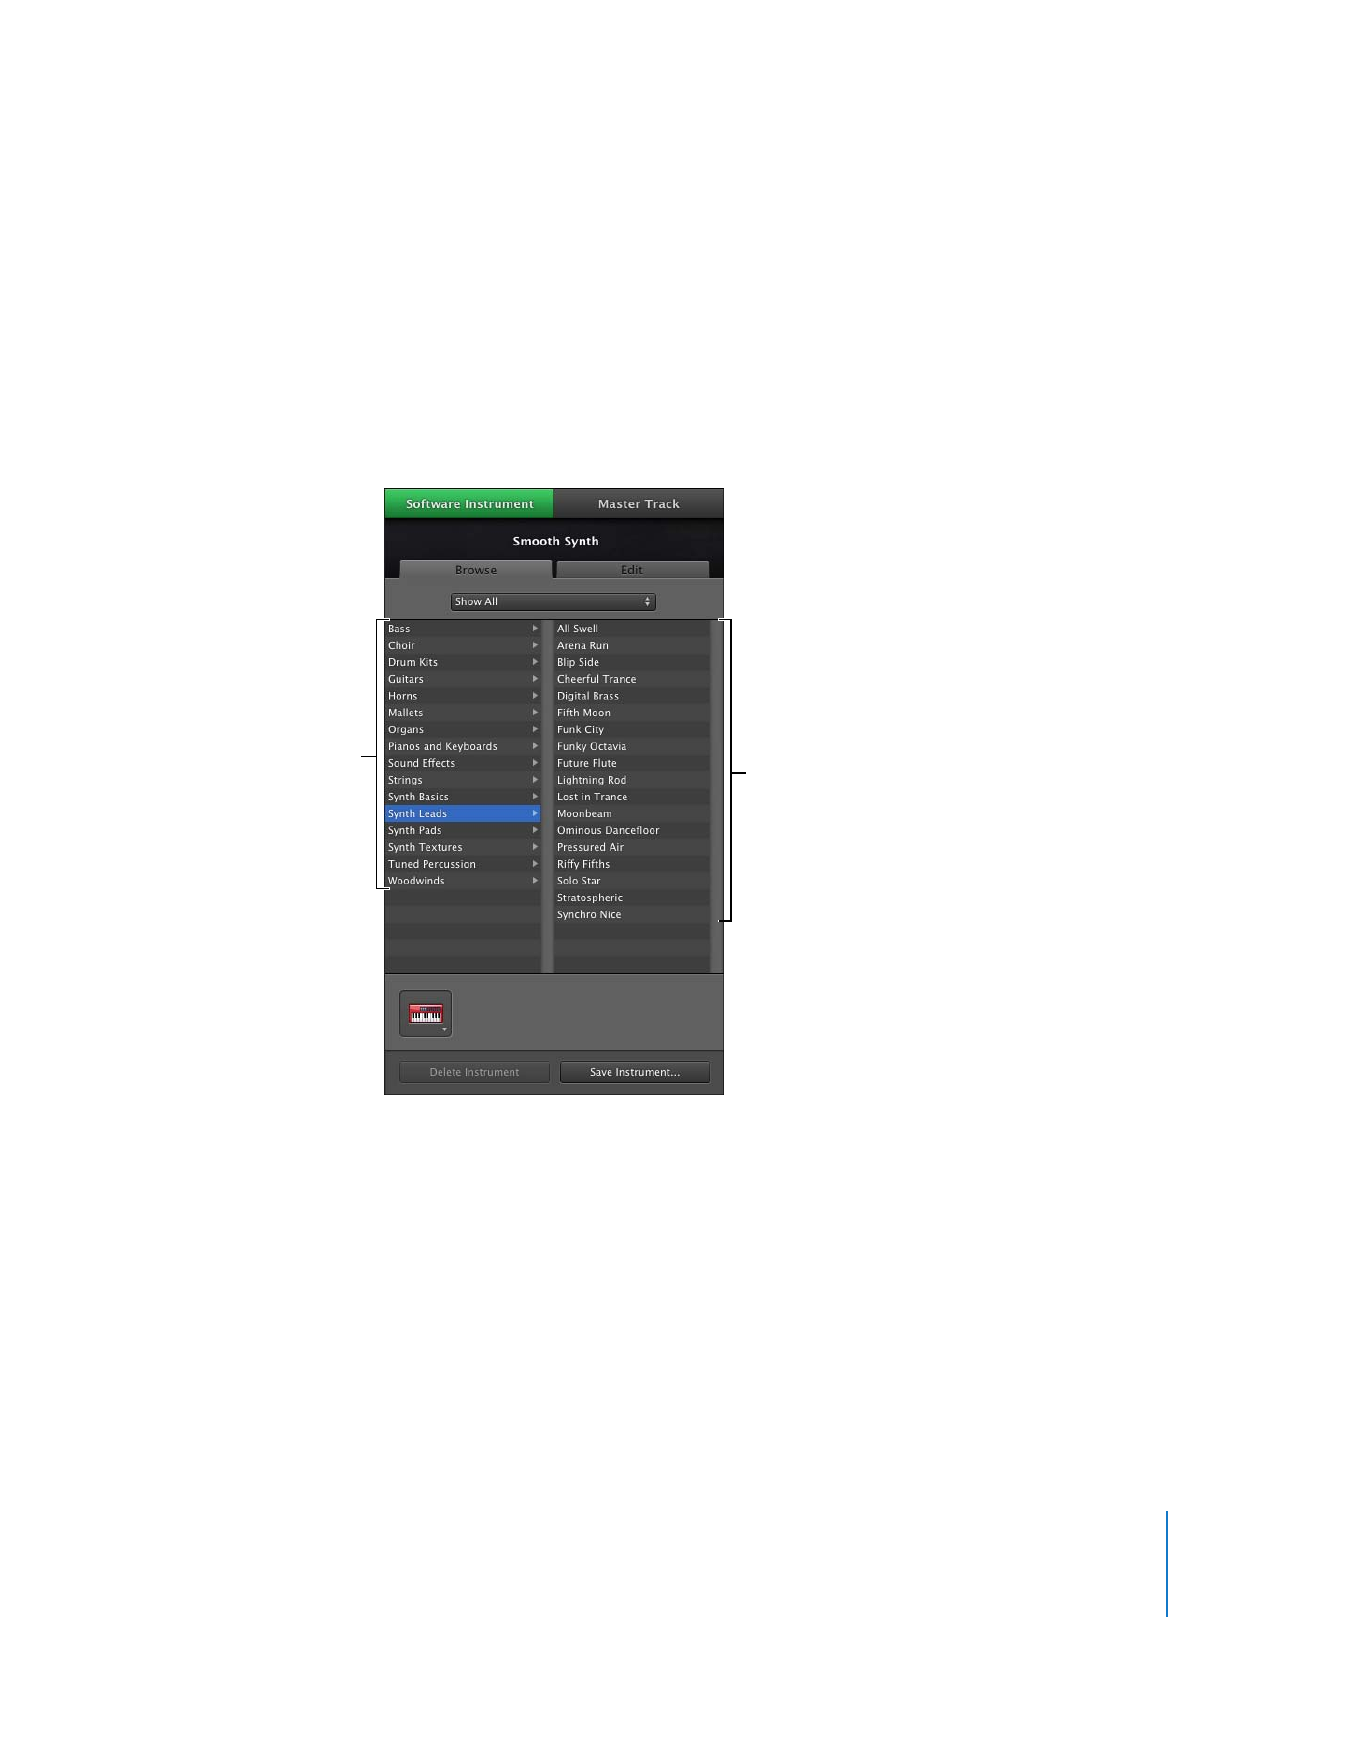
Playing Software Instruments with Musical Typing
With Musical Typing, you can play and record Software Instruments using your
computer keyboard. When you show the Musical Typing window, you can play the top
and middle rows of your computer keyboard just like the keys on a music keyboard to
play notes.
To show the Musical Typing window:
m
Choose Window > Musical Typing (or press Command–Shift–K).
If the onscreen keyboard is visible, you can switch to the Musical Typing window by
clicking the Musical Typing button on the left side of the window.
To play notes using Musical Typing:
m
With the Musical Typing window open, play the keys shown on the Musical Typing
keyboard.
 The keys in the middle row of your computer keyboard play the “white keys” on the
Musical Typing keyboard, in a one-and-one-half octave range from C through F.
 The keys W, E, T, Y, U, O, and P in the top row of your computer keyboard play the
“black keys” (sharps and flats).
To move up or down by octaves, do one of the following:
 Press Z to move down by an octave.
 Press X to move up by an octave.
 Click the small keyboard at the top of the Musical Typing window to move to the
octave shown, or drag the blue rectangle. The blue rectangle shows the current
range of Musical Typing.
Chapter 6
Tutorial 4: Playing and Recording Software Instruments
61
To change the velocity level of notes you play using Musical Typing:
 Press C to lower the velocity level.
 Press V to raise the velocity level.
To add pitch bend to notes you play using Musical Typing:
 Press 1 to lower the pitch of notes.
 Press 2 to raise the pitch of notes.
The pitch is bent for as long as you press the key.
To sustain notes you play using Musical Typing:
 Hold down the Tab key.
Notes are sustained for as long as you hold down the Tab key.
 Release the Tab key to stop sustaining notes.
To add modulation to notes you play using Musical Typing:
 Press 4 through 8 to add increasing amounts of modulation. Press 3 to turn off
modulation.
The level of modulation lasts until you change it or turn it off by pressing another key.
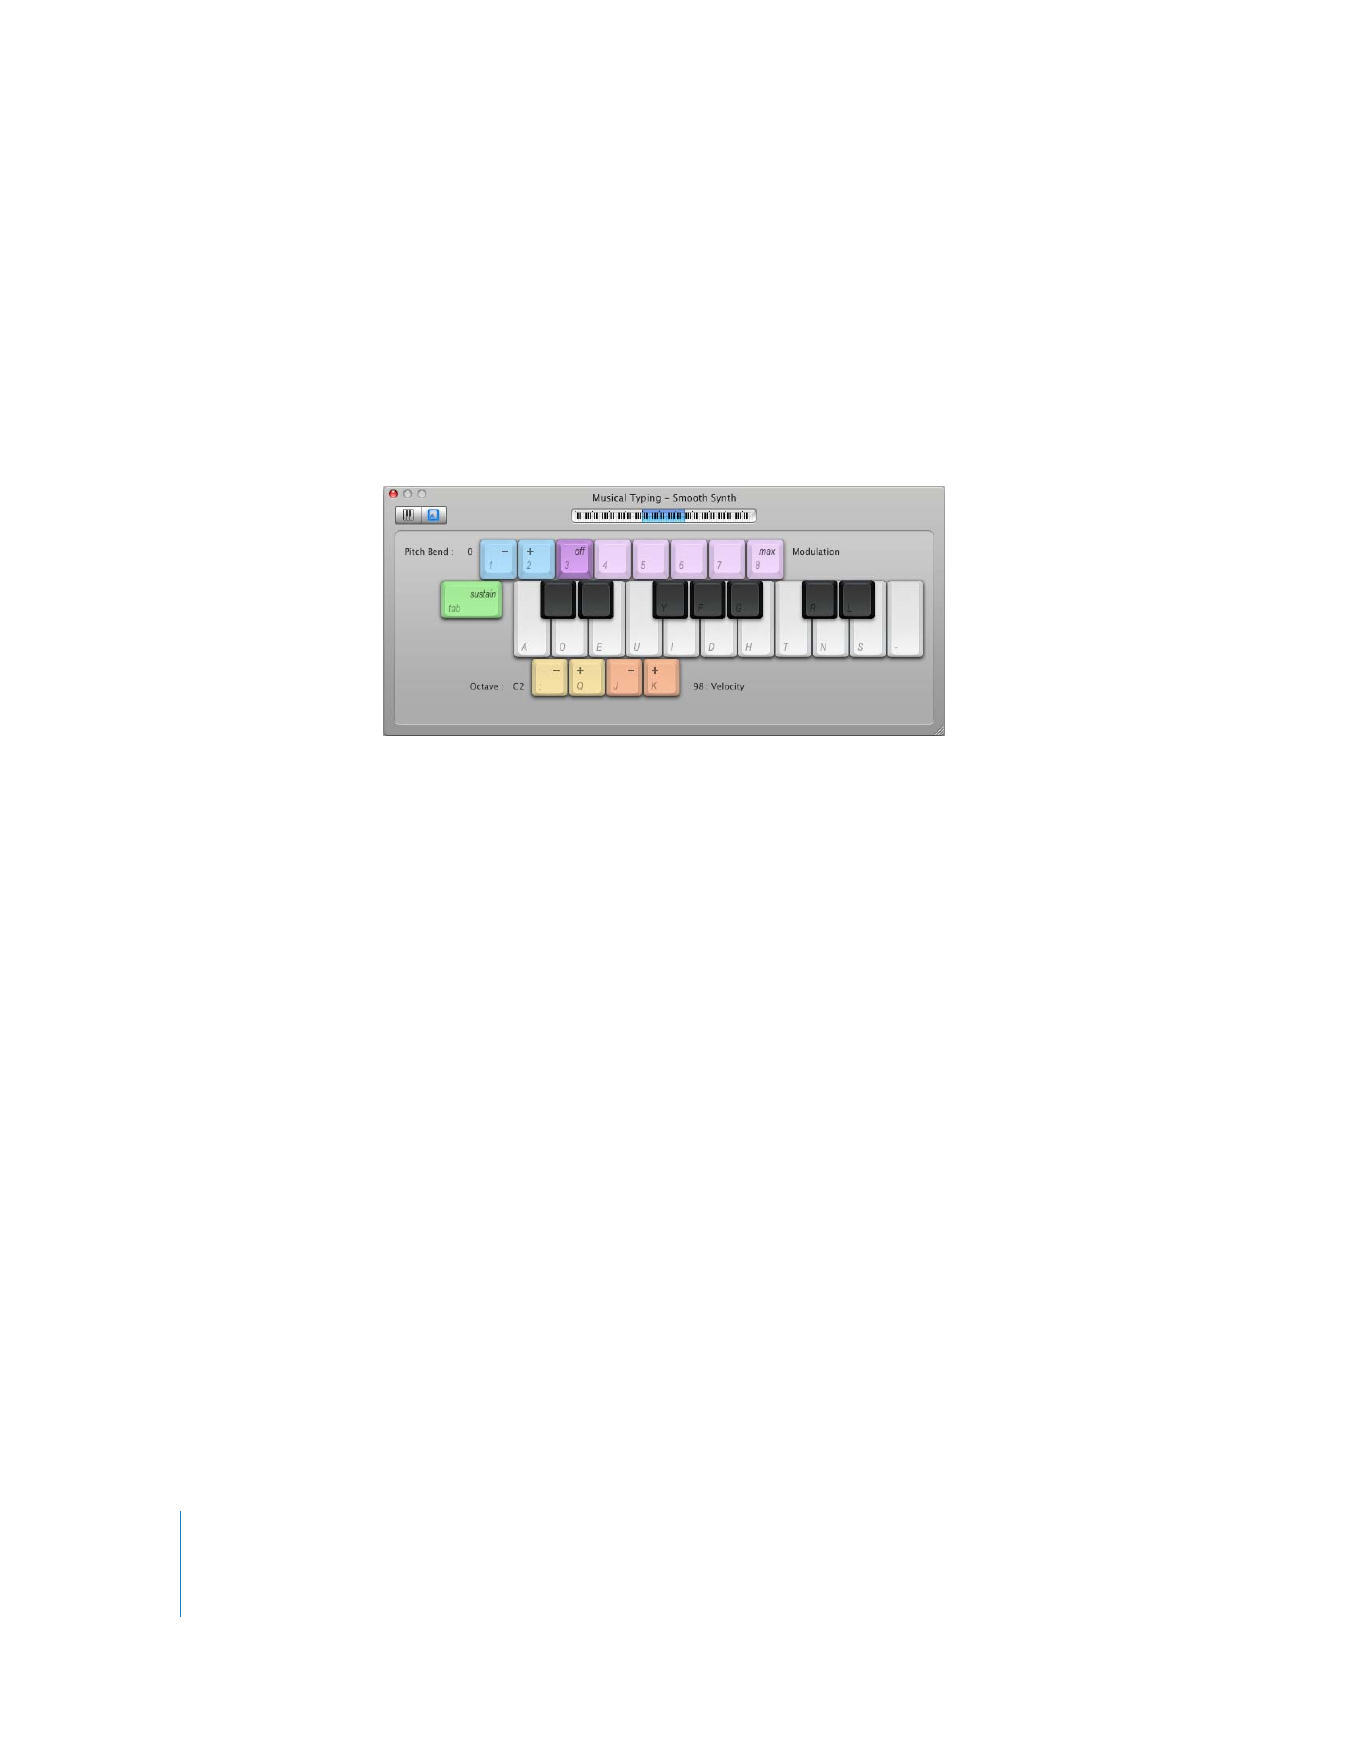
Playing Software Instruments with the Onscreen
Music Keyboard
You can use the onscreen music keyboard to play and record Software Instruments.
When you show the onscreen music keyboard, by default it displays a four-octave
range of keys. You can resize the keyboard to display up to ten octaves.
To show the onscreen music keyboard, do one of the following:
m
Choose Window > Keyboard (or press Command-K).
If the Musical Typing window is visible, you can switch to the onscreen keyboard
window by clicking the Keyboard button on the left side of the window.

62
Chapter 6
Tutorial 4: Playing and Recording Software Instruments
To play the onscreen music keyboard:
m
Click the keys on the keyboard. You can click when the project is playing, when it is
stopped, or when you’re recording.
Clicking lower on the key plays the note with a higher velocity (equivalent to pressing
the key harder), and clicking higher on the key plays the note with a lower velocity
(equivalent to pressing the key more softly).
The onscreen keyboard also shows notes you play on your connected keyboard, and
shows notes in regions on the selected track when you play the project.
To move the keyboard:
m
Place the pointer anywhere in the space above the keys and drag.
To resize the keyboard:
m
Drag the resize control in the lower-right corner of the keyboard window.
To change the range of notes you can play:
m
Click the small triangle to the left or right of the keys. Clicking the triangle on the left
lowers the keys by an octave, and clicking the triangle on the right raises the keys by
an octave.
Getting Ready to Record a Software Instrument
If you’re recording Software Instruments using a music keyboard, there are a couple of
things to check before you start recording:
 Make sure your music keyboard is connected to your computer and is working.
 Select a Software Instrument track and try playing your music keyboard, clicking
notes on the onscreen music keyboard, or using Musical Typing. You should hear the
Software Instrument as you play.
Recording a Software Instrument
Now you’re ready to record a Software Instrument. You can record one Software
Instrument track at a time.
To record a Software Instrument:
1
Click the header of the Software Instrument track you want to record in to select the
track.
2
Move the playhead to the point in the timeline where you want to start recording.
3
Choose Control > Count In to have the metronome play a one-measure count-in before
recording starts.
You can also set the playhead a few beats before the point where you want the music
to come in to make it easier to start on the beat.
Chapter 6
Tutorial 4: Playing and Recording Software Instruments
63
4
To start recording, click the Record button.
5
Start playing your music keyboard, clicking notes on the onscreen music keyboard, or
using Musical Typing. As you record, a new region appears in the selected Software
Instrument track.
6
When you’re finished, click the Record button again to stop recording. Click the Play
button to stop the project playing.
After you record, you can listen to your new recorded part to see how you like it.
To hear the new recording:
1
Move the playhead to the point in the timeline where the new region starts (align it
with the left edge of the region).
You can also move the playhead to an earlier point in the project, or to the beginning
of the project, to hear the new recording in the context of the project.
2
Click the Play button, or press the Space bar.
Merging Software Instrument Recordings
You can record a Software Instrument using the cycle region. When you record a
Software Instrument using the cycle region, by default a new take is recorded each
time the cycle region repeats, just like recording a Real Instrument. You can change the
default behavior so that Software Instrument recordings using the cycle region are
merged into a single take. This can be particularly useful when you record drum kits
and other layered parts.
To have GarageBand merge Software Instrument recordings:
1
Choose GarageBand > Preferences.
2
In the General tab, click the checkbox for Cycle Recording.
For information on recording using a cycle region, see “Recording Multiple Takes with
the Cycle Region” on page 54.
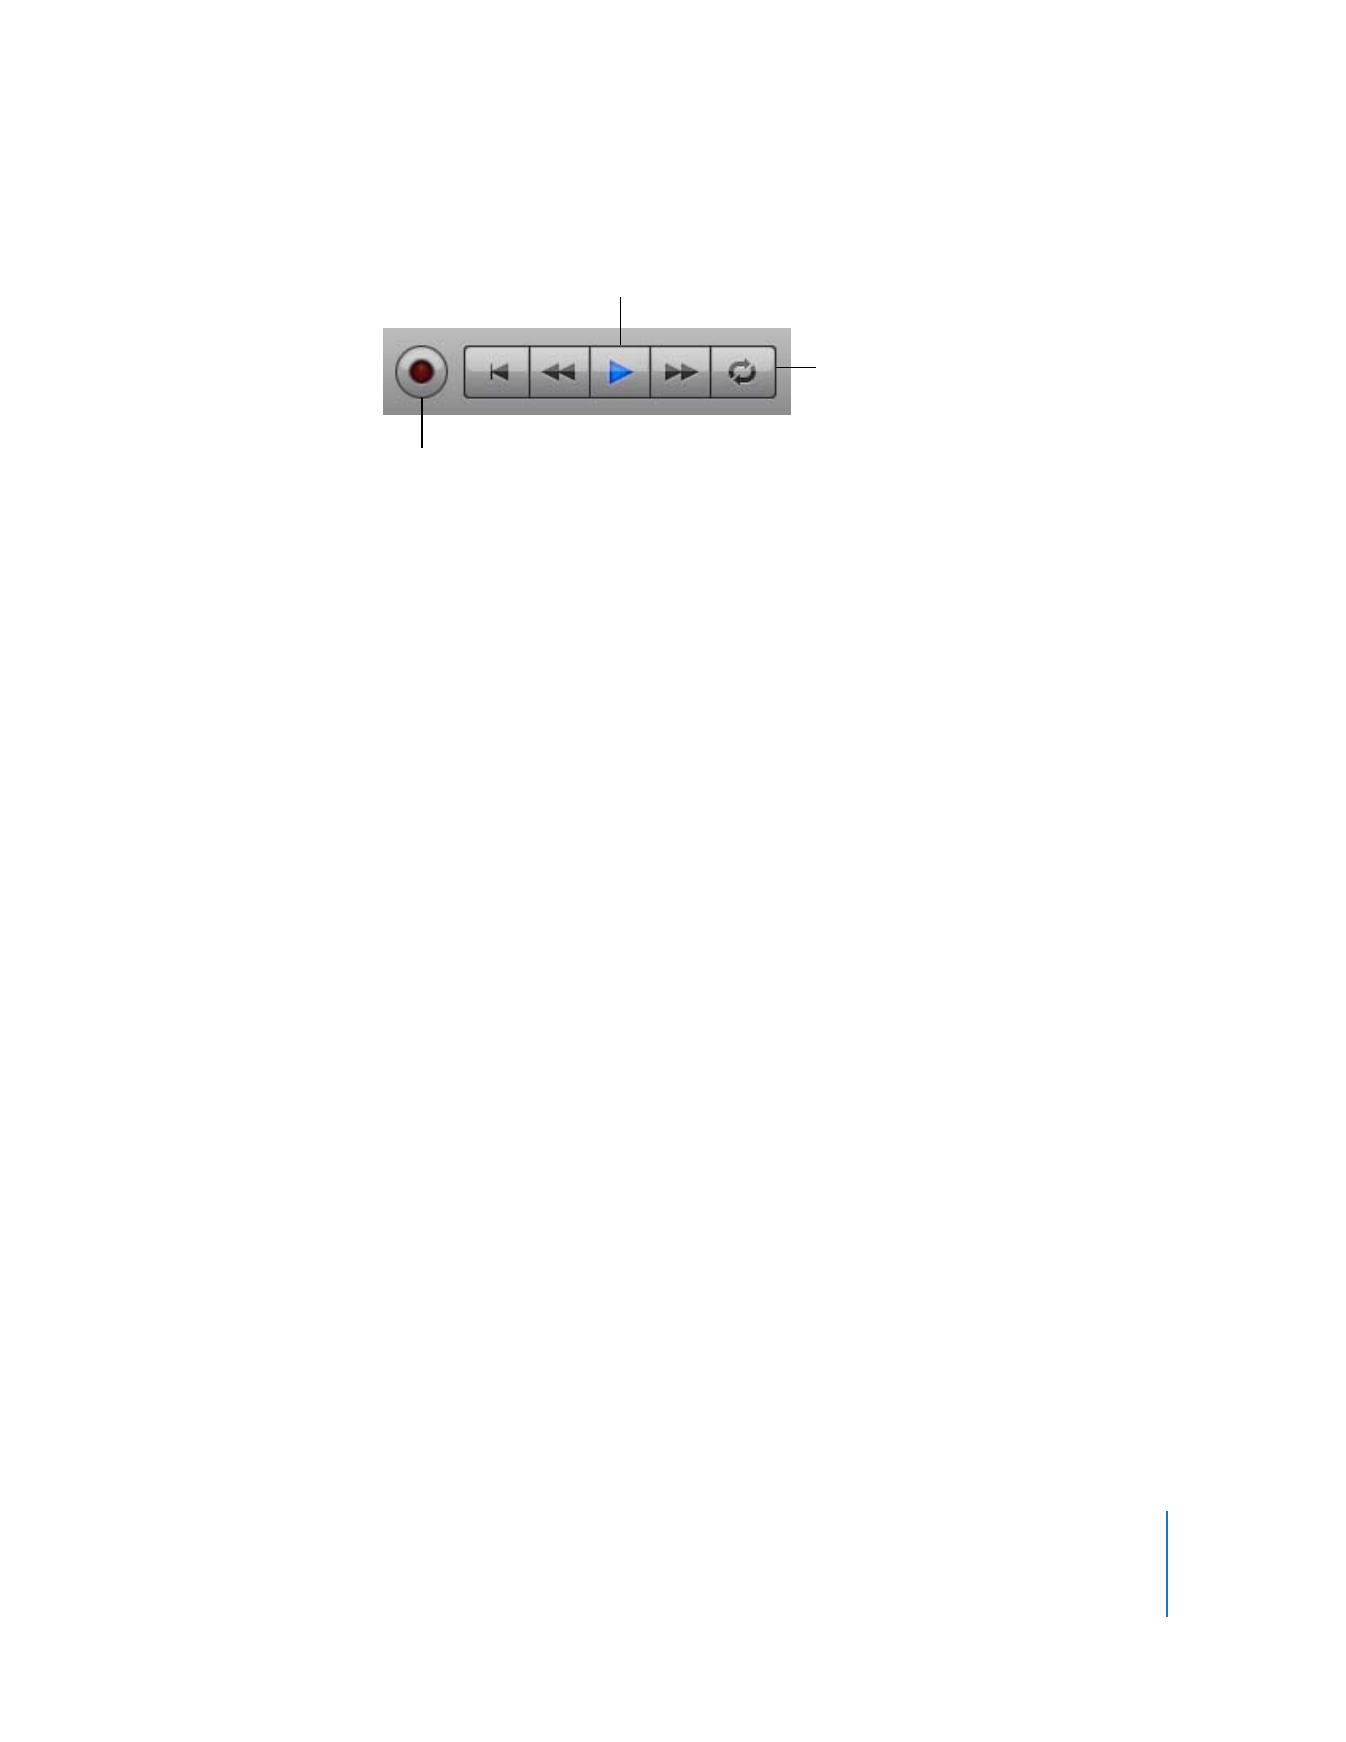
Play button
Cycle button
Record button
64
Chapter 6
Tutorial 4: Playing and Recording Software Instruments
Viewing Note and Chord Names As You Play
When you play a Software Instrument, GarageBand can automatically display the
names of the notes and chords you play.
To view Software Instrument note and chord names while you play:
1
Select the header of the Software Instrument track you want to play.
2
Click the icon on the left side of the LCD, then choose Chord from the menu that
appears (or click the up or down arrow in the LCD until you see the chord display).
Chord names (also called “chord symbols”) include a capital letter for the root note of
the chord, the chord quality (in most cases “ma” for major or “m” for minor), and
numbers that indicate added notes, such as sevenths, ninths, or suspended fourths.
Working in Score View
You can view and edit Software Instrument regions in standard music notation format.
In score view, you can edit notes and other musical events, including adding pedal
markings.
 View Software Instrument regions as music notation
 Choose the note value for score view
 Add, select, and edit notes in score view
 Add pedal symbols
 Change the clef sign
 Print music notation
About Score View
In addition to the editor’s graphic piano roll view, you can view Software Instrument
regions (both those you record and those from loops) in score view. In score view, the
notes in a region are shown as musical notes. Score view includes other musical
symbols such as rests, staves, clef signs, time signatures, key signatures, and pedal
markings. This section briefly describes some of these symbols, for users unfamiliar with
music notation.
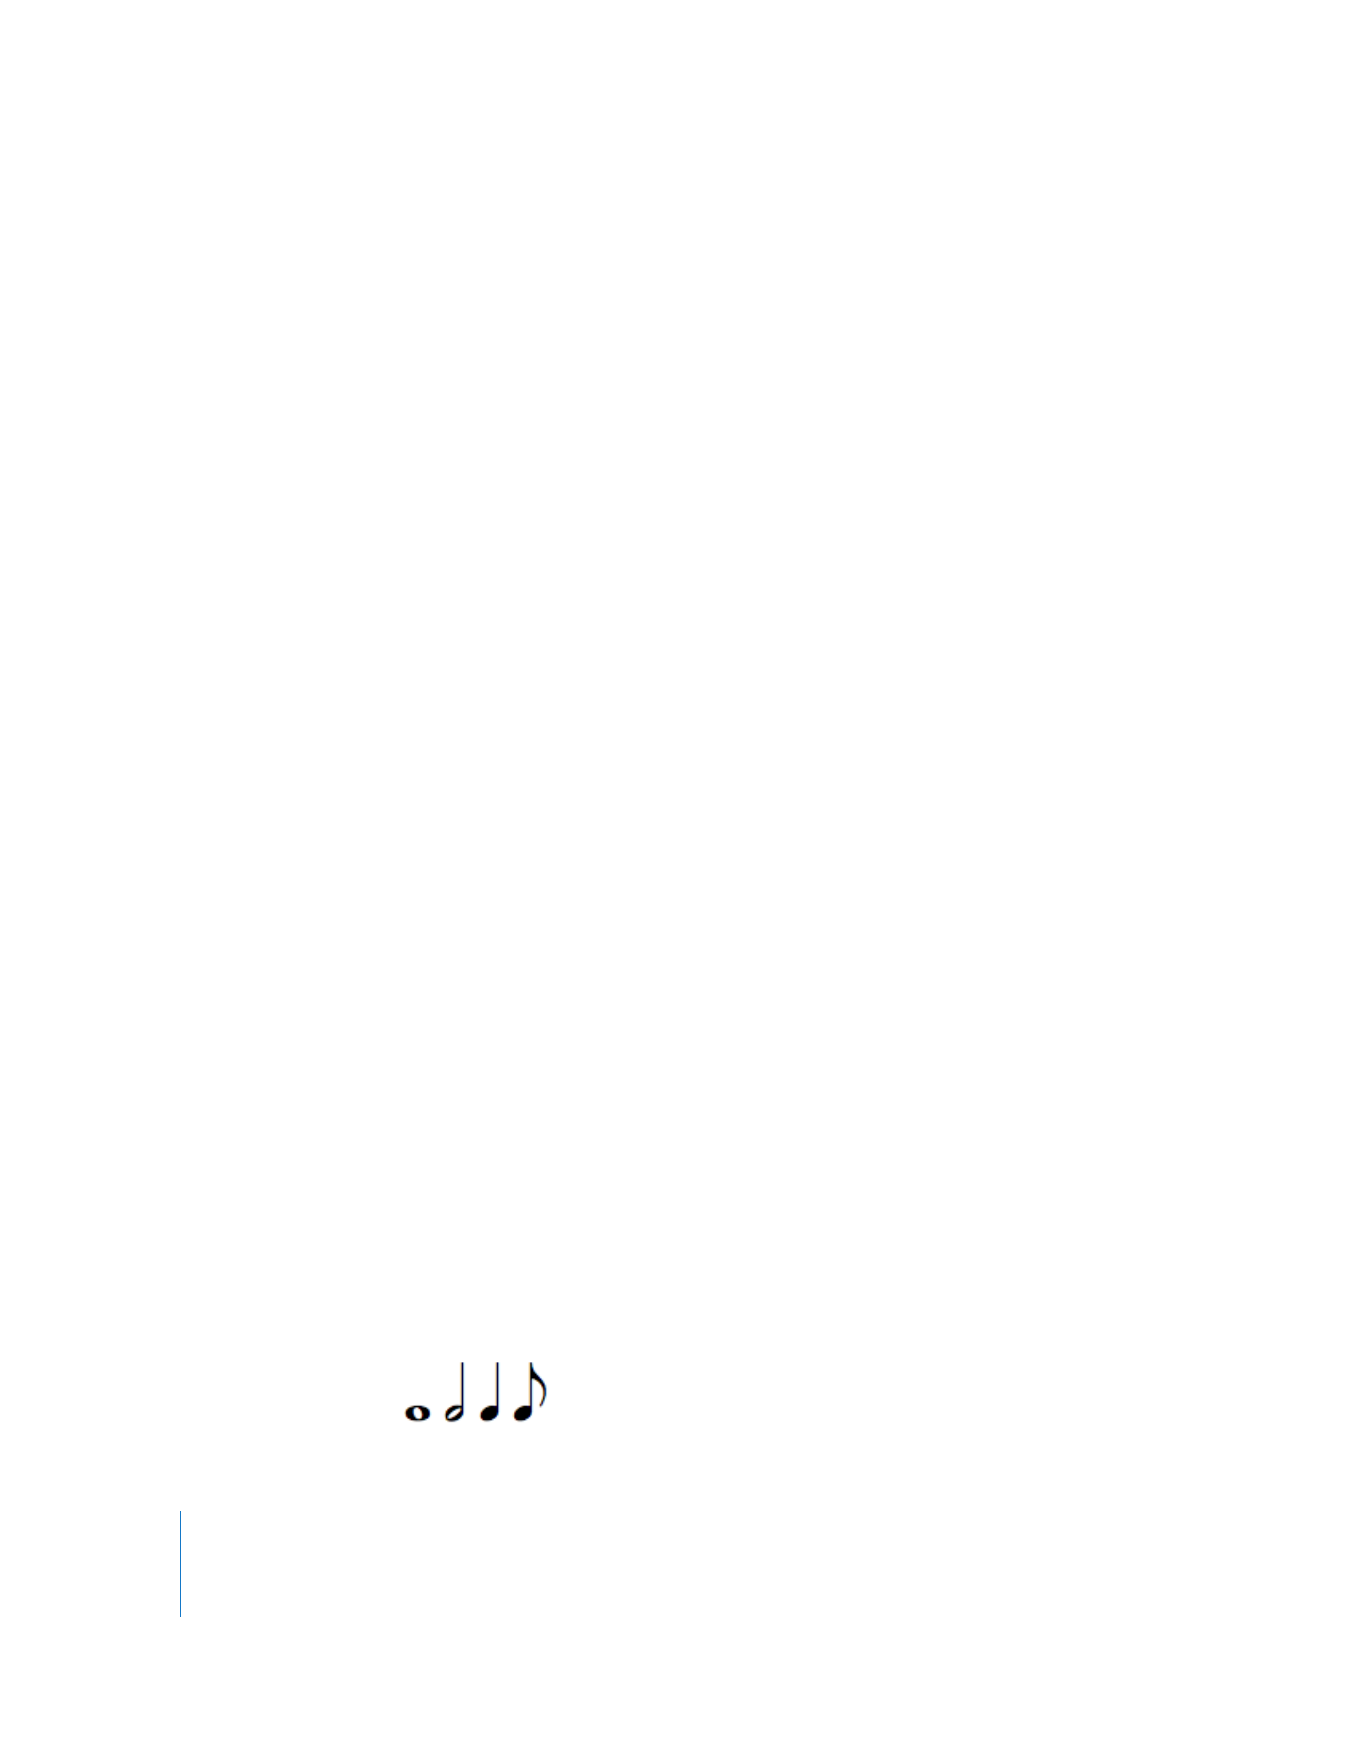
 Notes: A musical note has several parts, including the note head and stem. The note
head (the round part of the note) indicates the note’s duration (how long the note
lasts). Notes of shorter duration (shorter than a quarter note) have flags, and
sometimes these notes are joined together by beams. Each note shown below is half
as long as the note to its left (from left to right, the notes are whole note, half note,
quarter note, and eighth note).
Chapter 6
Tutorial 4: Playing and Recording Software Instruments
65
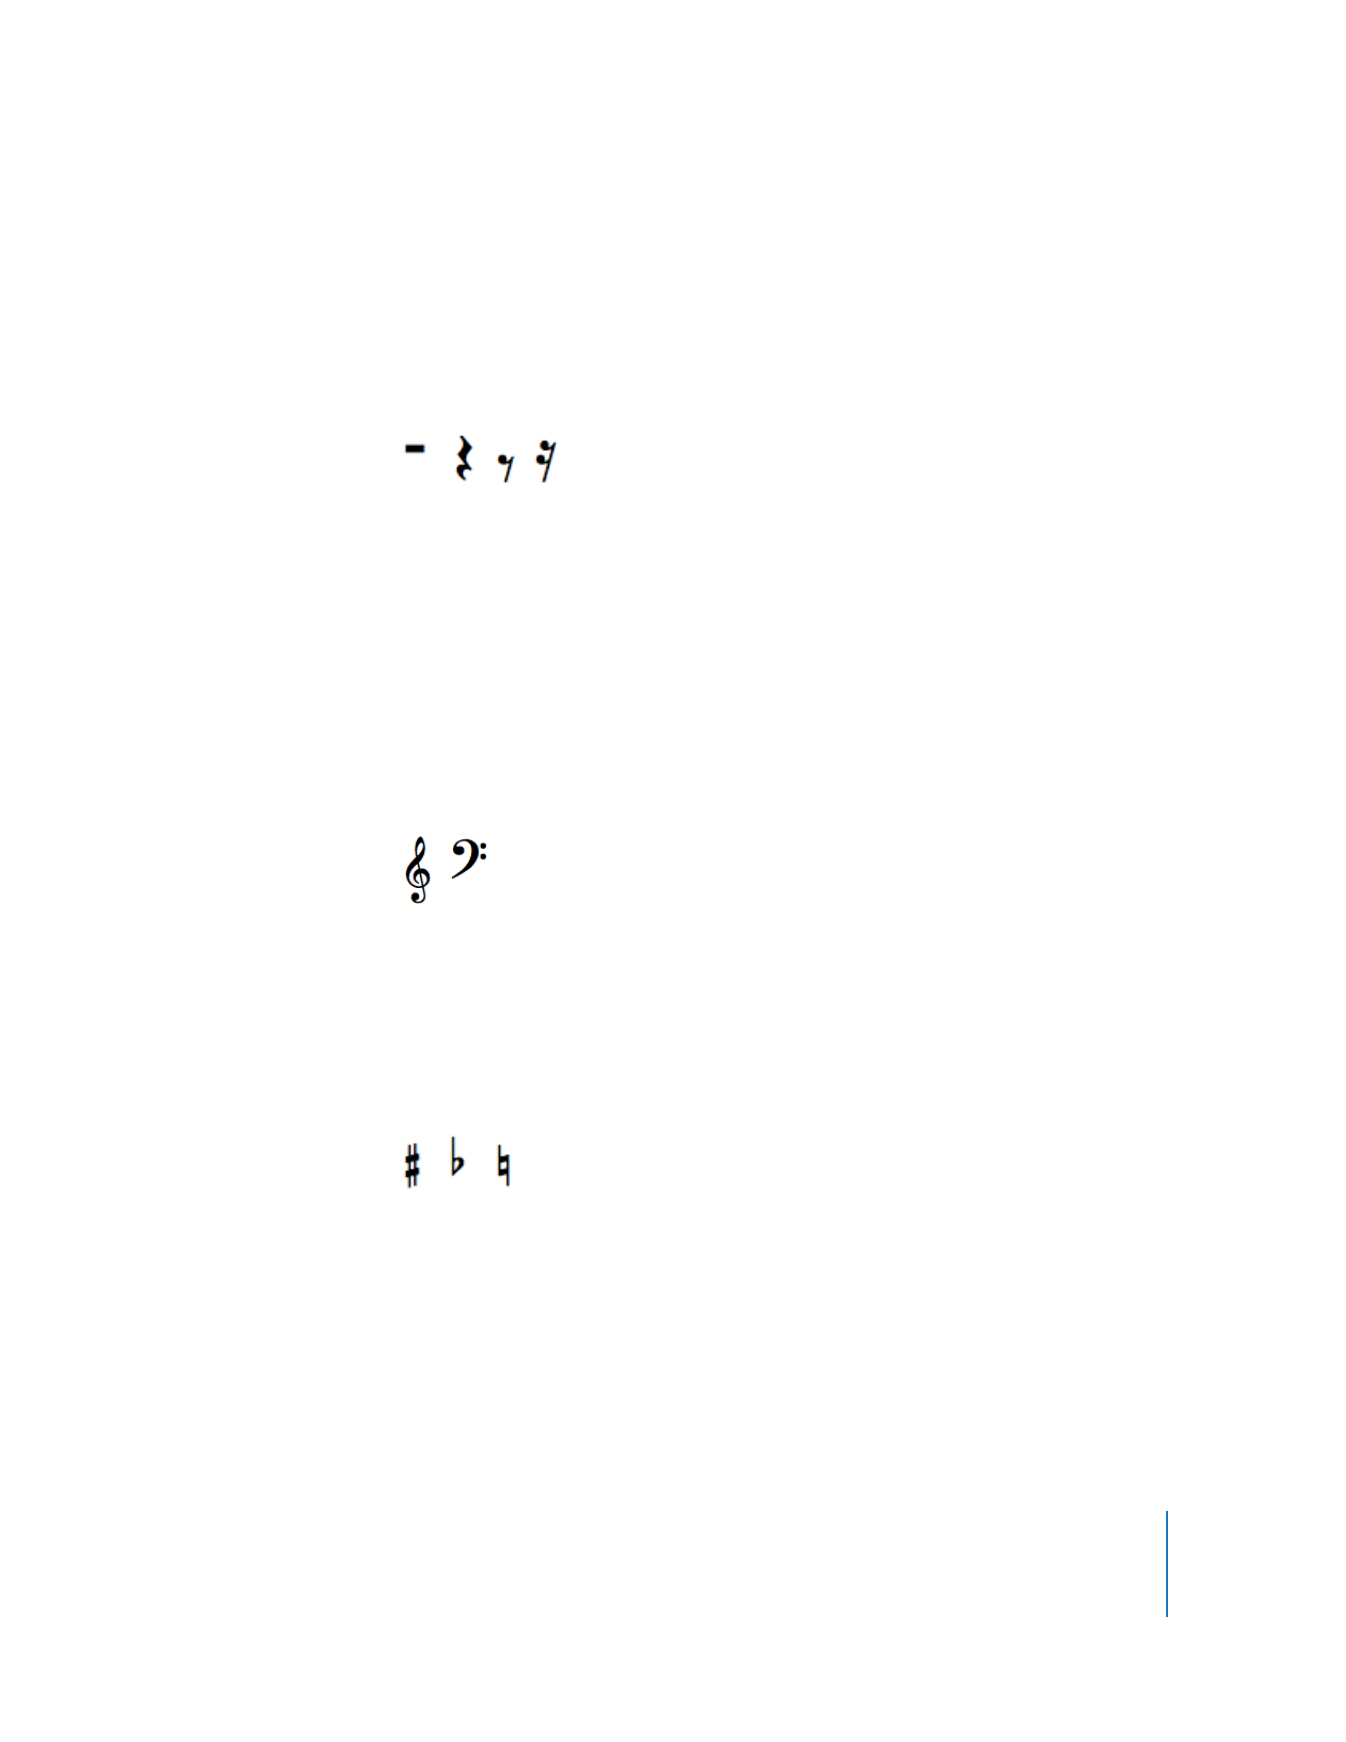
 Rests: When you’re reading music notation while playing, it is just as important
to know the space between notes as the notes themselves. The silences between
notes are shown by rests. Rests, like notes, have different symbols for different
lengths of time, and shorter rests use flags. Each rest shown below is half as long
as the rest to its left (from left to right, the rests are half rest, quarter rest, eighth rest,
and sixteenth rest).
 Staves: The set of five horizontal lines on which the notes appear is called a staff (the
plural is staves). The lines of the staff let you see the pitch of the notes from high to
low, like a grid. By default, GarageBand shows you two staves, similar to piano
notation. This format shows a range of over four octaves, with middle C in the center
(between the two staves). Most instruments and voices, except for the lowest bass
instruments, fall in this range. You can change score view to show only a single staff.
 Clefs: The symbol at the left edge of each staff is called a clef. Clefs indicate the
range of notes that the lines of the staff display. The staves in score view use the two
most common clefs, the treble and bass clef. You can change score view to show a
single clef, either treble or bass.
 Key signs: If the project is in a key other than C, the sharps or flats in the key appear
between the clef and the time signature. Sharps are raised a semitone above the
natural note (so, for instance, C#–“C sharp”–is a semitone higher than C), and flats are
lowered a semitone (so Bb–”B flat”–is a semitone lower than B). The symbols for
sharps and flats are shown below, followed by the “natural” symbol that cancels a
sharp or flat.
 Bar lines: The vertical lines extending through both staves show the beginning of
each measure (measures are also called bars).

66
Chapter 6
Tutorial 4: Playing and Recording Software Instruments
In addition to standard music notation symbols, score view includes the following
features to make working easier:
 Duration bars: In addition to the musical note itself, each note has a duration bar
that graphically displays the note’s duration (the amount of time the note lasts).
 Beat guides: In score view, the beat ruler not only shows measures and beats, but
also includes beat guides. Beat guides help you see the exact position of notes in
time. A beat guide appears as a small gray circle or dot above each note; when you
move a note, the beat guide moves with it to indicate the note’s position.
To view a Software Instrument region in score view:
1
In the timeline, select a Software Instrument region.
2
Click the Score button at the top of the editor’s header area.
In music notation, the position of notes is shown in terms of musical values (note
values). When you play music, you might play some notes slightly off the beat (ahead
of the beat or behind the beat) to achieve different types of feeling. These small
differences are not shown in musical notation.
In score view, GarageBand shows the position of notes “rounded” to the nearest note
value. You can choose the note value to round the display of notes to from the timeline
grid menu in the upper-right corner of the editor. Rounding does not change how the
note plays; it only changes the display, so that notes slightly out of time are shown at
the intended position.
To choose the note value for score view:
m
Click the Grid button in the upper-right corner of the editor, then choose a note value
from the timeline grid menu.
Editing Notes in Score View
You can edit notes and sustain pedal information for a Software Instrument region in
score view, just as you can in graphic view. You can:
 Add notes
 Select notes
 Move notes in time
 Cut and copy notes
 Change the pitch of notes
 Change the duration of notes
 Change the velocity of notes
 Add pedal markings to sustain notes
 Change the clef sign
Chapter 6
Tutorial 4: Playing and Recording Software Instruments
67
Adding Notes
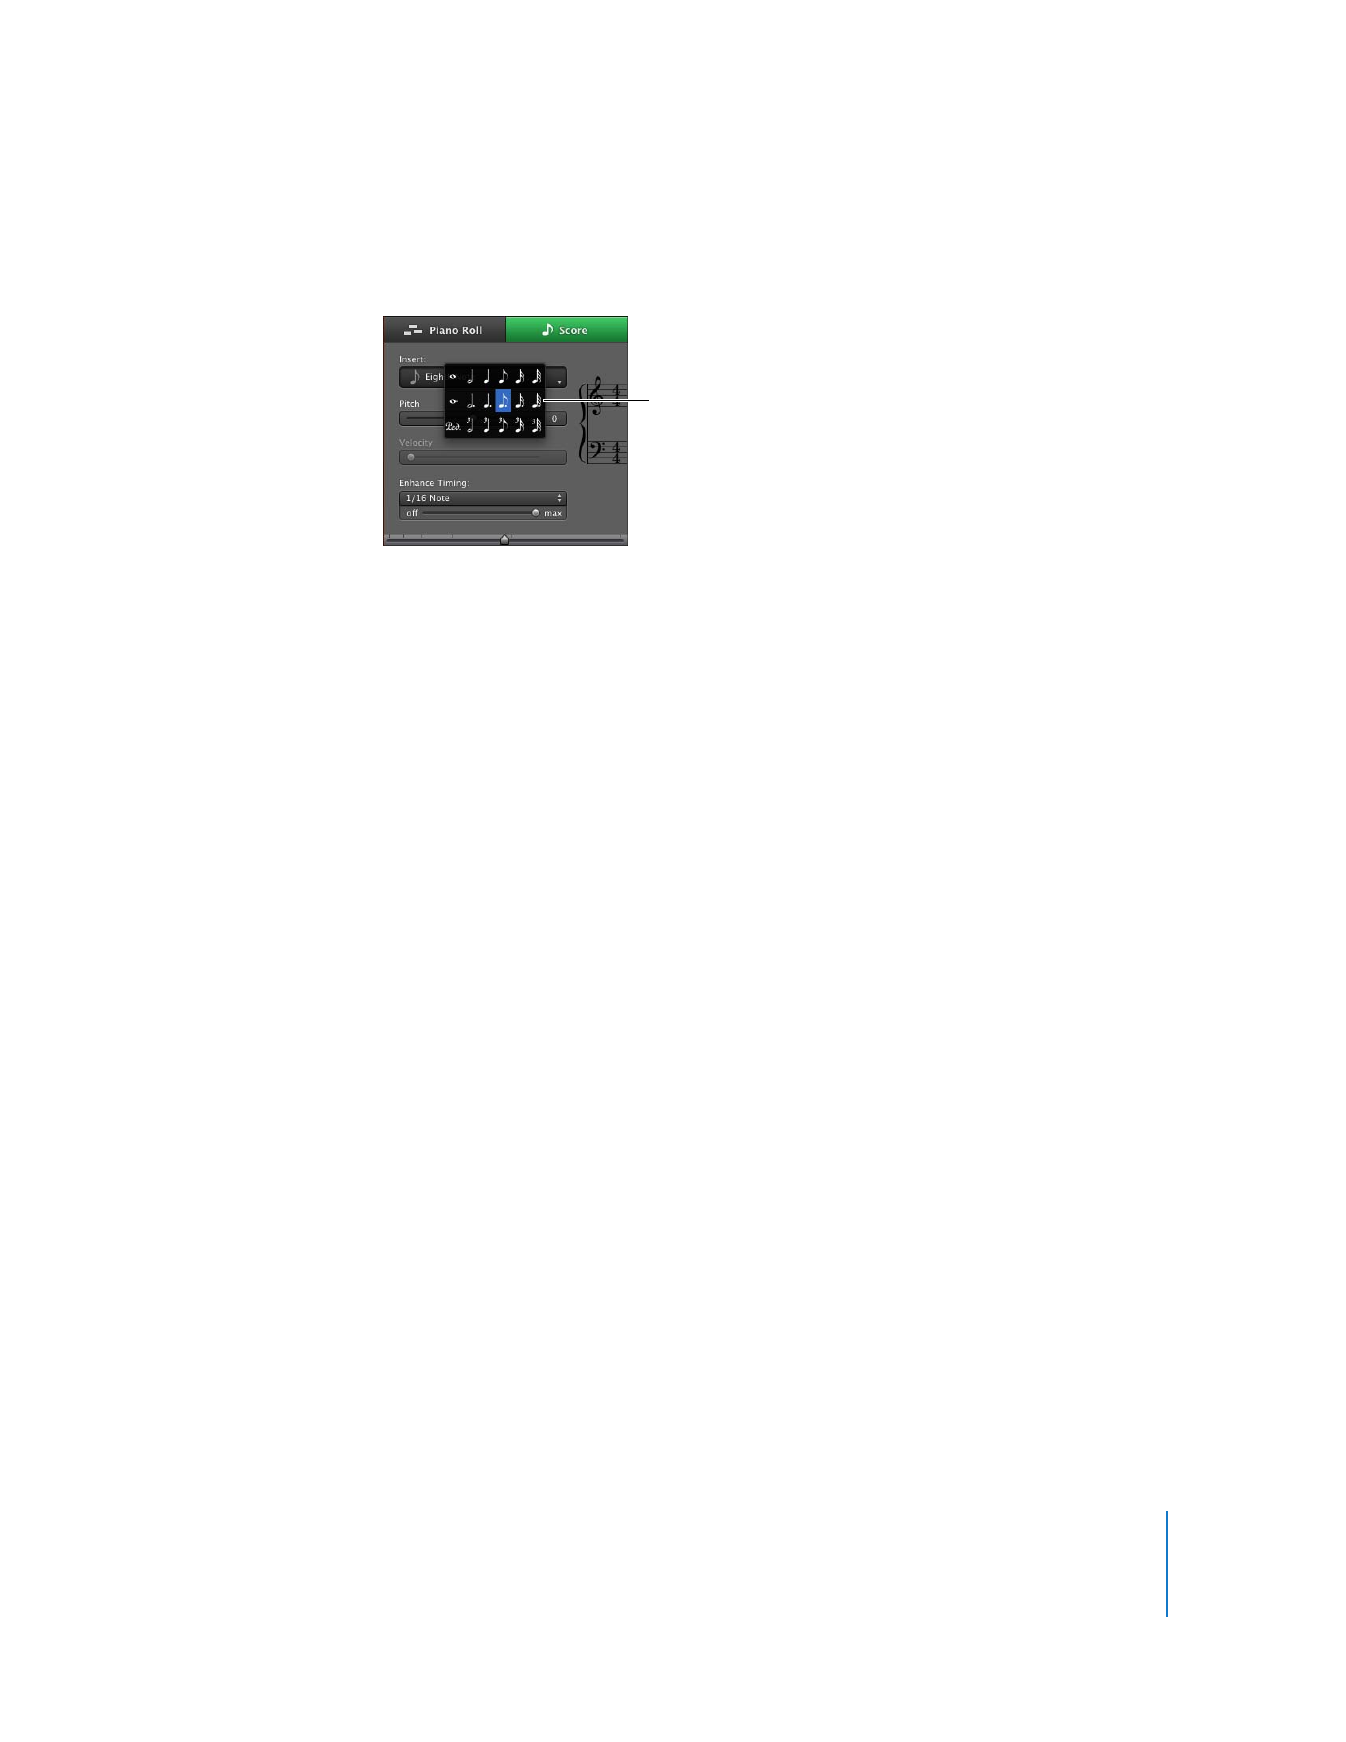
You add a note by choosing the note value for the note, then clicking in the editor.
To choose a note value:
m
Choose the note value you want from the Insert menu in the header area of the editor.
You can also Control-click anywhere in the notation display to choose a note value.
To add a note:
m
In the editor, Command-click at the point you want to add the note.
Selecting Notes
Before editing notes in score view, you must first select them.
To select a note:
m
Click the note head (the round part of the note). You can select multiple notes by Shift-
clicking or by dragging around the notes to enclose them.
Moving Notes
You can move notes in time in score view, in the same way as in the editor’s graphic
view.
To move a note in time:
m
Select the note, then drag it left or right. You can also move selected notes by pressing
the Left Arrow or Right Arrow keys.
As you move a note, the beat guide moves to help you see the note’s exact position
in time.
Copying Notes
You can copy notes in score view.
To copy a note:
m
Option-drag the note head to a new position.
Choose a note value
from the Insert pop-up
menu.

68
Chapter 6
Tutorial 4: Playing and Recording Software Instruments
Changing the Pitch of Notes
You can change the pitch of, or transpose, notes in score view.
To change the pitch of a note:
m
Select the note, then drag it up or down. You can also change the pitch of selected
notes by pressing the Up Arrow or Down Arrow keys.
You hear the note’s new pitch as it moves.
Changing the Length (Duration) of Notes
When you select a note, a duration bar for the note appears. You can change the note’s
duration (how long the note lasts) using the duration bar.
To change the duration of a note:
1
Select the note.
2
Drag the right edge of the duration bar left (to shorten the note) or right (to lengthen
the note). Duration bars work just like the notes in graphic view.
Deleting Notes
You can delete notes that you no longer want to include in your project.
To delete a note:
m
Select the note, then press the Delete key.
Changing Note Velocity
For many Software Instruments, the sound changes depending on the note’s velocity.
You can change the velocity of notes in score view, in the same way as in graphic view.
To change a note’s velocity:
m
Select the note, then drag the Velocity slider left (to lower the velocity) or right (to raise
the velocity).
Adding Pedal Symbols
Music notation for piano and some other instruments includes symbols for the sustain
pedal. When the sustain pedal is down, the instrument sustains all notes until the pedal
is released (up). You can add pedal down and pedal up symbols, which control whether
the notes are sustained in GarageBand.
To add pedal down and up symbols:
1
Click the Note Value button and choose the pedal symbol from the menu.
2
Hold down the Command key and place the pointer in the editor at the point where
you want the pedal down marker.
3
Press the mouse button.
Chapter 6
Tutorial 4: Playing and Recording Software Instruments
69
The pedal down symbol appears at the current position of the pointer. If you release
the mouse button, the pedal up symbol is placed shortly after the pedal down symbol.
4
Without releasing the mouse button, drag to the point where you want to place the
pedal up marker.
5
Release the mouse button.
The pedal up symbol appears at the current position of the pointer.
To move the pedal up symbol:
1
Click the pedal symbol to select it.
The pedal down and pedal up symbols become green, indicating that they’re selected.
2
Drag the pedal up symbol to its new position, then release the mouse button.
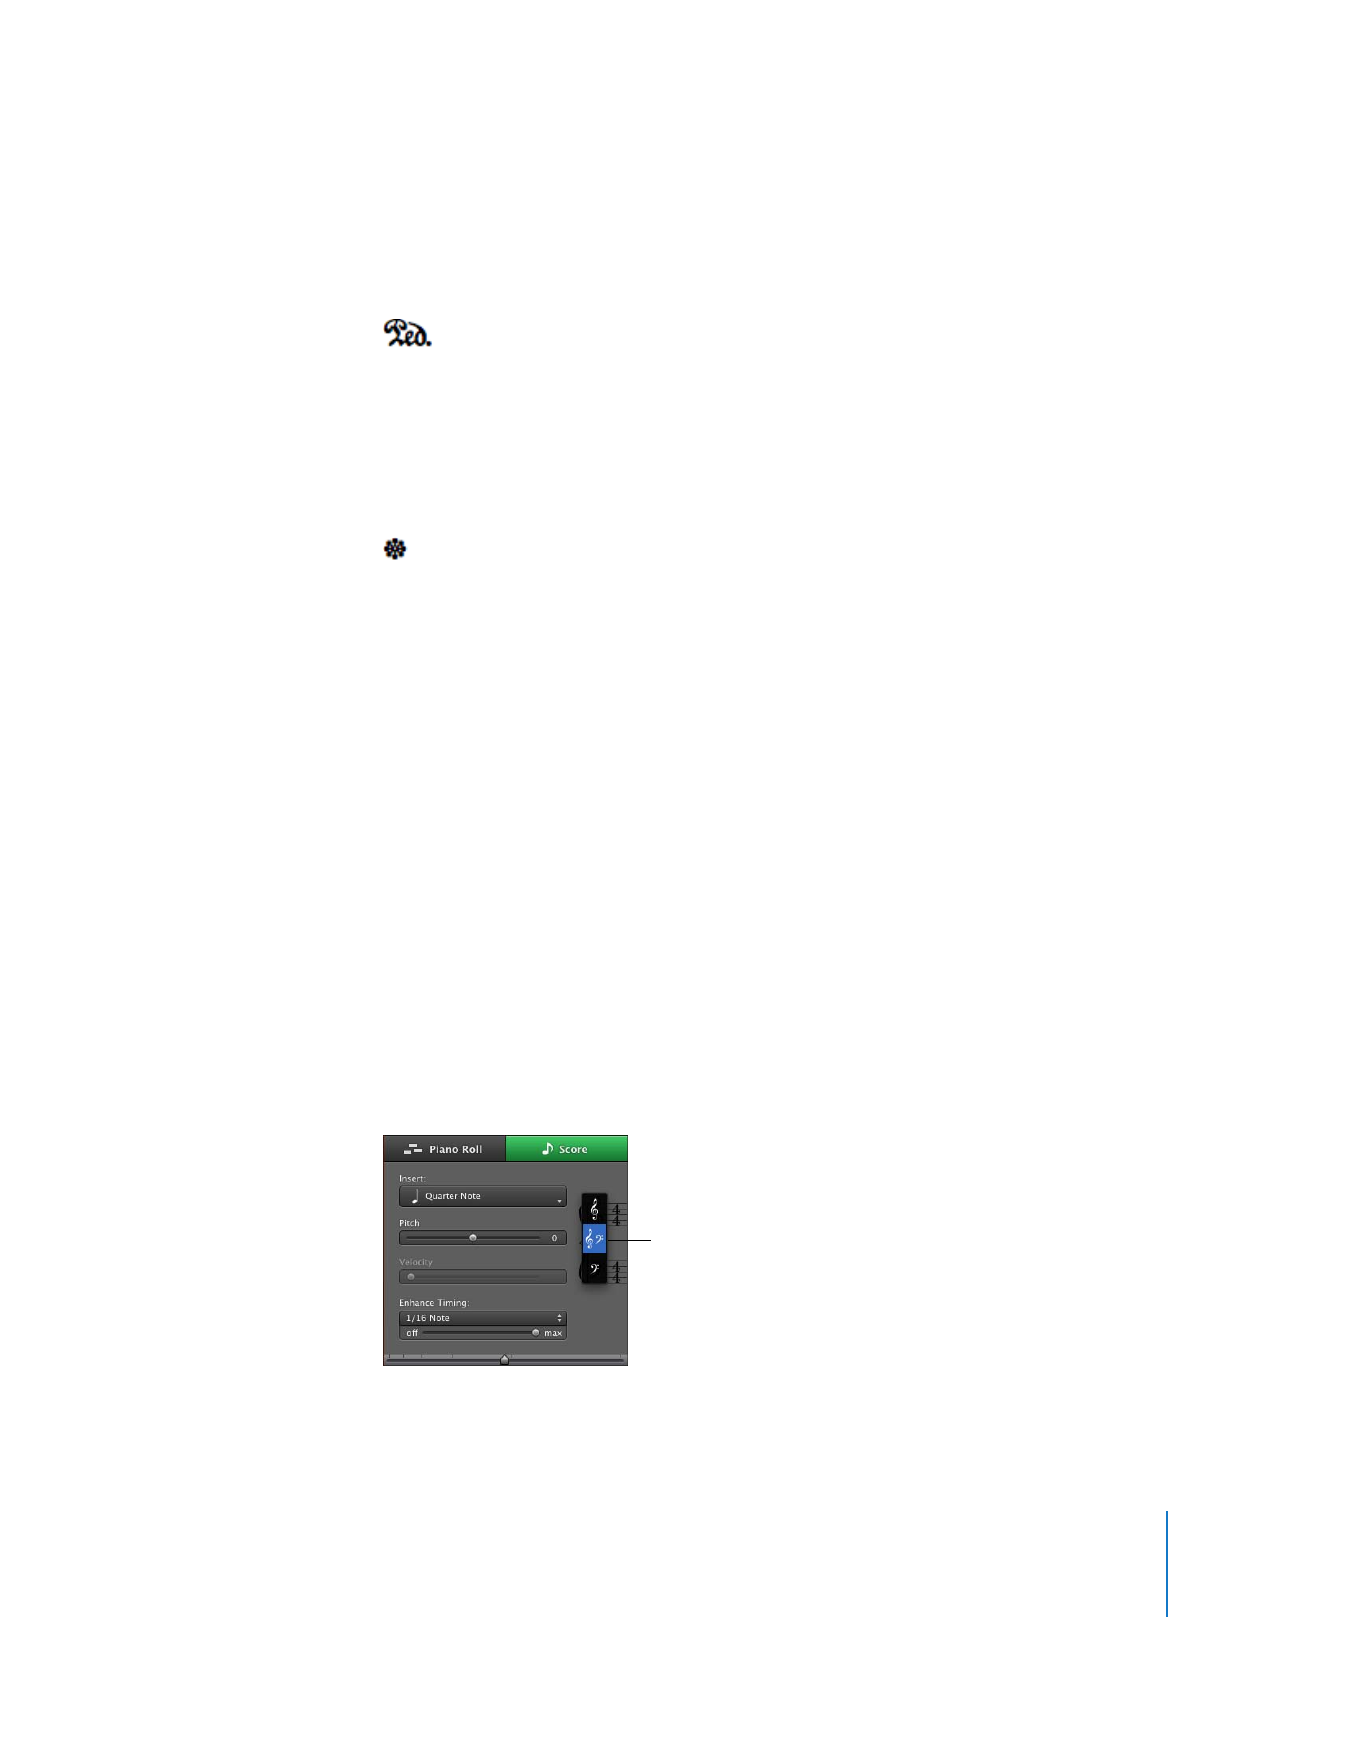
Changing the Clef Sign
By default, when you view a Software Instrument track as music notation, it shows the
treble and bass clefs in “piano style.” This format is useful for pianos, synthesizers, and
other instruments with a wide range of notes. However, some instruments, particularly
solo (single-note) instruments such as strings and winds, can use only a single clef, the
treble or bass clef.
You can change the score view display to show only a single treble or bass clef, and
later change it back to the “piano style” two-clef display.
To change the clef sign in score view:
1
Click the clef (or between the clefs) in the header of the score display.
A menu appears showing the different clefs.
2
Choose a new clef from the menu.
Click here to choose
a different clef.

70
Chapter 6
Tutorial 4: Playing and Recording Software Instruments
Printing Music Notation
You can print a Software Instrument track as music notation. When you print a track as
music notation, the track is printed in a standard layout, with the note values currently
displayed and using the clef sign currently shown in score view. The printed music
notation includes the project name as the title, the tempo, and the composer name.
To print a Software Instrument track as music notation:
1
Select the Software Instrument track.
2
Click Score to show the track as music notation.
Click the Grid button in the upper-right corner of the editor, and make sure the Score
grid is set to show the correct note value.
3
Choose File > Print.
4
In the Print dialog, choose the correct settings for your printer, then click Print.
The track is printed as music notation. The project name appears at the top of the page
as the title. The tempo appears in the upper left, and the composer name (as set in
GarageBand preferences) appears in the upper right. The measure number appears
above the first bar of each row of the music (called a stave). If the printed notation
requires more than one page, the page number appears centered at the bottom of
each page.
7
71
7