
Tutorial 3: Recording Vocals
and Musical Instruments
You can record your voice or any other sound you can
capture using a microphone. If you play a musical
instrument, you can also record it in a GarageBand
project.
In GarageBand, you record sound from a microphone or from a musical instrument
connected to your computer in a Real Instrument track. Real Instrument tracks have
blue headers, and the regions containing your recordings appear purple. You can
change track settings and add effects to Real Instrument tracks in the Track Info pane.
In this tutorial, you’ll learn how to:
 Add a Real Instrument track and change instrument settings
 Add an Electric Guitar track and choose a guitar amp
 Record sound in a Real Instrument or Electric Guitar track
 Record over a specific part of a project using the cycle region
 Record multiple takes
 Tune your guitar
Adding a Real Instrument Track
To record sound in a Real Instrument track, you first add the track to your project and
prepare it for recording.
To add a Real Instrument track:
1
Click the Add Track button, or choose Track > New Track.
2
In the New Track dialog, click Real Instrument, then click Create.
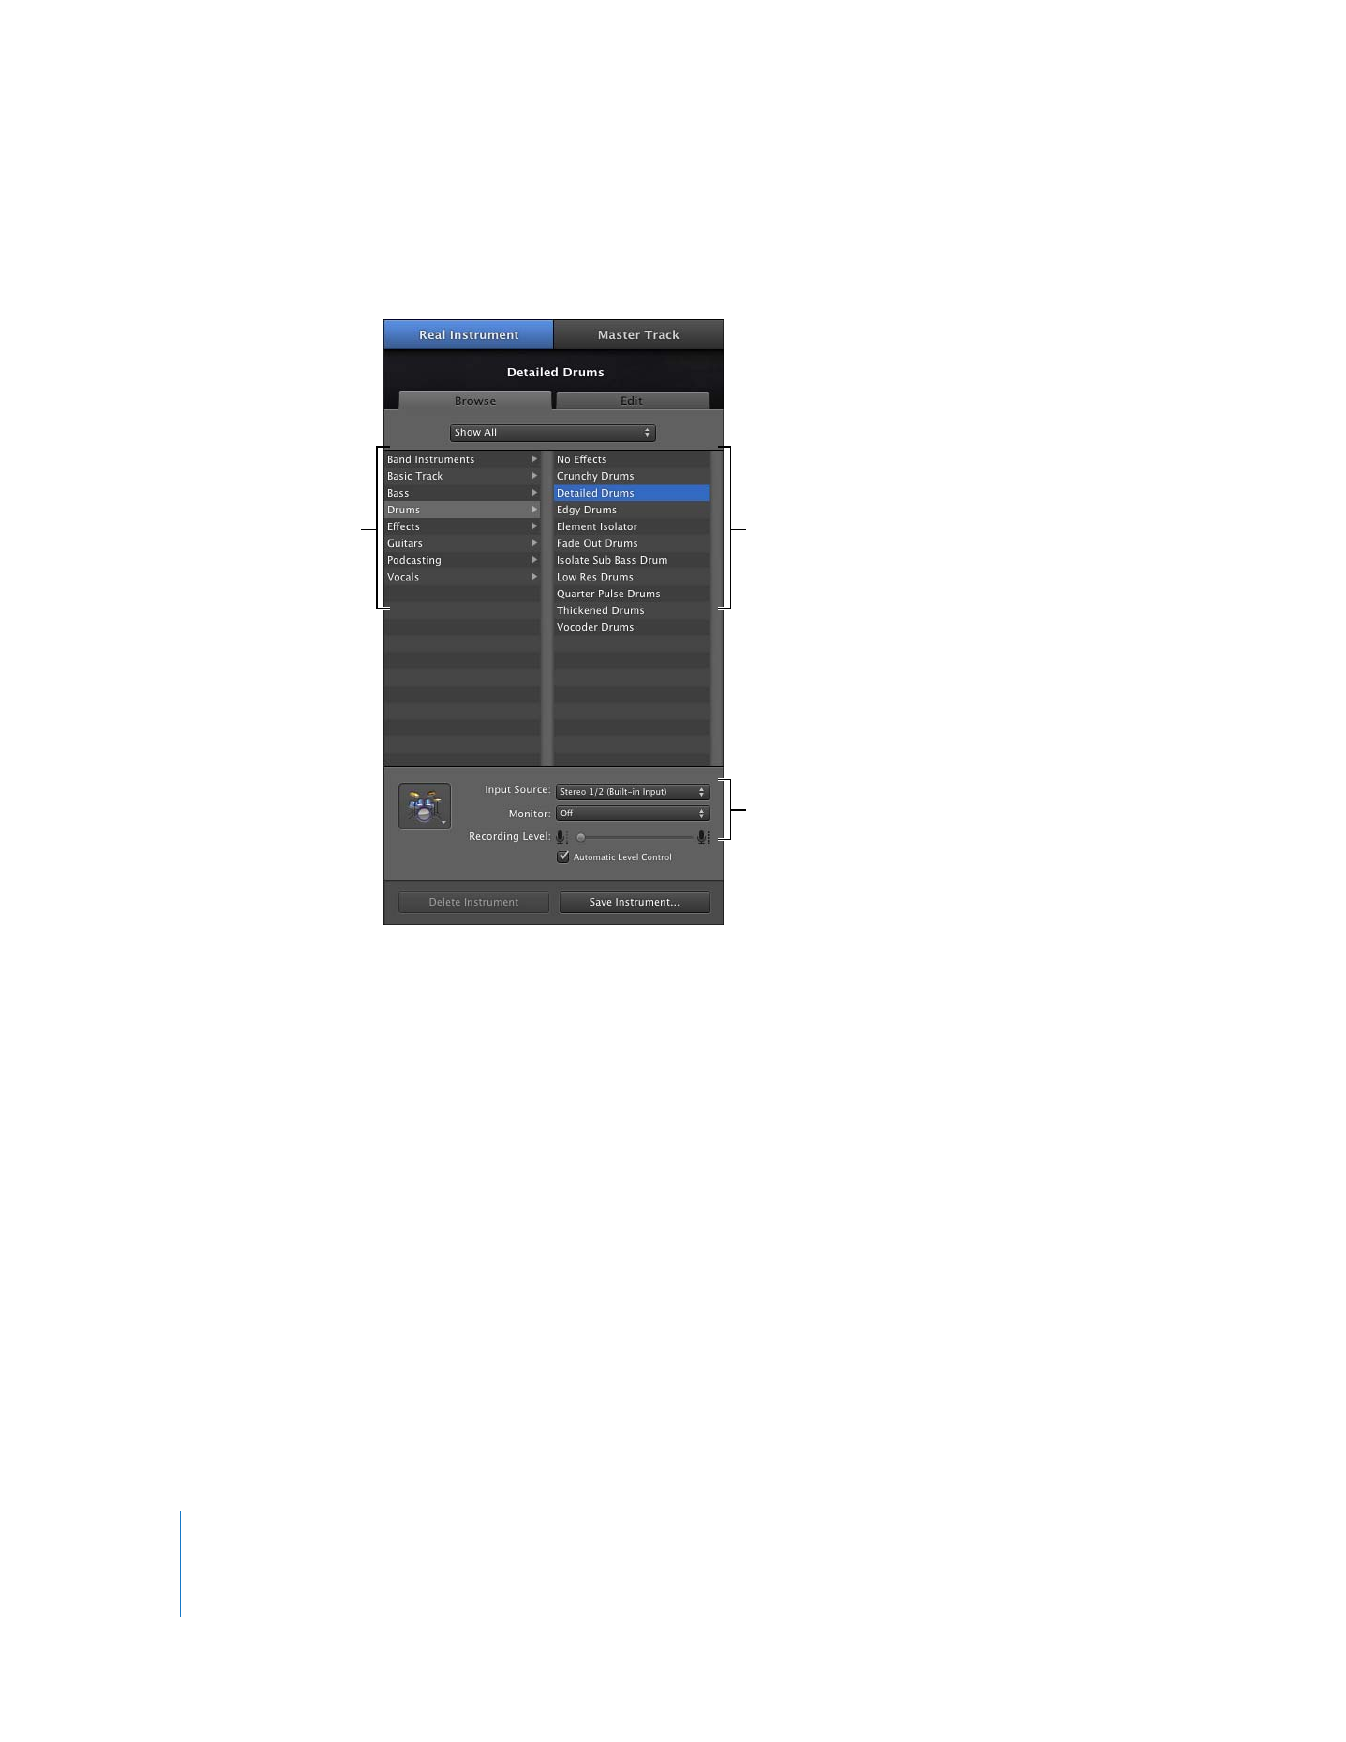
A new Real Instrument track appears in the timeline, and the Track Info pane opens to
the right of the timeline. The Track Info pane is where you choose different settings for
the selected track.
50
Chapter 5
Tutorial 3: Recording Vocals and Musical Instruments
3
In the Track Info pane, select an instrument type from the list on the left, then select an
instrument from the list on the right.
4
Choose the audio input for your microphone or instrument from the Input Source pop-
up menu.
 If you’re using your computer’s built-in microphone, choose Built-In Mic.
 If your microphone or instrument is connected to your computer’s audio input port,
choose Line In.
 If your microphone or instrument is connected to an audio interface, choose the
correct channel (or stereo pair of channels) from the menu.
 If the instrument you’re recording has a single input, choose a mono (monophonic)
input. If the instrument has both left and right inputs, choose a stereo input.
5
If you want to hear your microphone or instrument as you play, choose On or On with
Feedback Protection from the Monitor pop-up menu.
Use these controls to set
the input format and input
channel and to turn
monitoring on or off.
Select an instrument
category from this list.
Select an instrument
from this list.

Chapter 5
Tutorial 3: Recording Vocals and Musical Instruments
51
Turning on monitoring can cause feedback (loud, sharp noise) if the audio input picks
up the output from your speakers. You can choose “On with Feedback Protection” to
have GarageBand automatically turn off monitoring if feedback from the input source
occurs. You can also avoid feedback by listening with headphones rather than speakers.
You can reduce possible feedback by making sure the microphone or instrument is
pointed away from your speakers, and by turning down the master volume.
6
Adjust the recording level for the track so that the level as high as possible without
causing clipping or distortion.
To adjust the recording level, do one of the following:
 If the instrument or microphone has a volume control, adjust the volume control on
the device.
 If the instrument or microphone is connected to an audio interface, adjust the
volume control on the audio interface.
 In the Track Info pane, drag the Recording Level slider left to lower the input volume
for the selected channel, or drag it right to raise the input volume.
Note: You can’t control the volume of some audio interfaces and other devices from
GarageBand. If the Recording Level slider in the Track Info pane is dimmed, you
cannot adjust the input volume in GarageBand.
 Select the Automatic Level Control checkbox to have GarageBand automatically
lower the input level to avoid clipping, and raise the level to avoid excessive noise
when recording.
Note: If you chose “On with Feedback Protection” from the Monitor pop-up menu,
you cannot select Automatic Level Control.
Adding a Basic Track
You can also add a basic track. A basic track is a stereo Real Instrument track containing
no effects. You can change the input source and effects settings of a basic track after
adding it to the project.
To add a basic track:
m
Choose Track > New Basic Track.
The basic track appears in the timeline, and the Track Info pane opens. You can make
the same input settings described in the previous section.
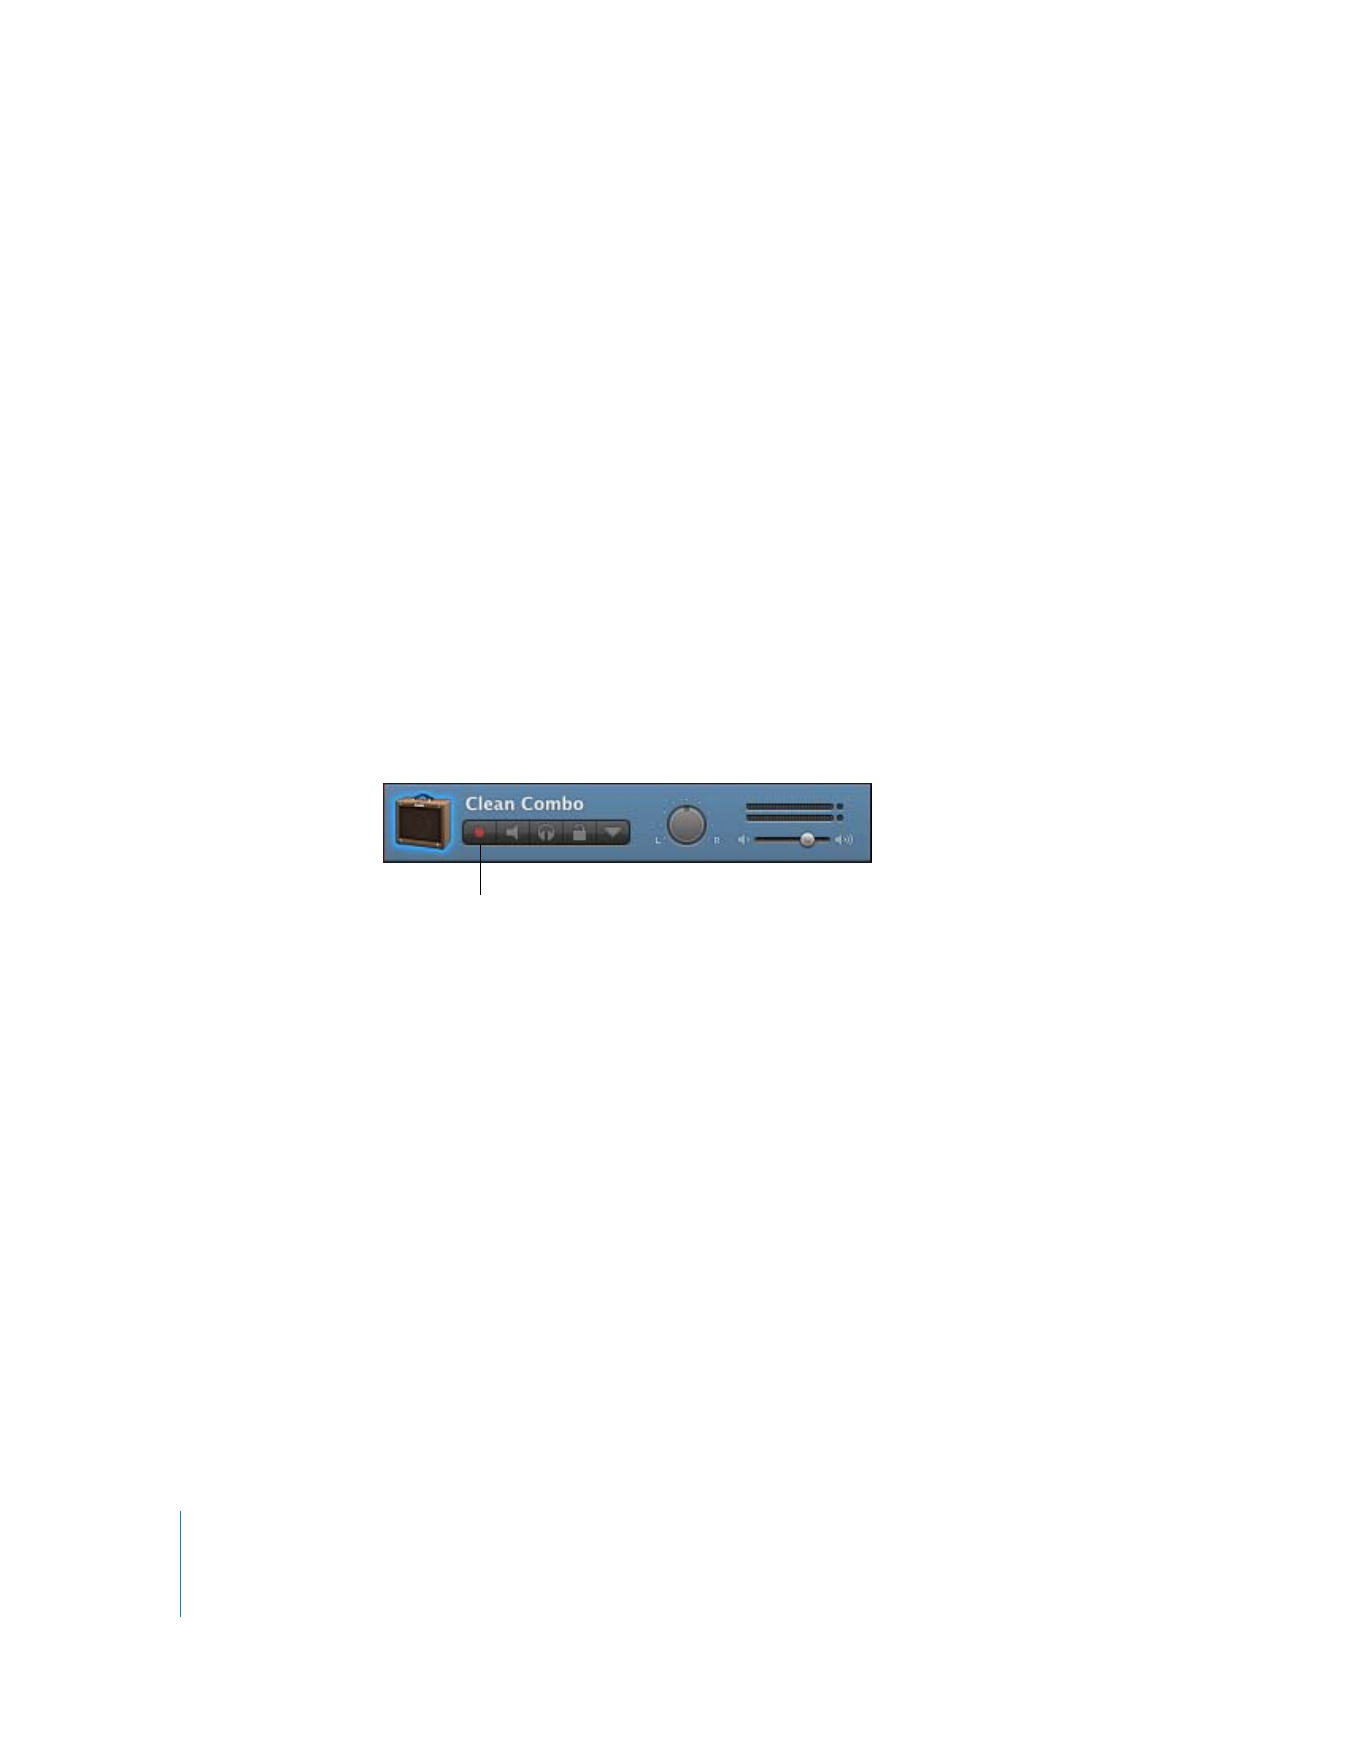
Adding an Electric Guitar Track
If you play an electric guitar, you can add an Electric Guitar track and record your guitar
in the track. You can choose a guitar preset, choose a guitar amp, and add stompbox
guitar effects to customize the sound of each Electric Guitar track.
52
Chapter 5
Tutorial 3: Recording Vocals and Musical Instruments
To add an Electric Guitar track:
1
Click the Add Track button, or choose Track > New Track.
2
In the New Track dialog, click Electric Guitar, then click Create.
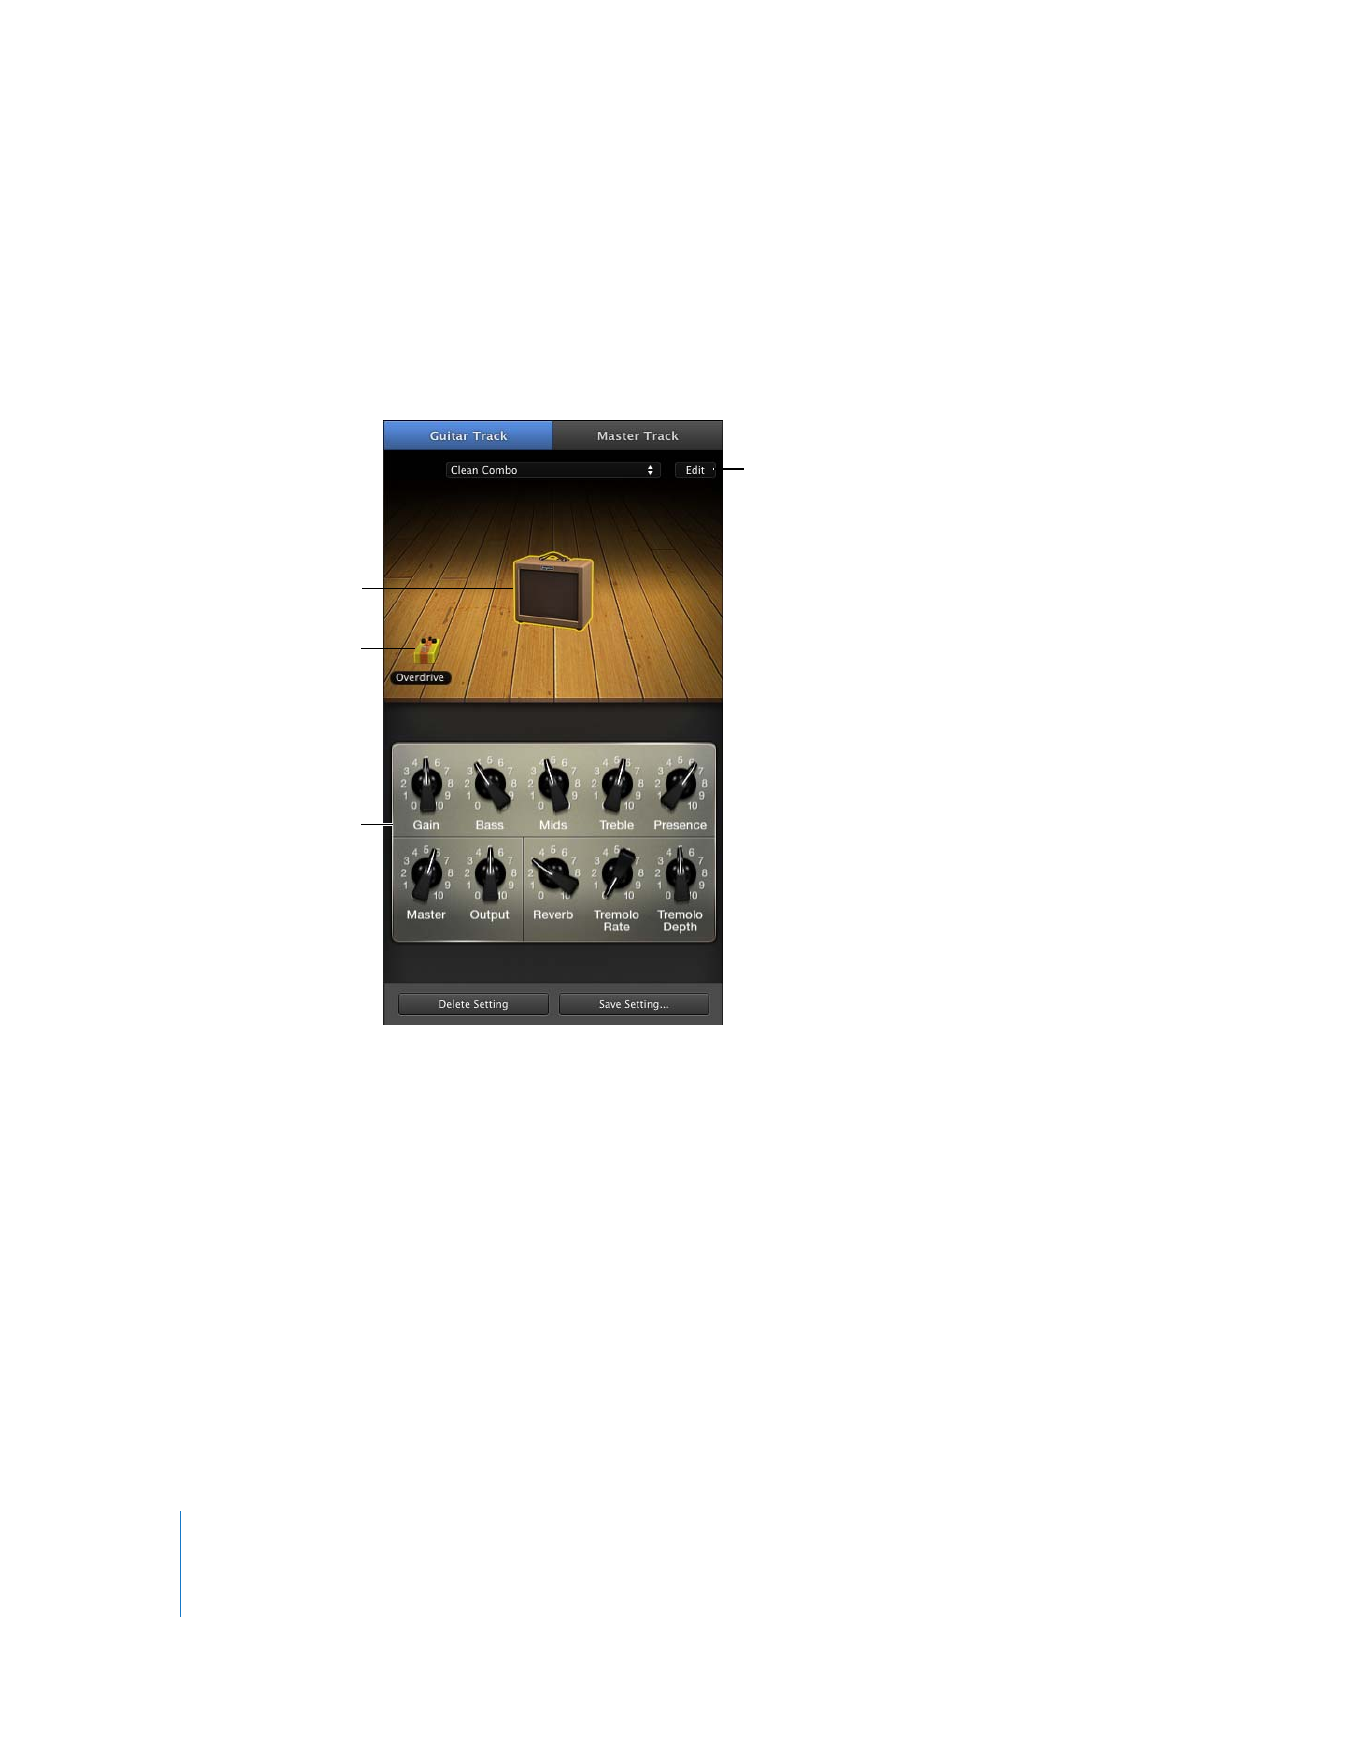
A new Electric Guitar track appears in the timeline, and the Track Info pane opens to
the right of the timeline, showing a guitar amp and stompbox effects for the track.
3
In the Track Info pane, choose a guitar preset from the pop-up menu.
4
To choose a different guitar amp, move the pointer over the amp on the stage, then
click the left or right arrow.
5
To change the input source, click Edit (with the amp selected), then choose a different
input from the Input Source pop-up menu.
6
To hear your guitar as you play, choose On or On with Feedback Protection from the
Monitor pop-up menu.
Getting Ready to Record
After you’ve added a Real Instrument or Electric Guitar track to record in, there are a
few things to check before you start recording:
Click the amp to see the
amp controls below.
Click a stompbox to see
its controls below.
Controls for the
selected item appear
below the stage.
Click to change the input
source or see all available
stompbox effects.
Chapter 5
Tutorial 3: Recording Vocals and Musical Instruments
53
 Make sure your microphone, guitar, or other instrument is connected properly and is
working.
 Make sure the correct audio drivers are selected in the Audio/MIDI pane of
GarageBand preferences. When you add a new audio device, GarageBand asks if you
want to use the device for audio input and output.
 Open the Track Info pane to make sure the instrument has the instrument and effects
settings you want, and is using the correct input source.
 Sing or play a few notes and watch the level meter in the track’s header to make sure
the track is receiving input and isn't clipping. If the red dots at the right of the level
meter (called clipping indicators) light up, adjust the input level by dragging the
Recording Level slider, selecting Automatic Level Control, or lowering the level of the
audio device connected to your computer.
 Set the project tempo and key so that you won’t have to change them later.
Recording a Real Instrument
Now you’re ready to record sound to the selected Real Instrument or Electric Guitar
track.
To record to a Real Instrument or Electric Guitar track:
1
Make sure the track is selected, and that the red Record Enable light in the track’s
header is on.
2
Move the playhead to the point in the timeline where you want to start recording.
3
Choose Control > Count In to have the metronome play a one-measure count-in before
recording starts to make it easier to start playing on the beat.
(Alternatively, you can move the playhead a few beats before the point where you
want the music to come in.)
4
Click the Record button in the transport controls to start recording.
5
Start playing your instrument or singing into your microphone. As you record, a new
region appears in the selected Real Instrument track with the music you record.
6
When you’re finished, click the Play button to stop recording.
After a few moments, an audio waveform appears in the newly recorded region.
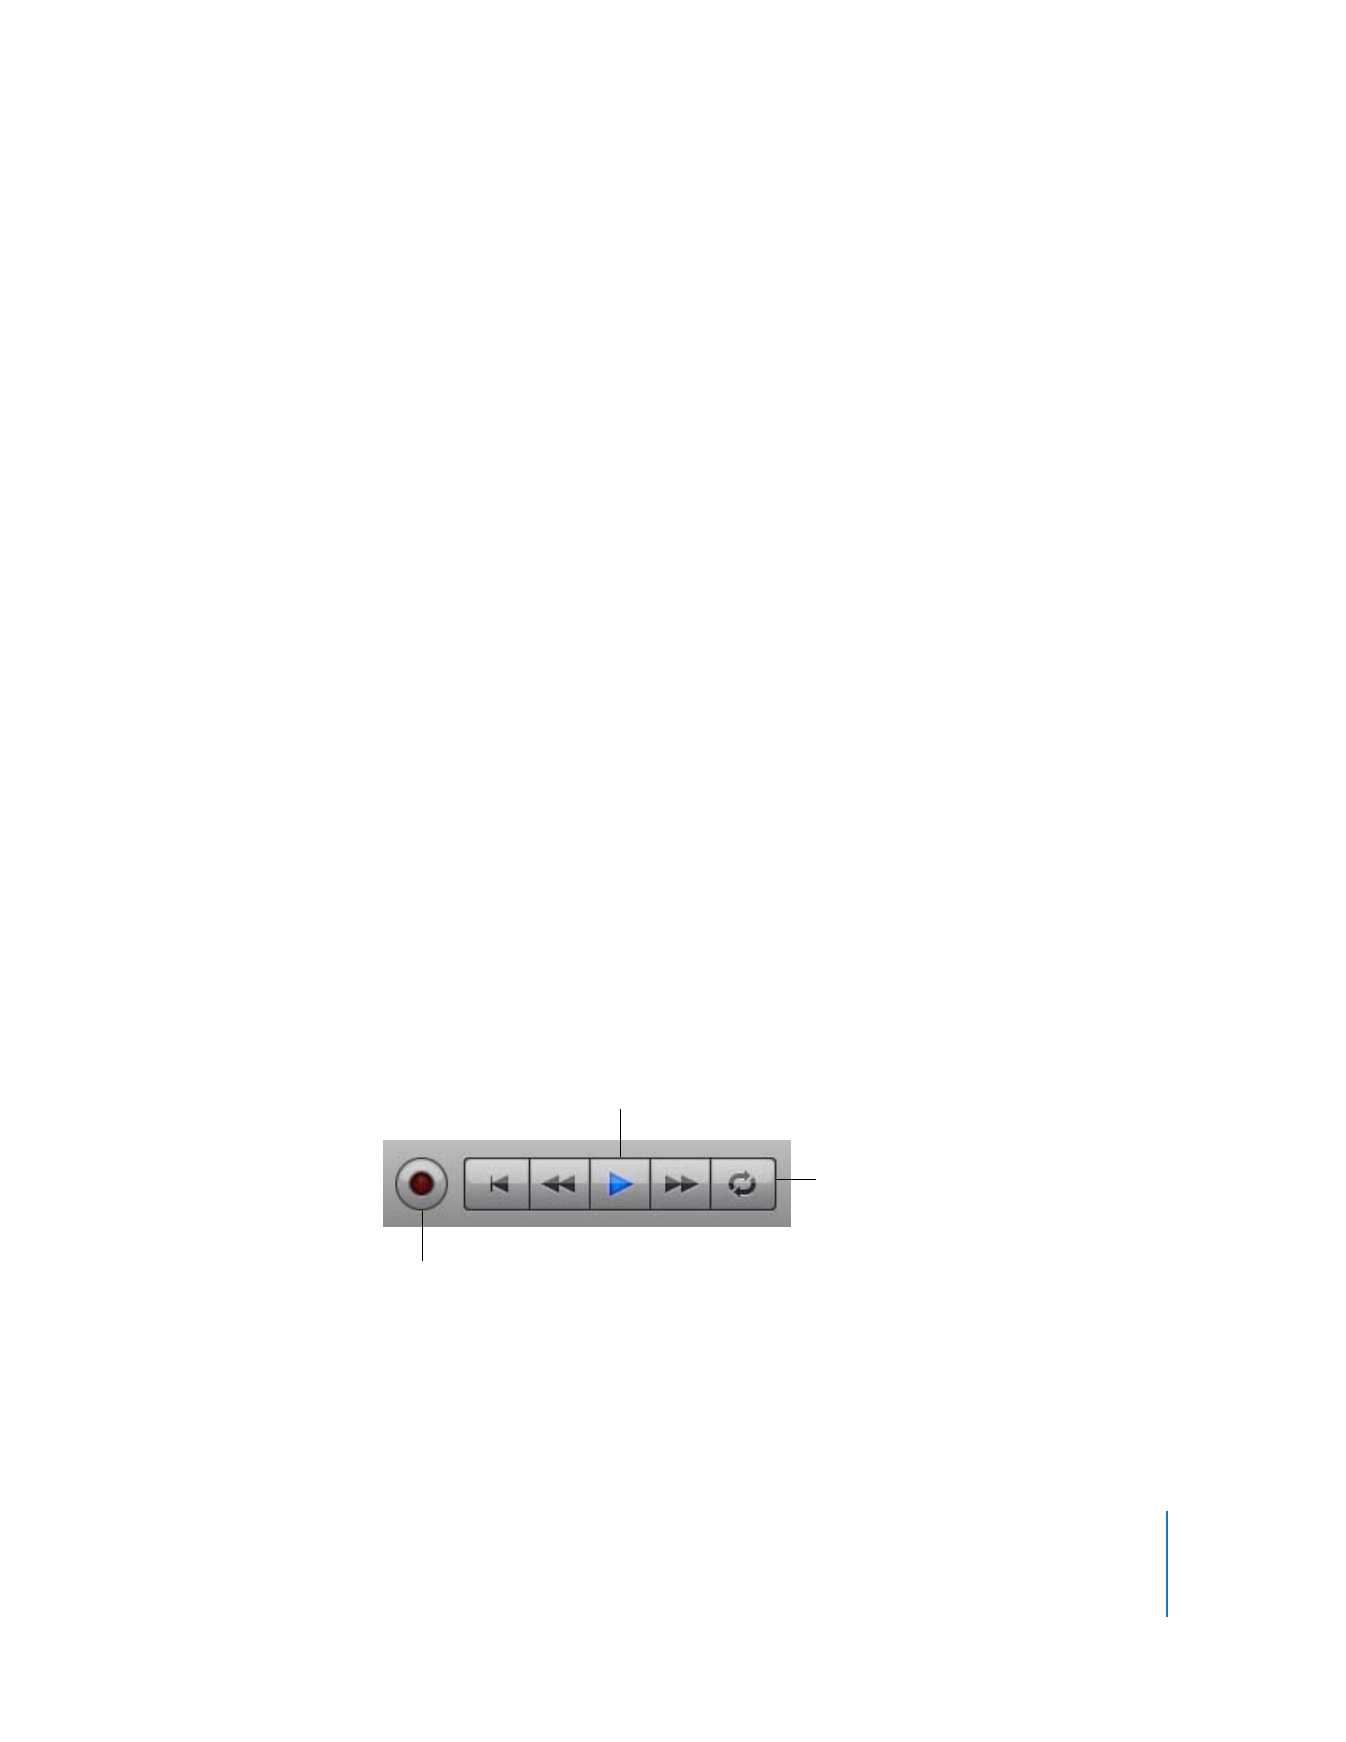
Play button
Cycle button
Record button
54
Chapter 5
Tutorial 3: Recording Vocals and Musical Instruments
Now you can listen to your new recording to see how you like it.
To hear your new recording:
1
Move the playhead to the point in the timeline where the new region starts (align it
with the left edge of the region).
You can also move the playhead to an earlier point in the project, or to the beginning
of the project, to hear the new recording in the context of the project.
2
Click the Play button, or press the Space bar.
Recording Multiple Takes with the Cycle Region
You can define a specific part of a project to record in using the cycle region. The cycle
region determines where recording starts and ends. When you record using the cycle
region, you can record multiple versions, or “takes,” and then choose which take you
want to use.
To set the cycle region:
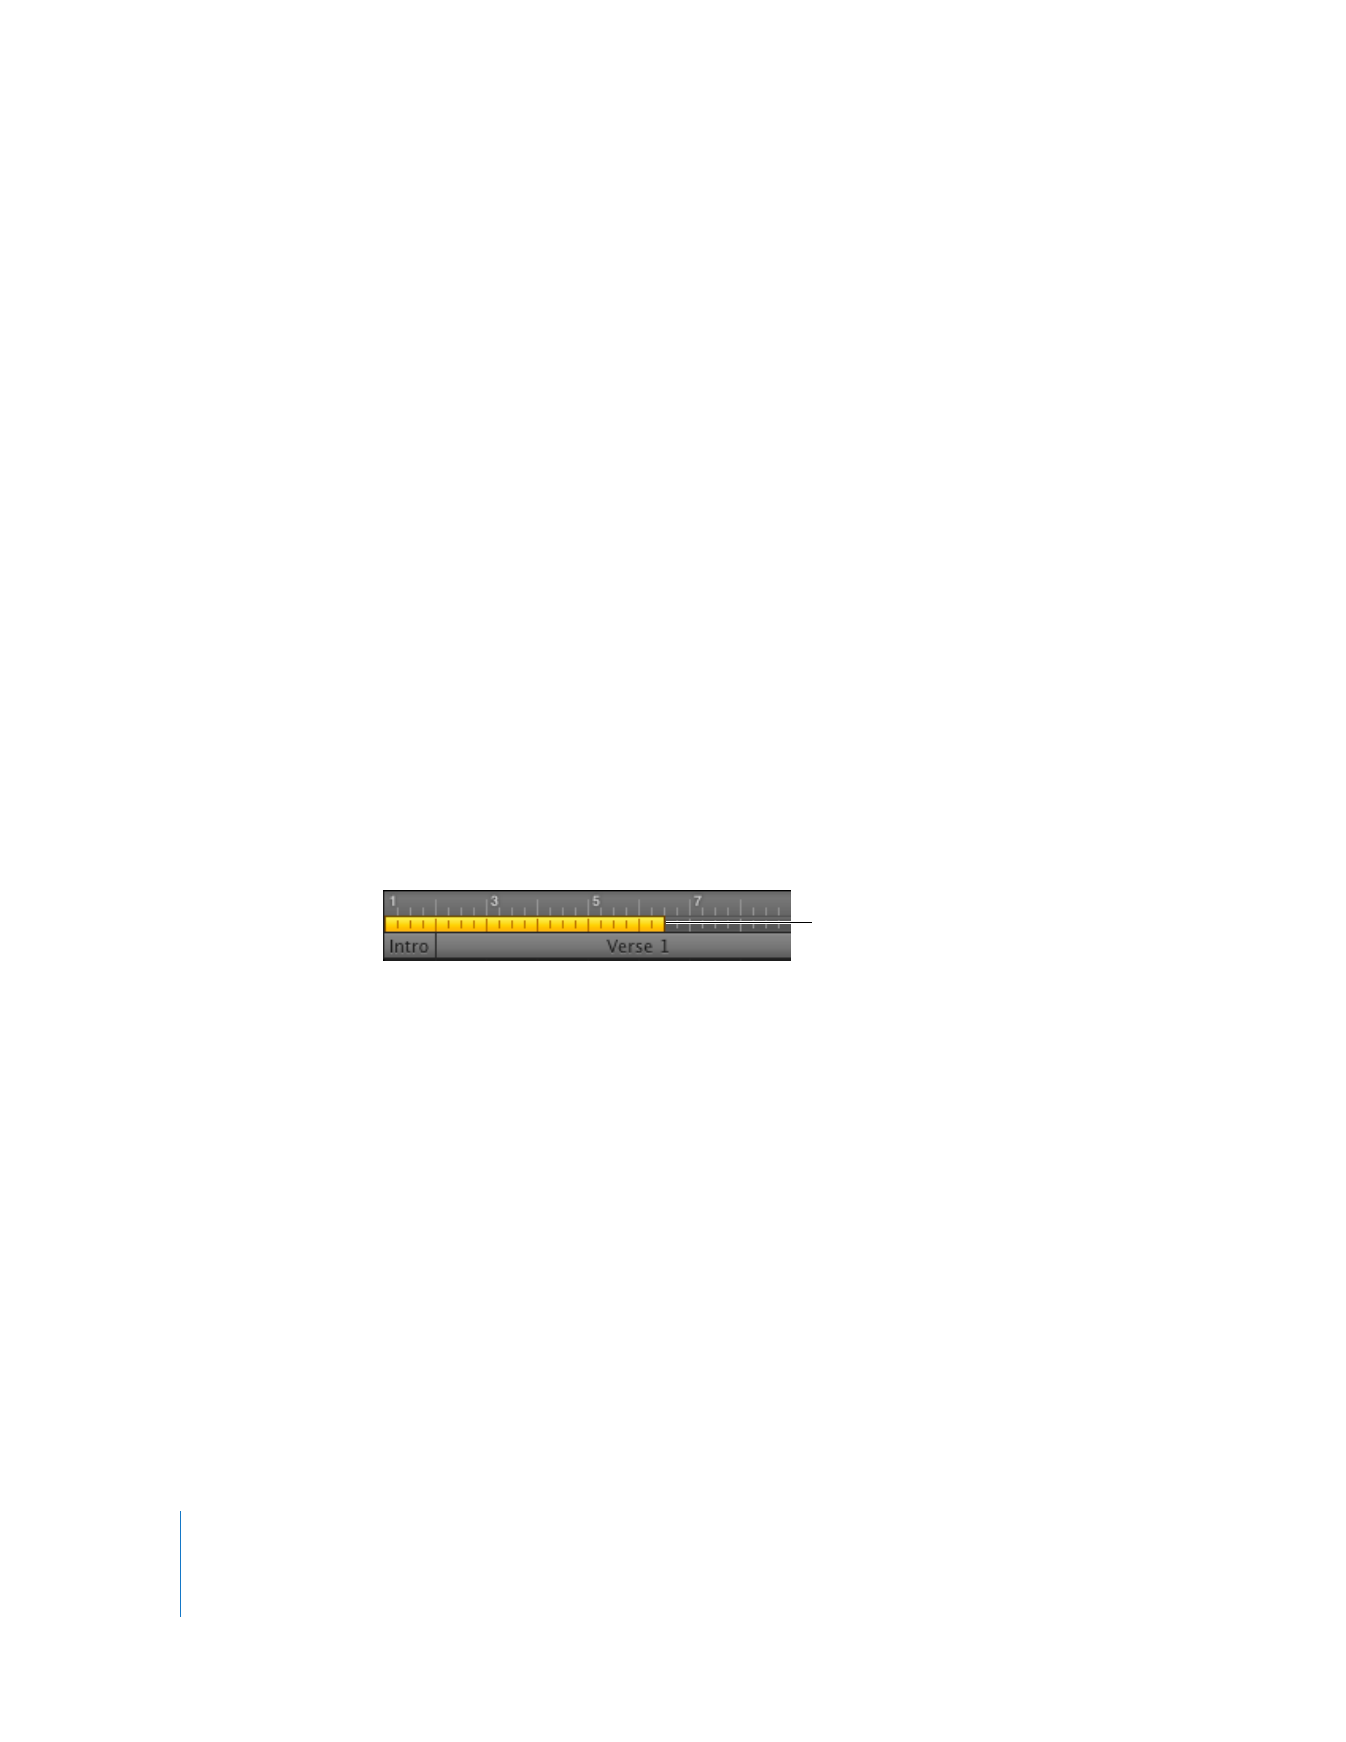
1
Click the Cycle button. The cycle region appears as a yellow strip just below the beat
ruler.
2
Move the left edge of the cycle region to the point on the beat ruler where you want to
start recording, then drag the right edge of the cycle region to the point where you
want to recording to end. You can drag the center of the cycle region to move it to a
different part of the timeline.
You may want to have the cycle region start a few extra beats before the point where
you want to start recording, to make it easier to start playing on the beat, and end a
few beats after you want to stop recording, in case your last note extends past the end
of the cycle region.
Drag either edge of the cycle
region to change its length.
Chapter 5
Tutorial 3: Recording Vocals and Musical Instruments
55
To record multiple takes using the cycle region:
1
Select the Real Instrument track you want to record in.
2
Click the Record button to start recording.
3
Play your musical instrument or sing into your microphone. As you record, a new
region appears in the selected Real Instrument track.
4
When you’re finished, click the Play button to stop recording.
5
If you want to record additional takes, click the Record button and play the part again.
6
When you’ve finished using the cycle region, click the Cycle button again to turn
it off.
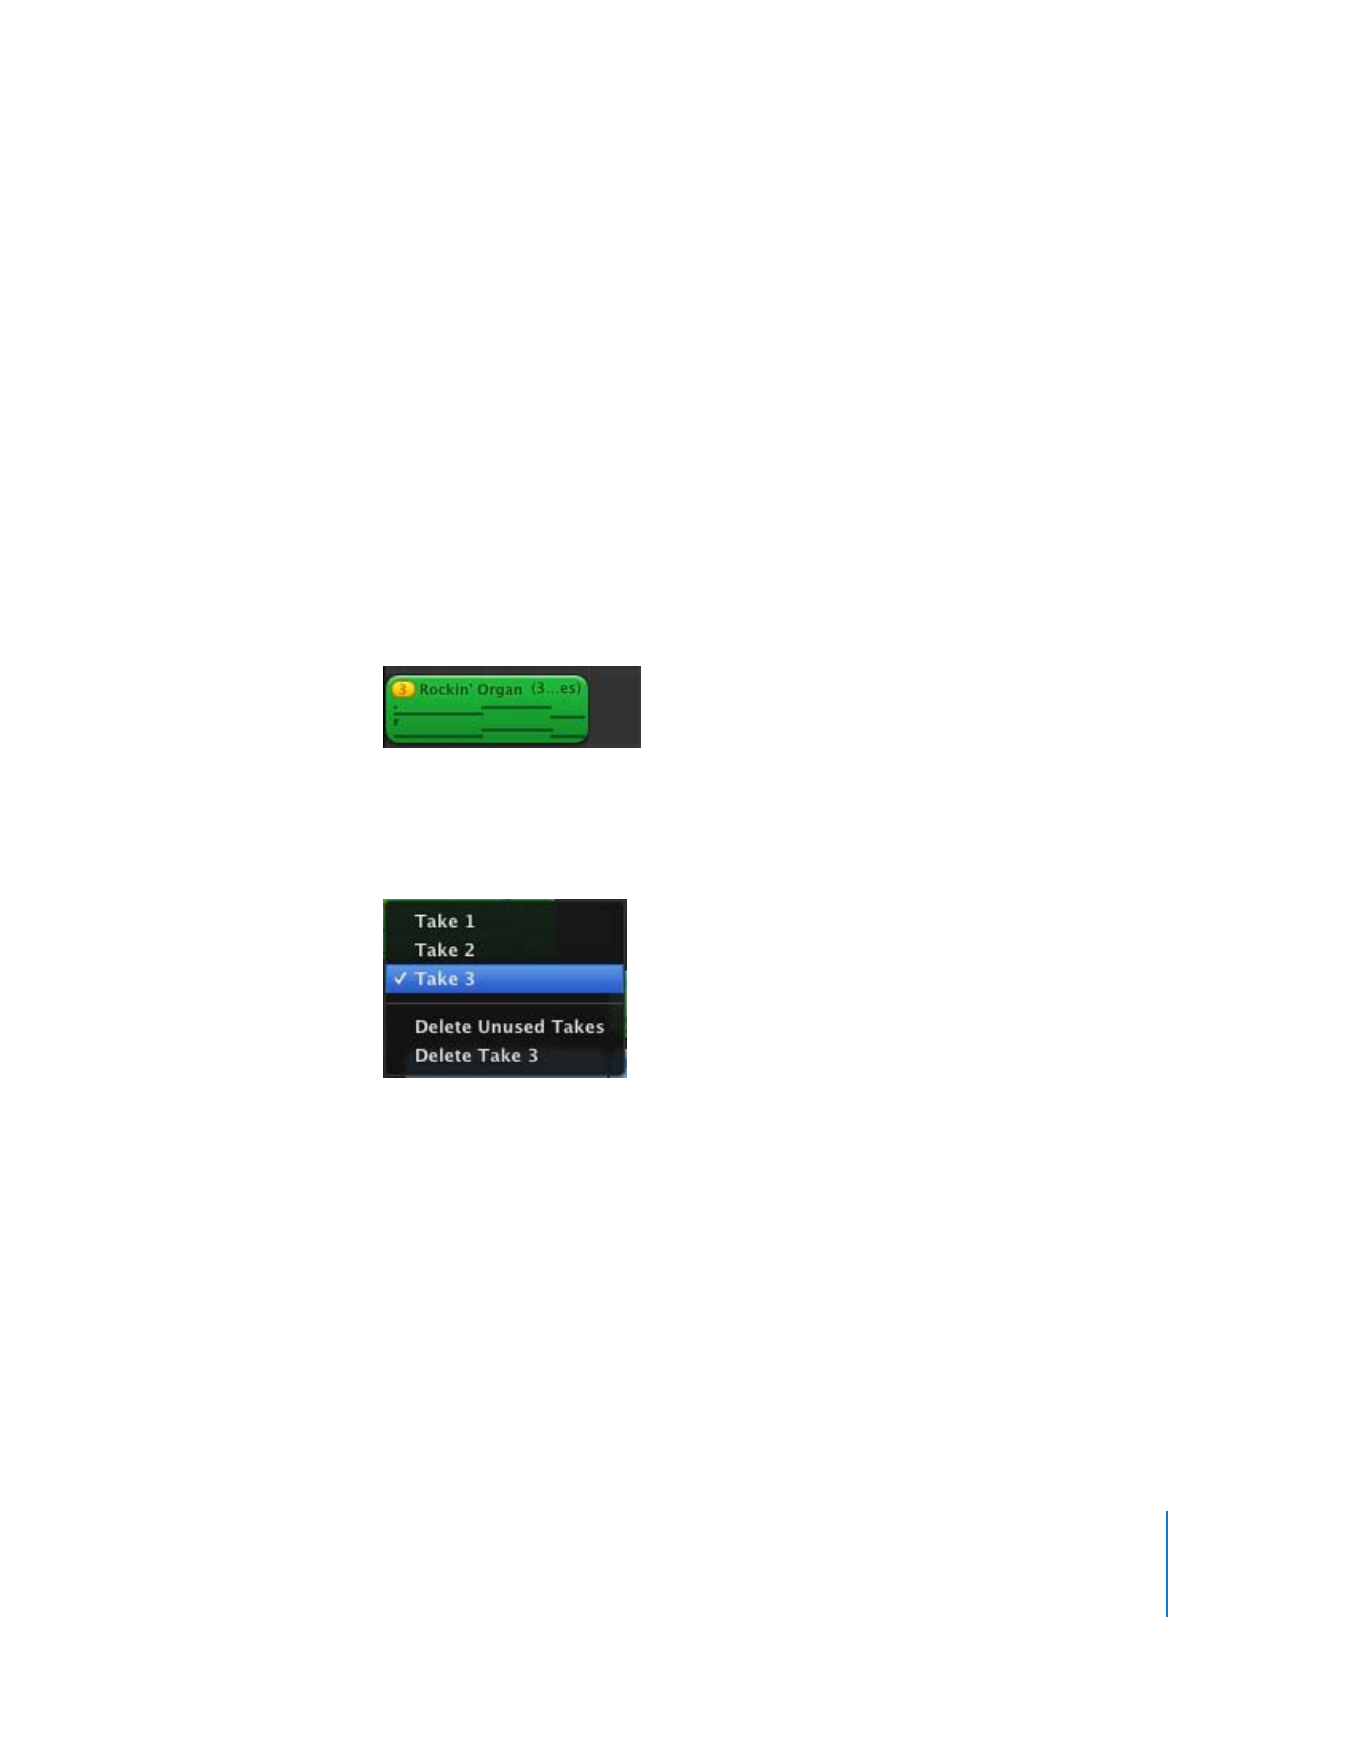
When you record multiple takes, the recorded region has a circle in its upper-left corner
showing the selected take (the one you hear when you play the project). You can
choose and listen to different takes to decide which one you like best.
To choose a different take:
1
In the timeline, click the circled number in the upper-left corner of the loop.
A Takes menu appears showing the takes recorded in the region.
2
Choose a different take from the Takes menu.
When you choose a different take, the loop changes to show the waveform of the new
take.
To delete the selected take:
m
Choose Delete [take name] from the Takes menu.
You can also delete all takes except the selected one.
To delete all unused takes:
m
Choose Delete Unused Takes from the Takes menu.
56
Chapter 5
Tutorial 3: Recording Vocals and Musical Instruments
Recording on Several Tracks at the Same Time
You can record up to eight Real Instruments and one Software Instrument at the same
time. This lets you record voices and instruments together, and simultaneously record a
backing track, for example.
When you select a track, recording is enabled (turned on) for that track (meaning that
recording will start on that track when you click the Record button). You can enable
up to seven additional tracks by clicking the round Record Enable button in each
track’s header. The Record Enable button turns red to show that the track is enabled
for recording.
To disable a track for recording, click the Record Enable button in the track’s
header again.
To record multiple Real Instruments at the same time:
1
In the Track Info pane, be sure each Real Instrument track is set to use a different input
source.
2
Enable the tracks you want to record by clicking the Record Enable button in each
track’s header.
3
Click the Record button in the transport controls to start recording.
To record a Software Instrument at the same time as one or more Real Instruments:
1
Enable the Software Instrument track for recording by clicking its Record Enable
button.
2
Click the Record button in the transport controls to start recording.
If you enable more than eight Real Instrument tracks or more than one Software
Instrument track, the track farthest from the last track you enable is disabled for
recording, so as not to exceed the maximum number of recording tracks.
To record on multiple tracks, you need to have an audio interface with at least two
input channels for recording.
You can also add and adjust effects for a Real Instrument track. For information about
using effects, see “Using Effects in GarageBand” on page 95.
Click the Record Enable
button for each track you
want to record.
Chapter 5
Tutorial 3: Recording Vocals and Musical Instruments
57
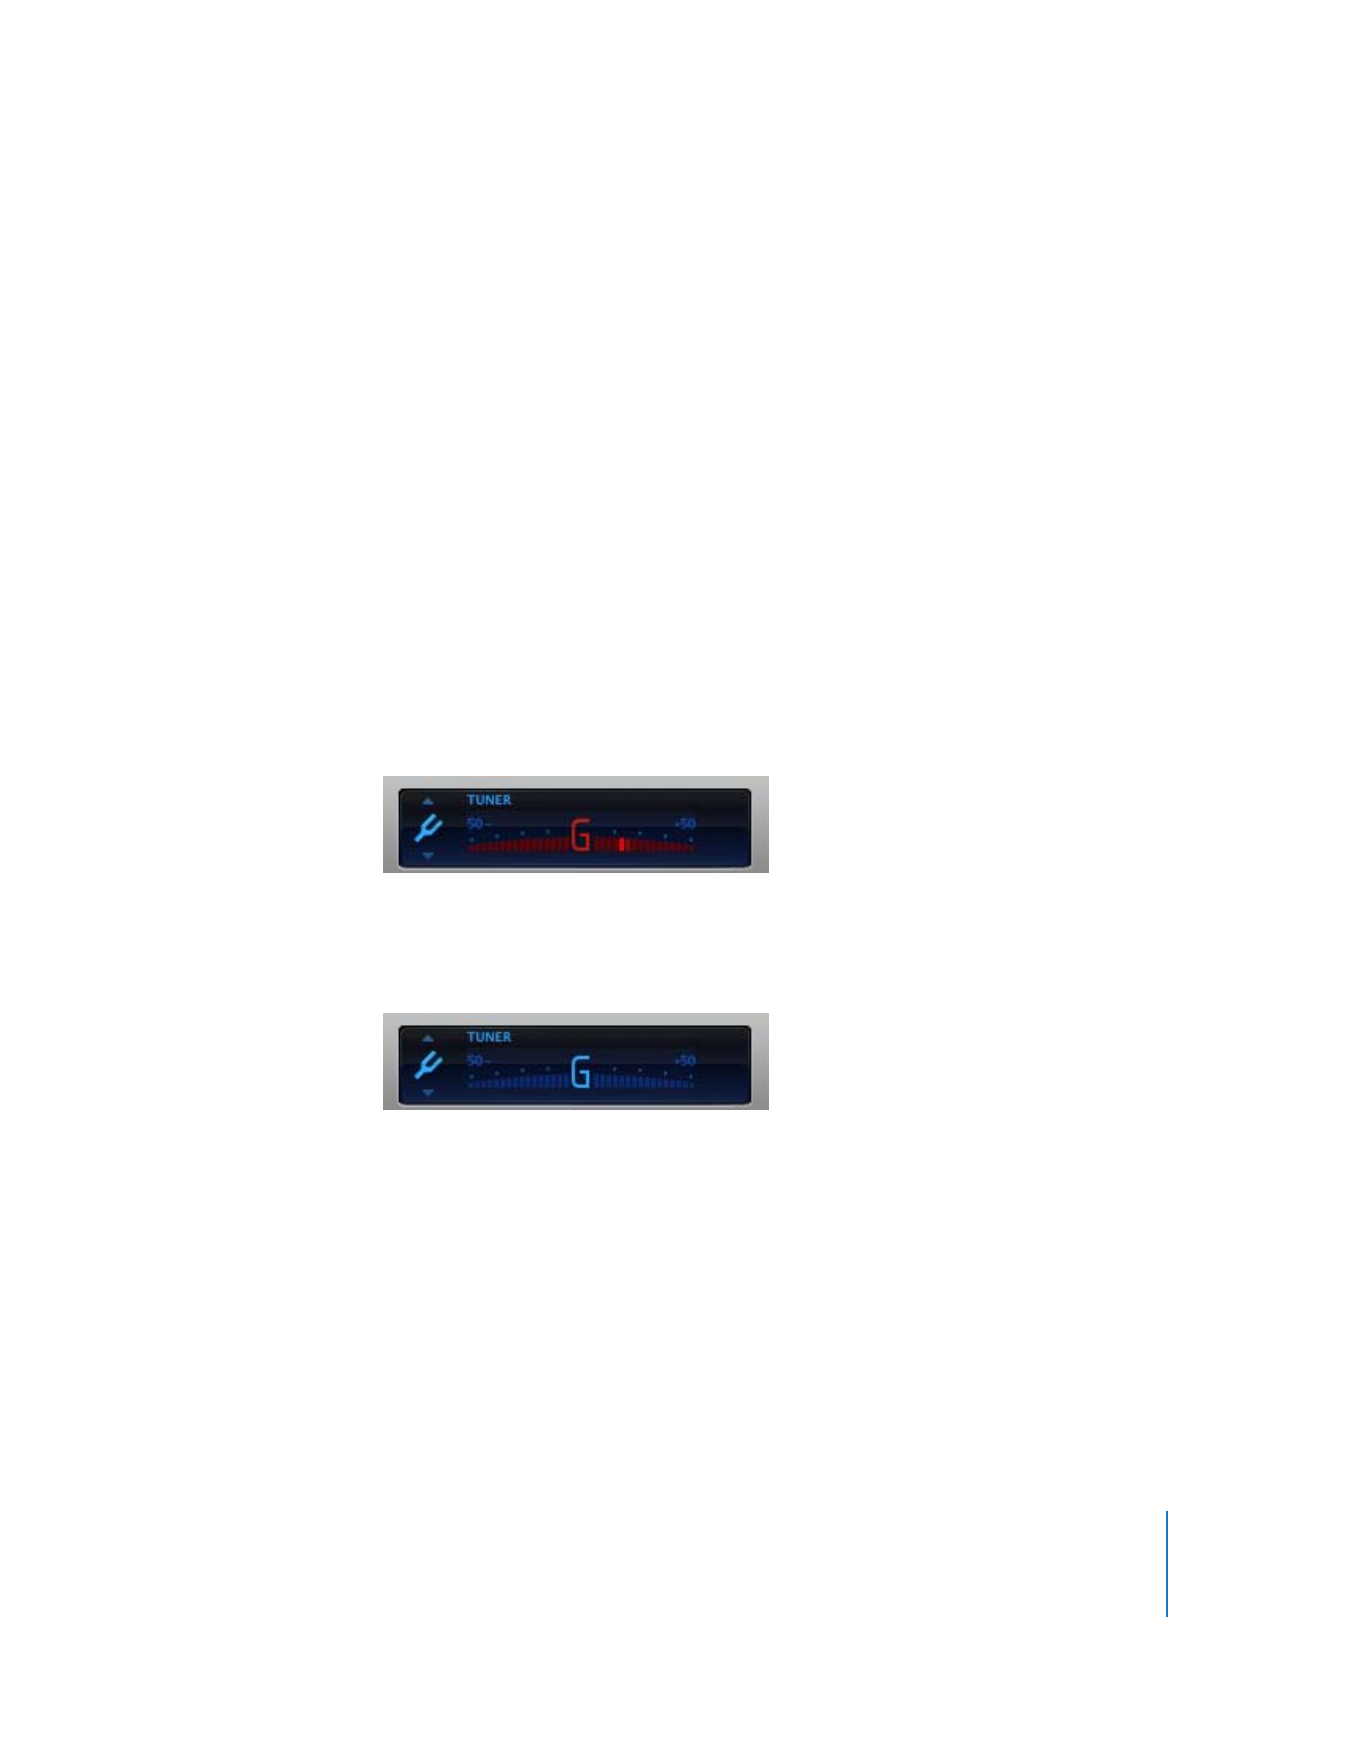
Tuning Your Guitar in GarageBand
GarageBand includes an instrument tuner that you can use to check the tuning of a
guitar, bass, or other instrument connected to your computer. The instrument tuner
works with Real Instruments, but not with Software Instruments.
The instrument tuner shows a horizontal scale with the note name displayed in the
center of the scale. When you play a single note on your Real Instrument, the pitch is
shown in relation to the correct pitch for the note displayed.
To use the instrument tuner:
1
Make sure the Real Instrument you want to tune is connected to your computer.
2
Select the Real Instrument track for the instrument you want to tune.
3
In the LCD, choose Tuner mode, or choose Control > “Show Tuner in LCD.”
4
Play a single note on your instrument and watch the tuner.
As you play, the tuner shows the note name of the closest note. If the note is not in
tune, the note name and the tuner glow red, and a vertical red bar appears, showing
whether the note is sharp or flat.
The bar appears to the right of the note name if the note is sharp, and to the left if the
note is flat. When the note is in tune, the note name and the tuner scale glow blue, and
the vertical bar disappears.
Be sure to play only a single note at a time while tuning. The instrument tuner can’t
tune to a chord, nor can it tune if you play different notes rapidly.

6
58
6